Learning materials
✎Modified 2019-11-12 by gzardini
Understand the components of the localization pipeline: from image to lane pose estimation.
The goal of this material is to get familiar with the pipeline that extracts lane localization from the image stream. This is the base of the Lane Following demo.
Overview of the pipeline
✎Modified 2019-11-12 by Aleksandar Petrov
Determining its own position in the lane is essential for any Duckiebot to drive safely in Duckietown. In the following section we will go step by step through the various steps of the image pipeline: from image to lane pose estimation.
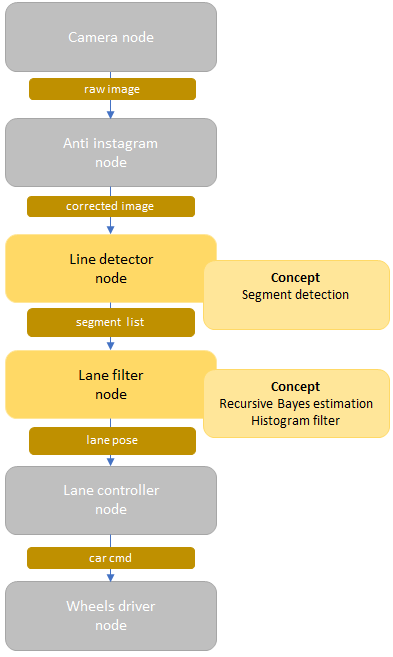
Figure 2.2 shows the two most important parts of the localization: the line detector and the lane filter, and where they stand in the complete image to control pipeline. The control aspect will be the focus of the next set of exercises. We will focus here only on the two above-mentioned parts.
Line detector node
✎Modified 2019-11-11 by AmaurX
Role of the node
✎Modified 2019-11-12 by gzardini
The line detector node is responsible for detecting lines in the field of view of the Duckiebot. As the color of the lines provides localization information, we are also interested in clustering them into three different colors: red, white and yellow.
ROS interfacing of the node
✎Modified 2019-11-12 by Aleksandar Petrov
The line detector node subscribes to:
- The corrected image stream
The line detector node publishes:
- Segment list (type:
SegmentList.msg) is an array which saves all segments (type:Segment.msg) found in the image. A segment consists of color(red, yellow, white)and 2D vector(startpoint, endpoint).
Relevant part of the code
✎Modified 2019-11-12 by gzardini
We won’t go too much into the details of the code, but the most important bits are here:
Snippet of the main function:
def processImage_(self, image_msg):
    ...
    white = self.detector_used.detectLines('white')
    yellow = self.detector_used.detectLines('yellow')
    red = self.detector_used.detectLines('red')
    ...max] = self.filter.getEstimate()
...
Snippet of the detectLines function:
class LineDetectorHSV(dtu.Configurable, LineDetectorInterface):
    ...
    def detectLines(self, color):
        with dtu.timeit_clock('_colorFilter'):
            bw, edge_color = self._colorFilter(color)
        with dtu.timeit_clock('_HoughLine'):
            lines = self._HoughLine(edge_color)
        with dtu.timeit_clock('_findNormal'):
            centers, normals = self._findNormal(bw, lines)
        return Detections(lines=lines, normals=normals,
                          area=bw, centers=centers)
    ...
In a nutshell, the code first filters the image pixels by color, then uses a Hough line detector from OpenCV, and extract the normals to the detected lines. The most important part is executed in the Hough detector. Find the file here if you want to read more.
The focus of the exercise
✎Modified 2019-11-12 by hosnerm
Over all the parameters we could choose to play with here, we decided to focus on the number of segments that this node will output to the next one:
- If it gives too few segments, the localization will be imprecise but quick
- If it gives too many segments, the localization will be on average more accurate, but also slower to compute
There is a segment_max_threshold parameter that allows the user to limit the number of segments that are sent. The parameter limits the maximum number of segments for each of the colors individually. Setting it for example to 10 will yield an output of 10 yellow, 10 white and 10 red segments. Exercise 1 - Choosing the best number of segments (frequency) will give you the opportunity to play with it and see the effects of the trade-off.
Lane filter node
✎Modified 2019-11-11 by AmaurX
Role of the node
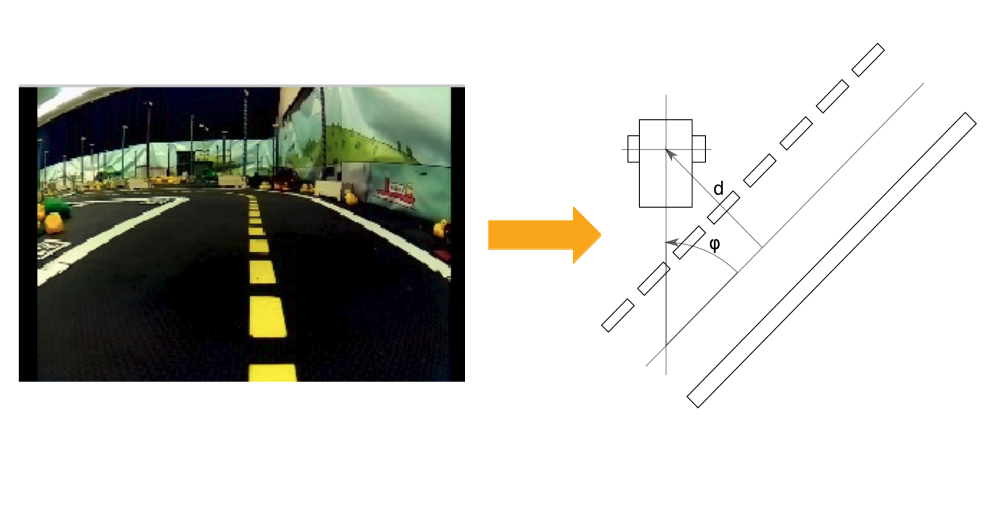
✎The lane filter node is responsible for estimating the position of the Duckiebot with respect to the center of the driving lane.
ROS interfacing of the node
✎The lane filter node subscribes to:
- The segment list from the line detector node
The lane filter node publishes:
-
Lane pose (type:
duckietown_msgs/lane_pose): is struct with the following parameters which are currently in use: -
(
float32) the lateral offset, where = 0 is the middle of the right lane. - (
float32) the angle from the center of the lane to the orientation of the Duckiebot.
When the Duckiebot is perfectly aligned in the center of its lane, facing forward, this estimation should be
Bayes filter
✎Modified 2019-11-12 by Aleksandar Petrov
To track the estimated pose of the Duckiebot in the lane, we use a Bayes filter. As usual, it relies on the predict and update steps.
Let’s focus on the update step, as the predict step is simply applying the model of the dynamics on the belief.
In this node, the estimation of is represented as a matrix, holding on one axis and on the other. This means that the space of is discretized. The discretization step is controlled by the matrix_mesh_size parameter. The bigger the discretization is, the rougher the estimates will be. The smaller the discretization is, the finer the estimates will be.
But since the minimum and maximum values of both and are constant, the size of the matrix increases when the discretization step becomes smaller. In Exercise 3 - Choosing the best matrix size, you will have to play with this parameter to understand the trade-off between the granularity of the estimation and the computation time.
Snippet of the bayes filter:
def processSegments(self,segment_list_msg):
    ...
    #(v and w come from car_cmd)
    self.filter.predict(dt=dt, v=v, w=w)

    #input: line segments from line detector
    #output: belief matrix
    self.filter.update(segment_list_msg.segments)

    #input: belief matrix
    #output: maximal d and phi from belief matrix
    [d_max, phi_max] = self.filter.getEstimate()
    ...
The histogram filter (for the update step)
✎Modified 2019-11-12 by Aleksandar Petrov
Each 2D white and yellow segment is projected onto the Duckiebot reference frame. Then the corresponding tuple is extracted from geometric knowledge of the lane.
Each segment’s extracted tuple casts a vote in the measurement likelihood histogram matrix, as mentioned above. This matrix can be then displayed as an image stream.
One would hope that the majority of the segments will vote to the same area of the histogram. With this matrix, the belief matrix is updated.
Then, the maximum is extracted from the updated belief matrix. The maximum’s coordinates give us the best estimate of the tuple .
Snippet of the the generation of votes for the histogram filter:
#Generation of votes for the the histogram filter
def generateVote(self, segment):
    p1 = np.array([segment.points[0].x, segment.points[0].y])
    p2 = np.array([segment.points[1].x, segment.points[1].y])
    t_hat = (p2 - p1) / np.linalg.norm(p2 - p1)

    n_hat = np.array([-t_hat[1], t_hat[0]])
    d1 = np.inner(n_hat, p1)
    d2 = np.inner(n_hat, p2)
    l1 = np.inner(t_hat, p1)
    l2 = np.inner(t_hat, p2)
    if (l1 < 0):
        l1 = -l1
    if (l2 < 0):
        l2 = -l2

    l_i = (l1 + l2) / 2
    d_i = (d1 + d2) / 2
    phi_i = np.arcsin(t_hat[1])
    if segment.color == segment.WHITE:  # right lane is white
       if(p1[0] > p2[0]):  # right edge of white lane
           d_i = d_i - self.linewidth_white
       else:  # left edge of white lane
           d_i = - d_i
           phi_i = -phi_i
       d_i = d_i - self.lanewidth
    elif segment.color == segment.YELLOW:  # left lane is yellow
       if (p2[0] > p1[0]):  # left edge of yellow lane
           d_i = d_i - self.linewidth_yellow
           phi_i = -phi_i
       else:  # right edge of white lane
           d_i = -d_i
       d_i = - d_i

       weight = 1
       d_i += self.center_lane_offset

       return d_i, phi_i, l_i, weight
For more about this part of the code, go here.