Assembly - Duckiebot DB18
✎
Modified 2021-03-13 by duckietown
This page is for the DB18 configuration used in classes in 2018 and 2019.
For the instructions from 2017 see the DB17 Duckiebot operation manual.
A microSD card with the Duckiebot image already on it. This procedure is explained here.
1.5 hours of assembly time.
An assembled Duckiebot in configuration DB18.
Make sure you visit the FAQ section at the bottom of this page. This may already answer your comments, questions or doubts.
The complete assembly process is divided into 9 subparts. Make sure to complete them in the following order:
What is in the box
✎Modified 2021-01-08 by duckietown
All the pieces in your Duckiebox are shown in Figure 16.1. Note that the battery and camera calibration pattern are not shown in the picture.
Moreover, you might have slightly different components than those shown: for example, different USB power cables, slightly different sets of screws or a camera mount and backplate of different colors. Do not worry, these instructions can be followed anyway.
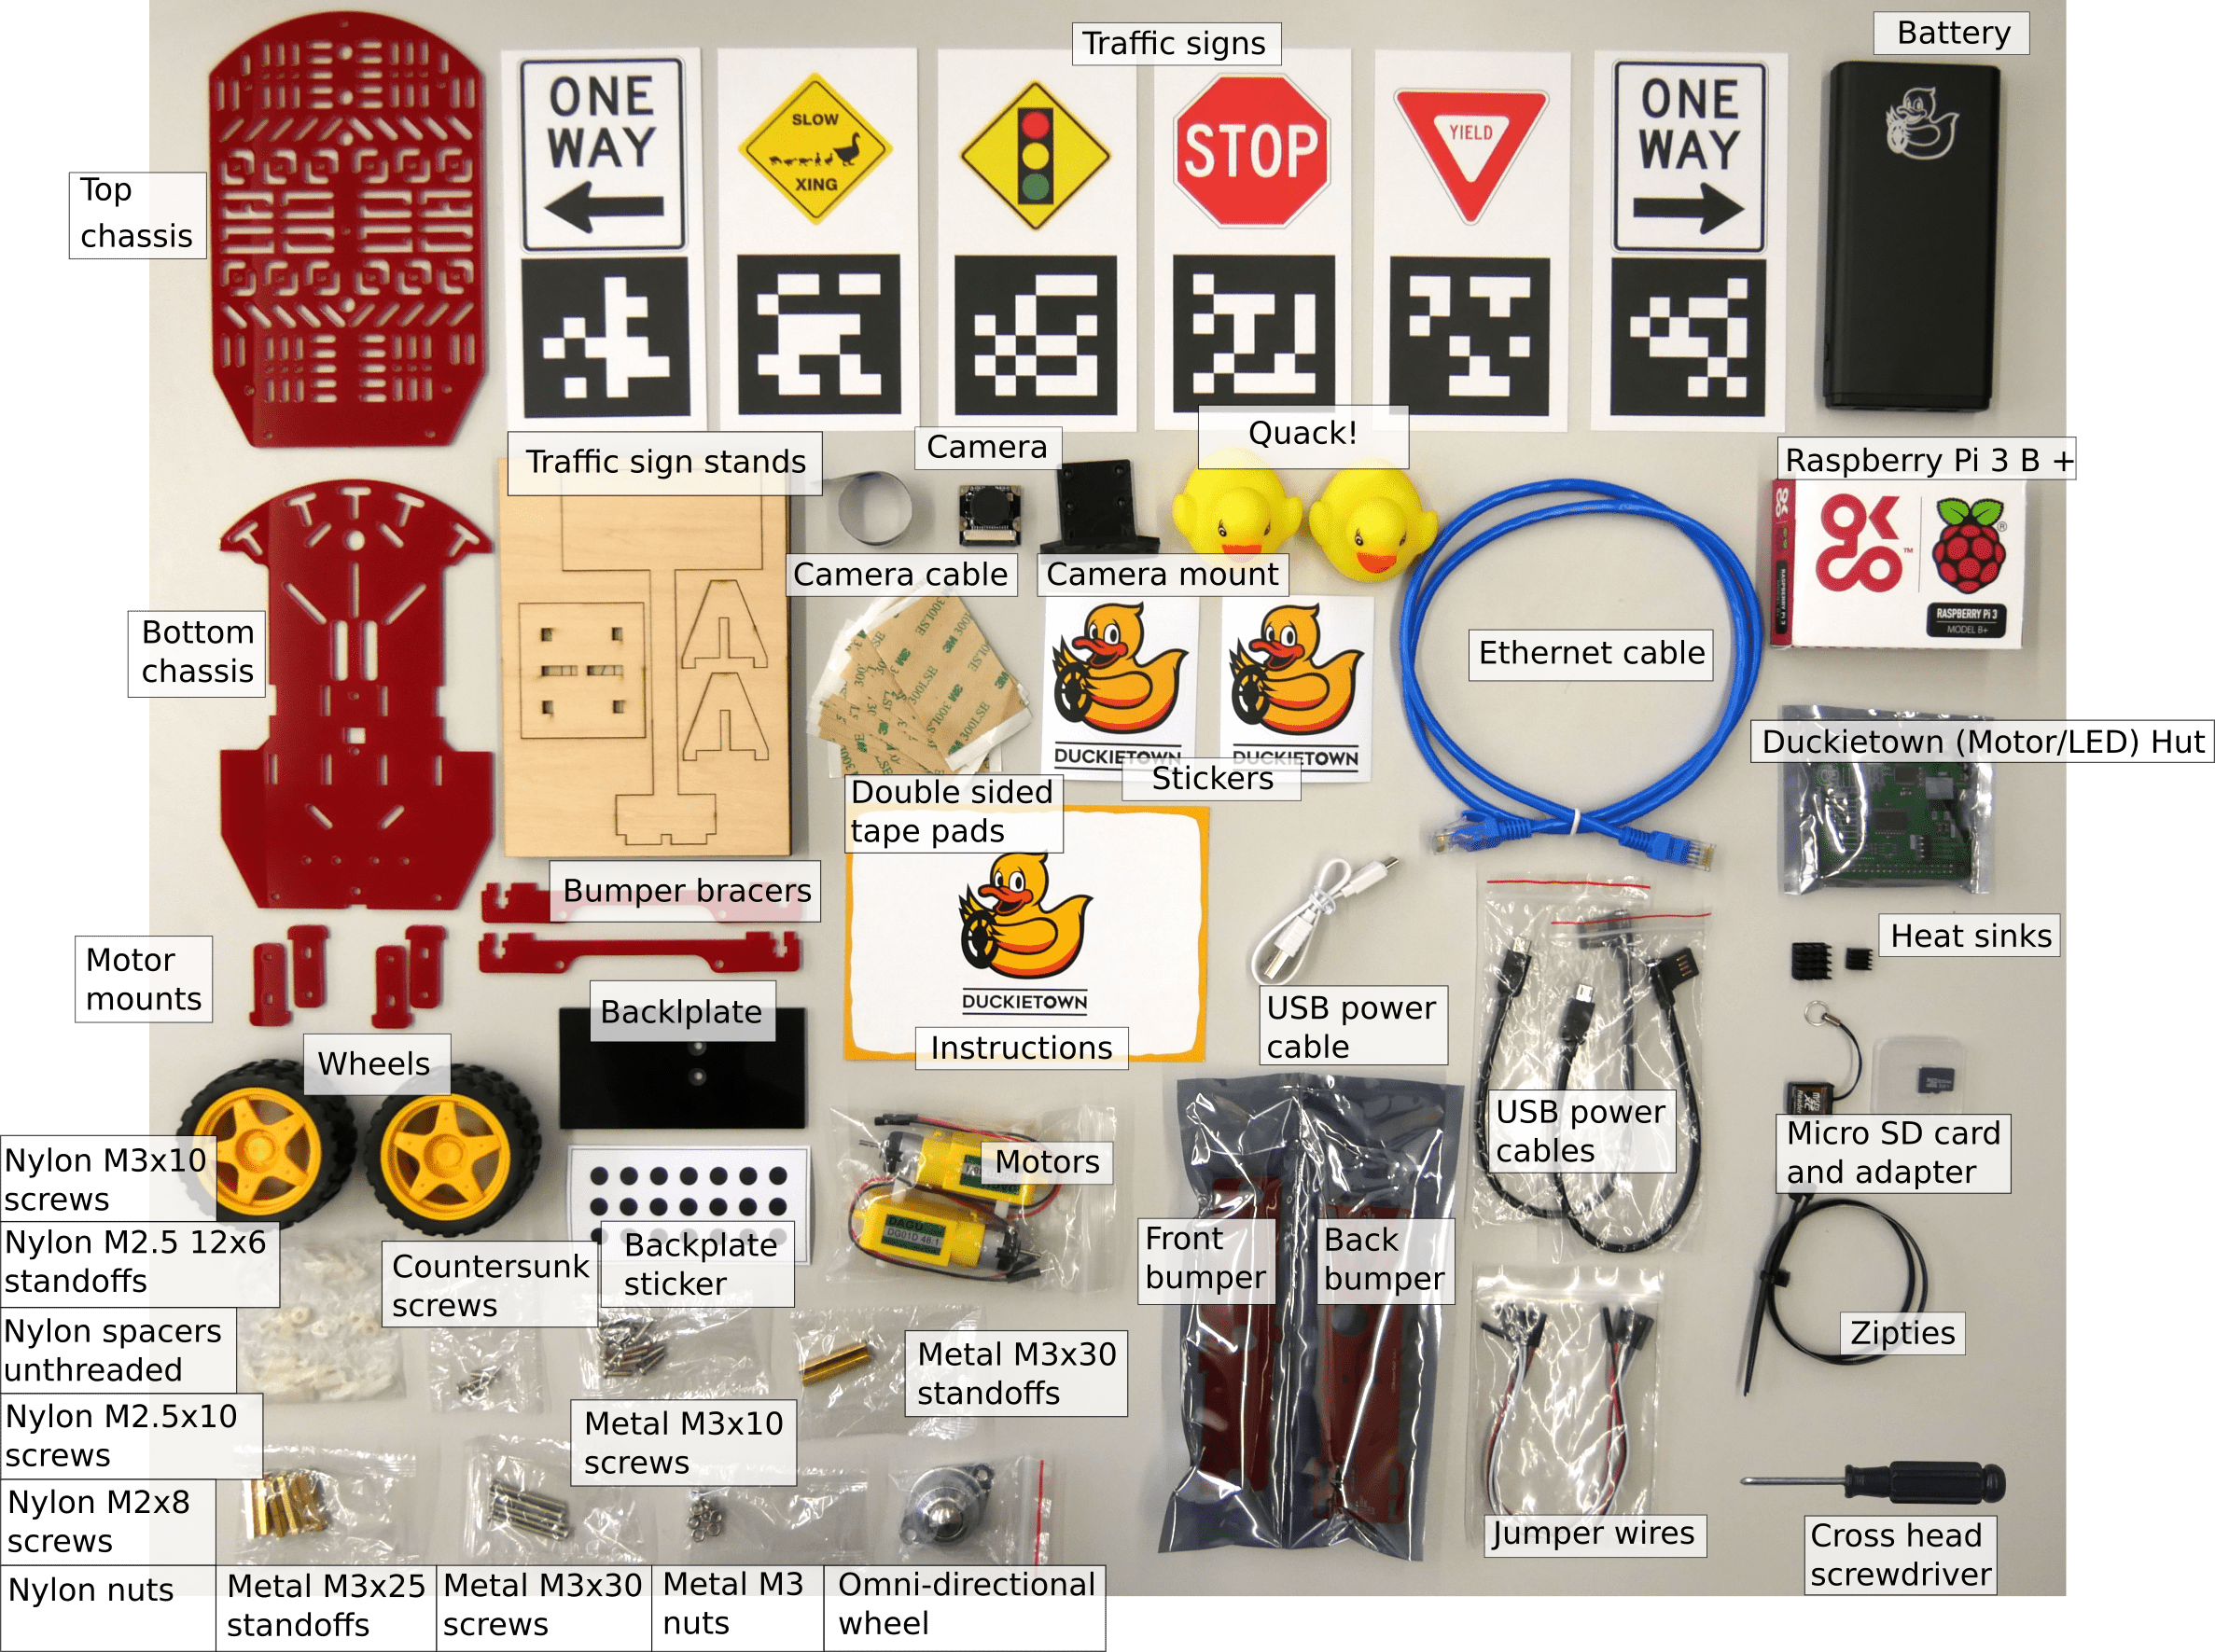
Some of the components in your Duckiebox will not be used at this stage, e.g., the traffic signs and stands. Keep these aside, they will come in handy in other parts of the book.
Finally, you should have several spares, especially for the mechanical bits (nuts and screws). These are included just in case you drop a few and can’t find them anymore (especially the tiny nylon ones like to hide in the cracks!).
Preliminary Steps
✎Modified 2021-01-08 by duckietown
Unboxing
✎Modified 2021-01-08 by duckietown
Unbox all of your components and lay them out on a flat surface. Ensure that you have well lit, uncluttered space to work on.
Although not necessary, you might find useful getting a small (M2.5) wrench to ease some of the passages.
Do the bumper braces fit?
✎Modified 2021-01-08 by duckietown
Take the rear bumper bracers and the back bumper. The back bumper will be mounted in the last steps as a press fit to the rear bumper bracers. Try to fit the bracers into the holes of the back bumper.
Some bumper bracers have a plastic protective film which is a residue of the manufacturing process. If you struggle in the press fitting, peel off the plastic cover from one side of the bracer. If this does not help, peel off the plastic cover from both sides.
Plastic cover
✎Modified 2021-01-08 by duckietown
Peel the plastic cover from all the chassis parts (except the bumper bracers) on both sides.
Screws
✎Modified 2021-01-08 by duckietown
Note that a few among all of your metal screws are special. They are “countersunk” screws. Keep these aside. They will be needed in Part 7: Back bumper.
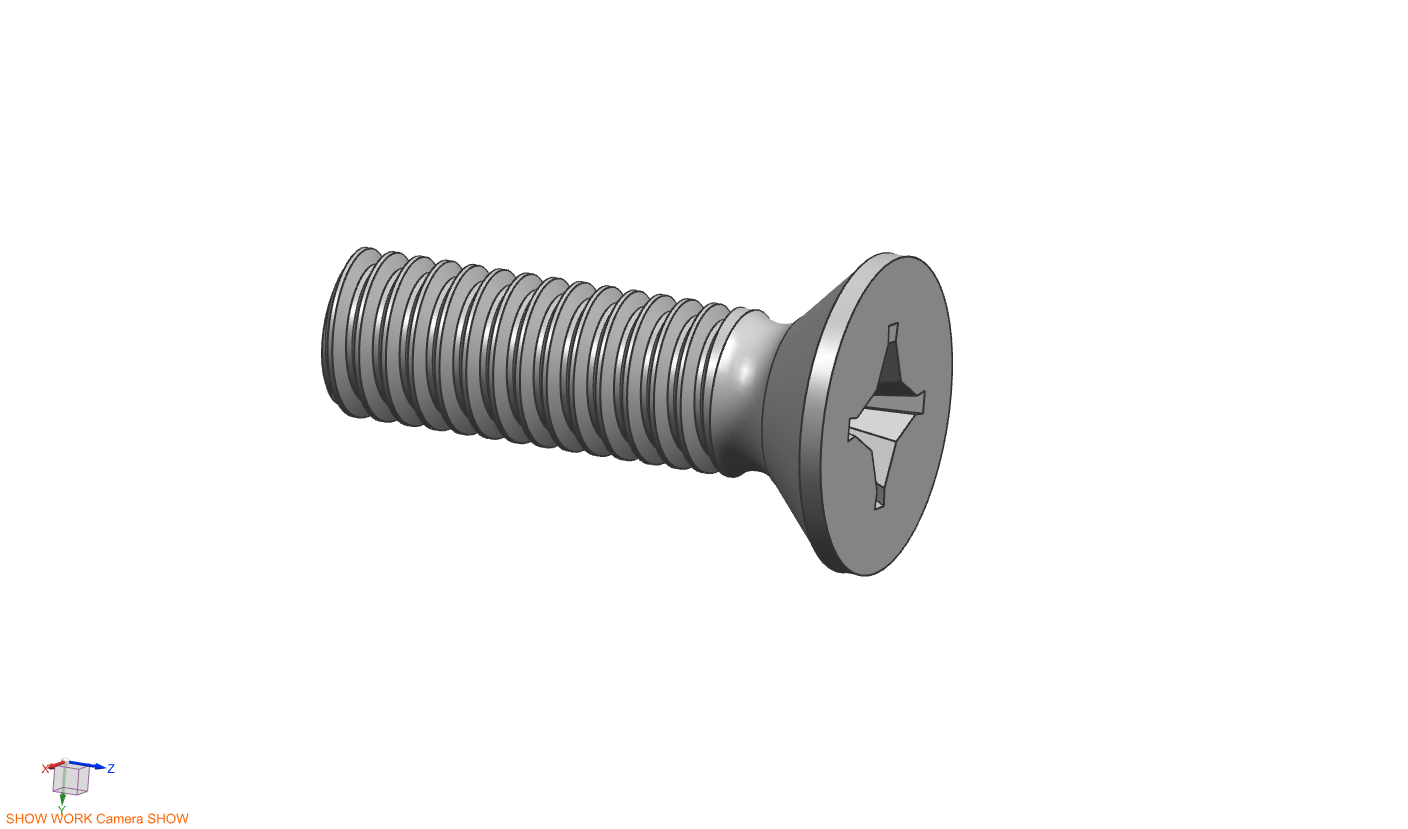
Every time you read M3x8 screw, a M3x10 will do the same trick. You can exchange them at will.
Do not exchange metal and nylon screws though. The latter are not electrically conductive and are passive protections to potential short circuits that can damage your Duckiebot beyond repair. This is especially true for - Part 3: Bottom chassis; make sure you use the correct nylon screws at that step.
Remember that instructions are your friend! At least at this stage, try to follow them precisely.
If regardless of this foreword you still choose to try and figure it out yourself, it’s ok, but for the love of what is precious, do not plug the battery in until you have performed a visual inspection here.
Motors
✎Modified 2021-01-08 by duckietown
From the Duckiebox package take the following components:
- Bottom plate (1x)
- Yellow dc motors (2x)
- Motor holders (4x)
- M3x30 screw (4x)
- M3 nuts (4x)
Step 1
✎Modified 2021-01-08 by duckietown
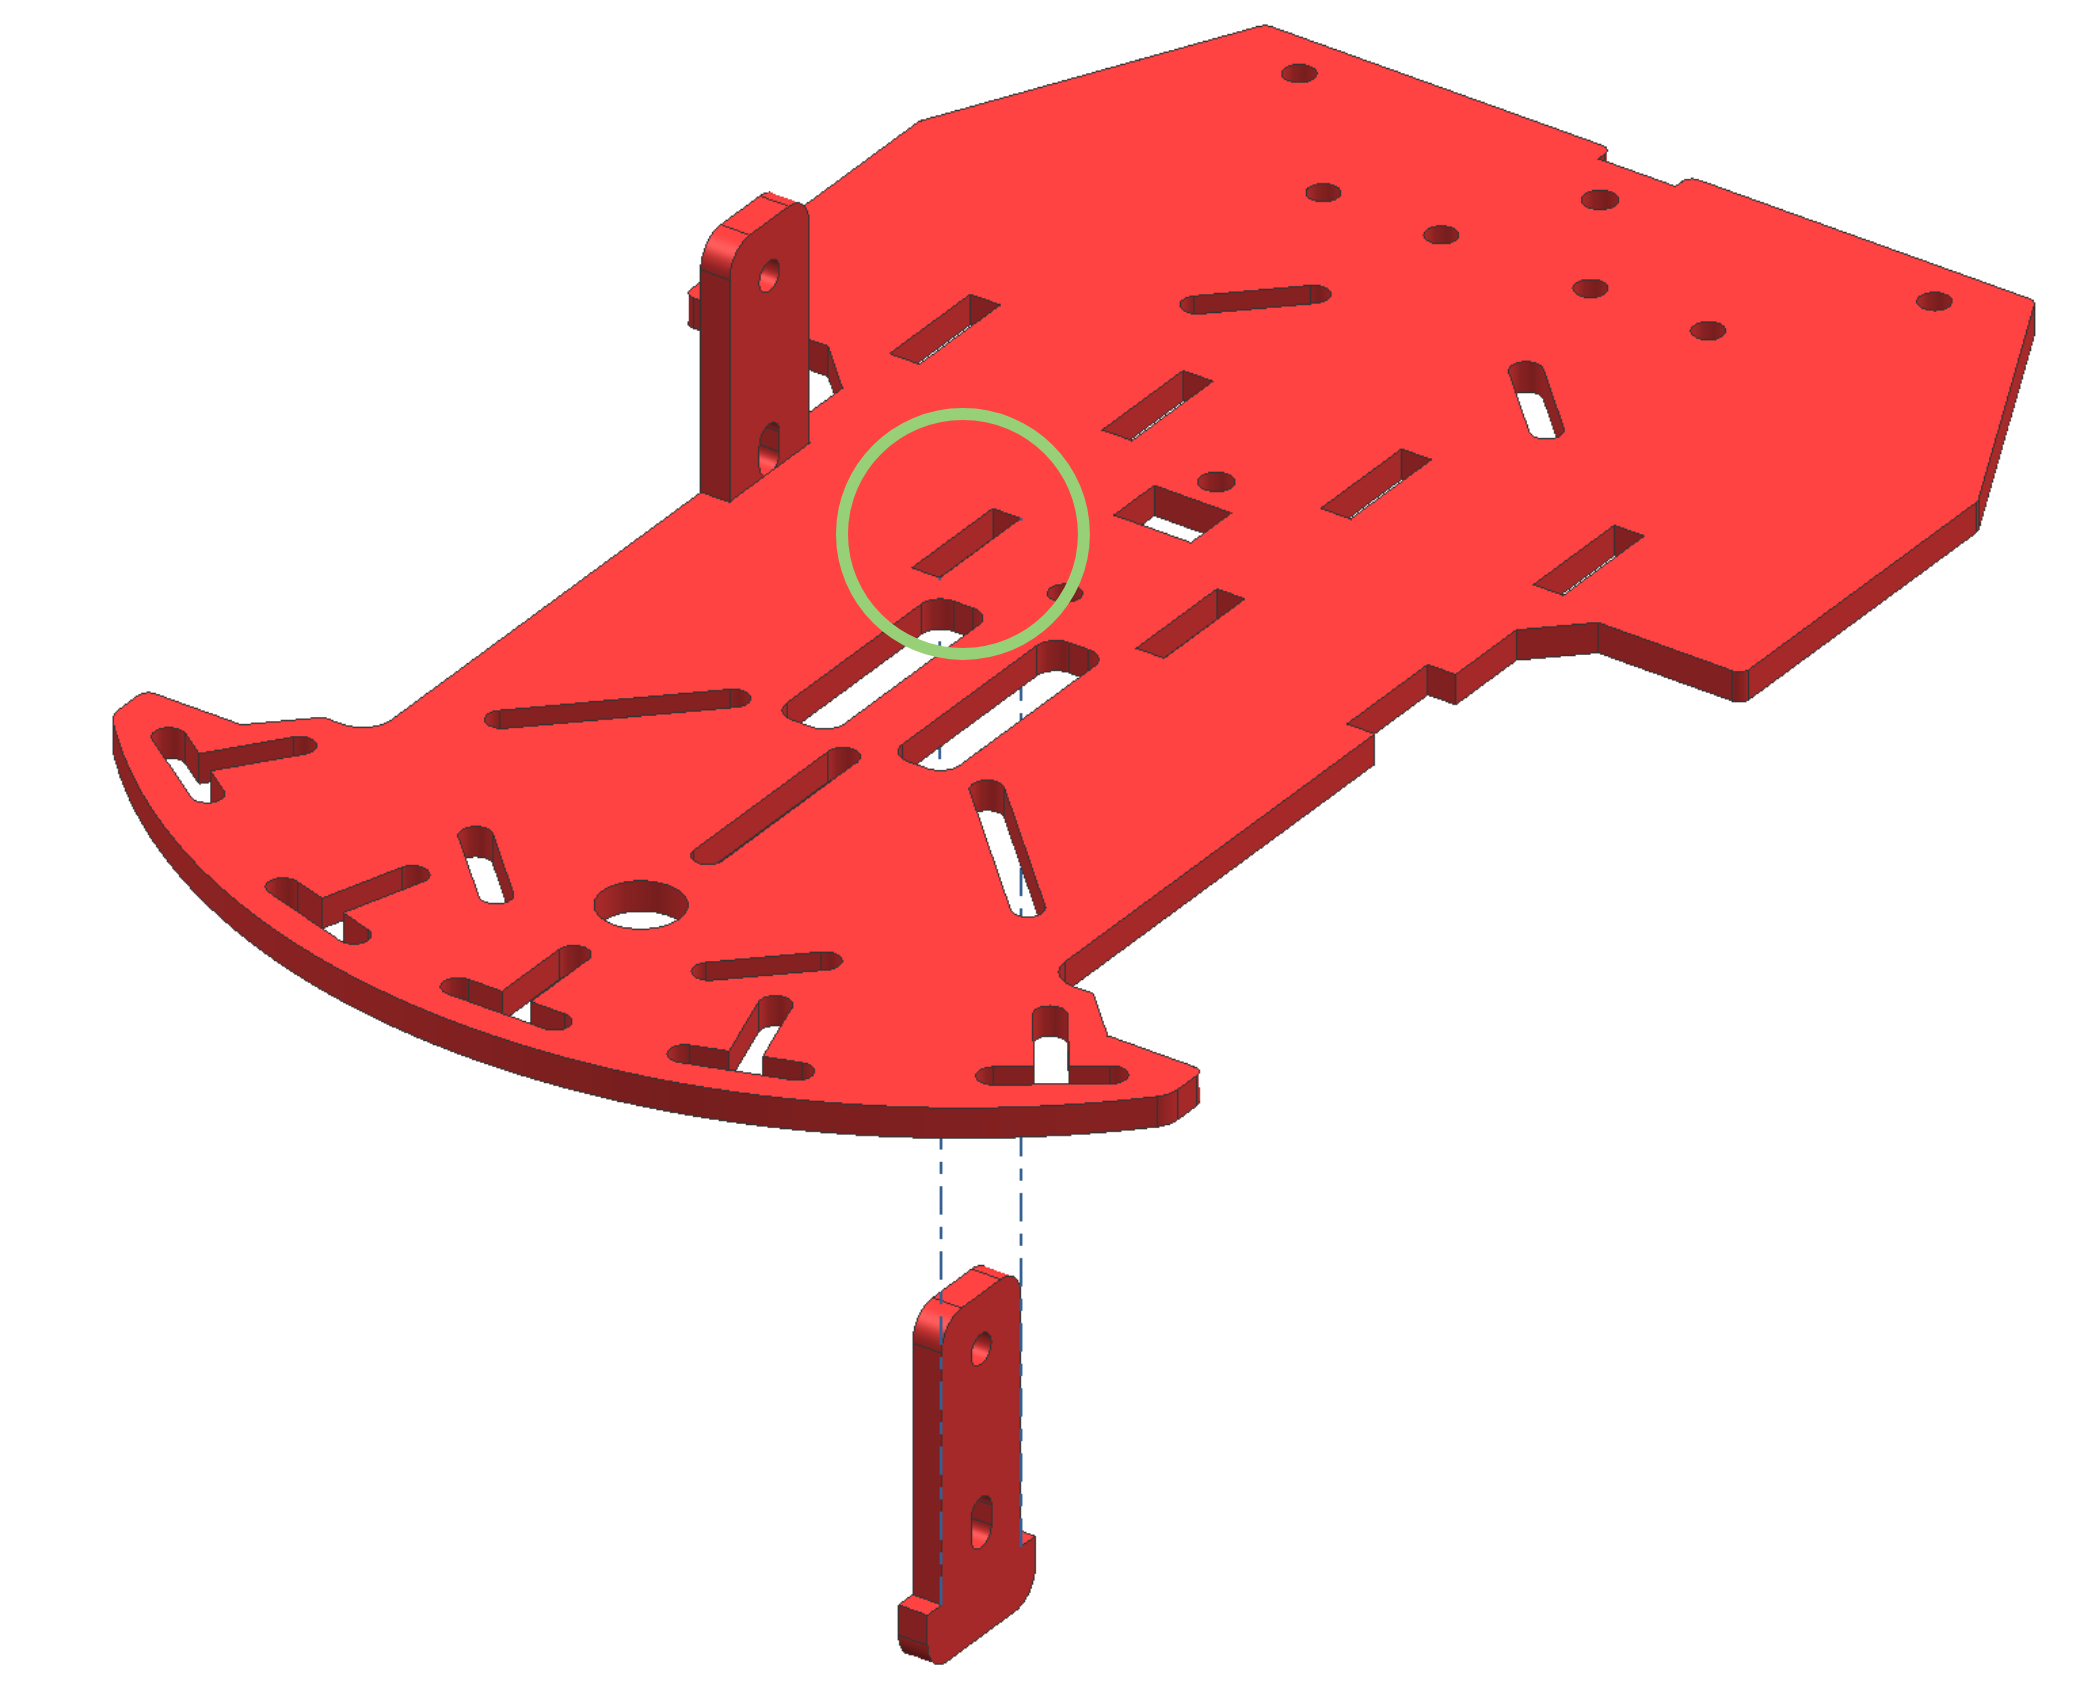
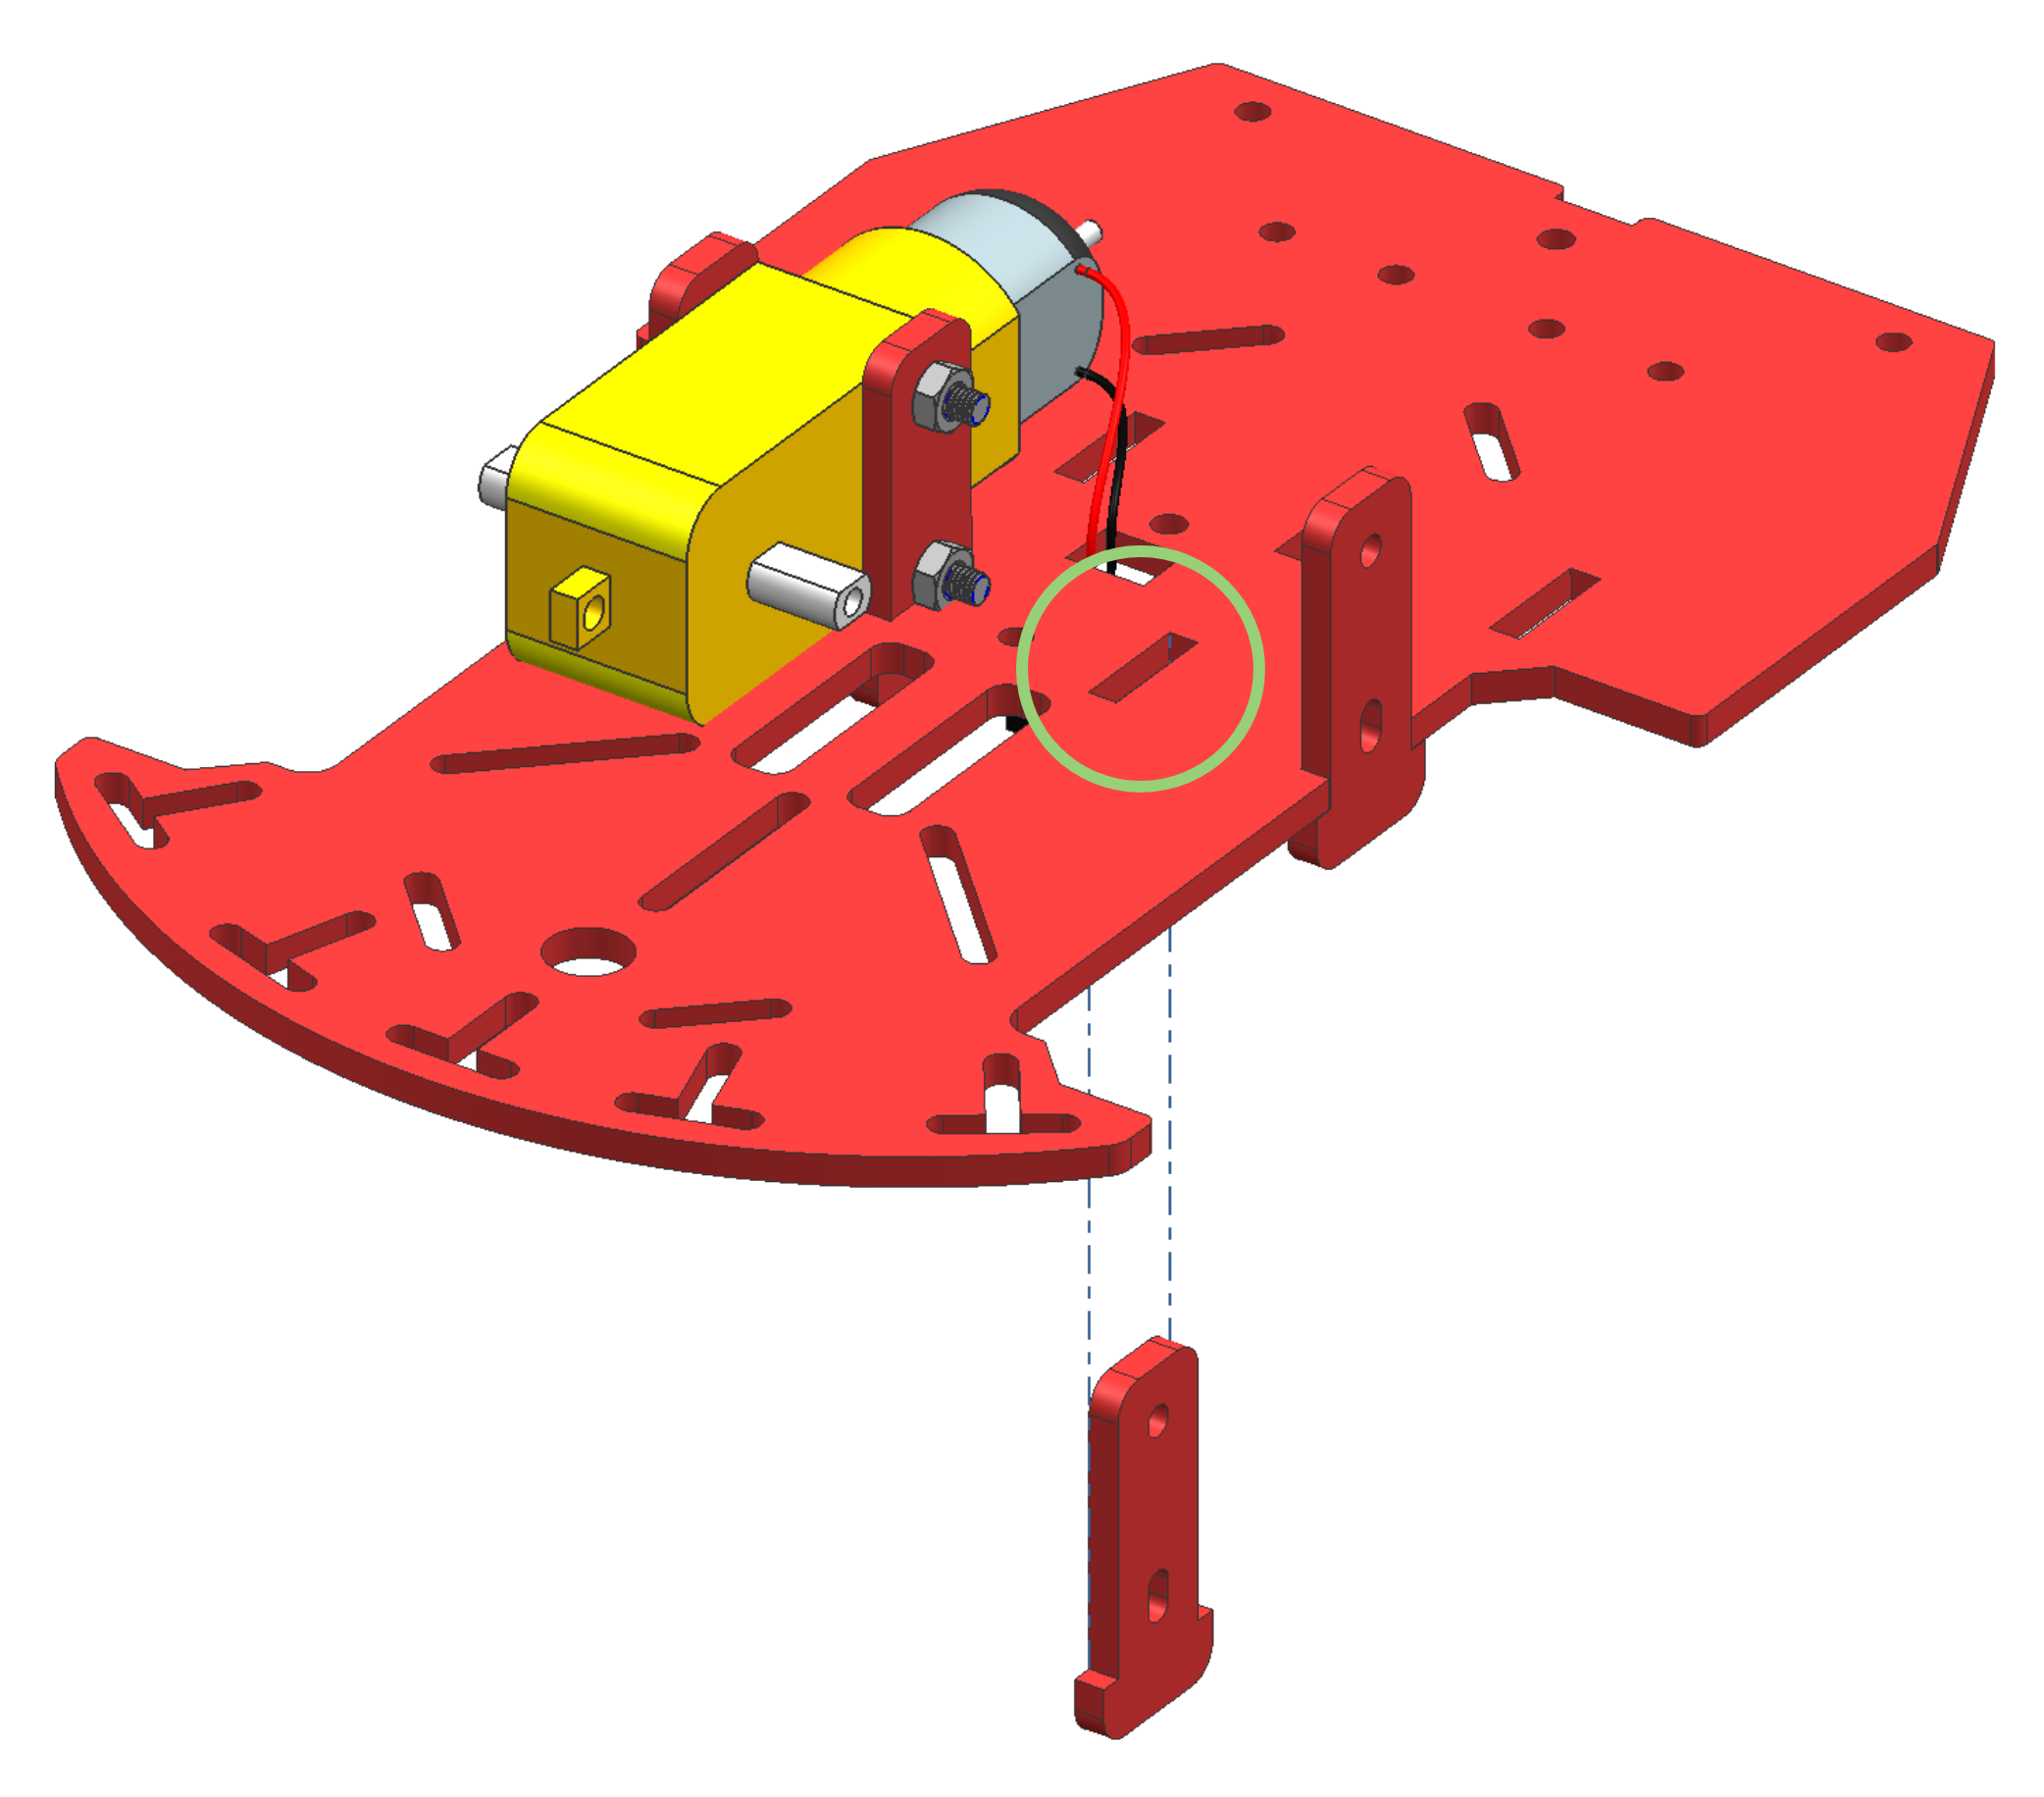
Pass two of the motor holders through the openings in the bottom plate of the chassis as shown in Figure 16.3. If you have troubles fitting the holders, it is probably because you have not removed the protective plastic film. Note which holes you are using. You should be using the middle section ones.
Put one motor between the holders as shown in Figure 16.4.
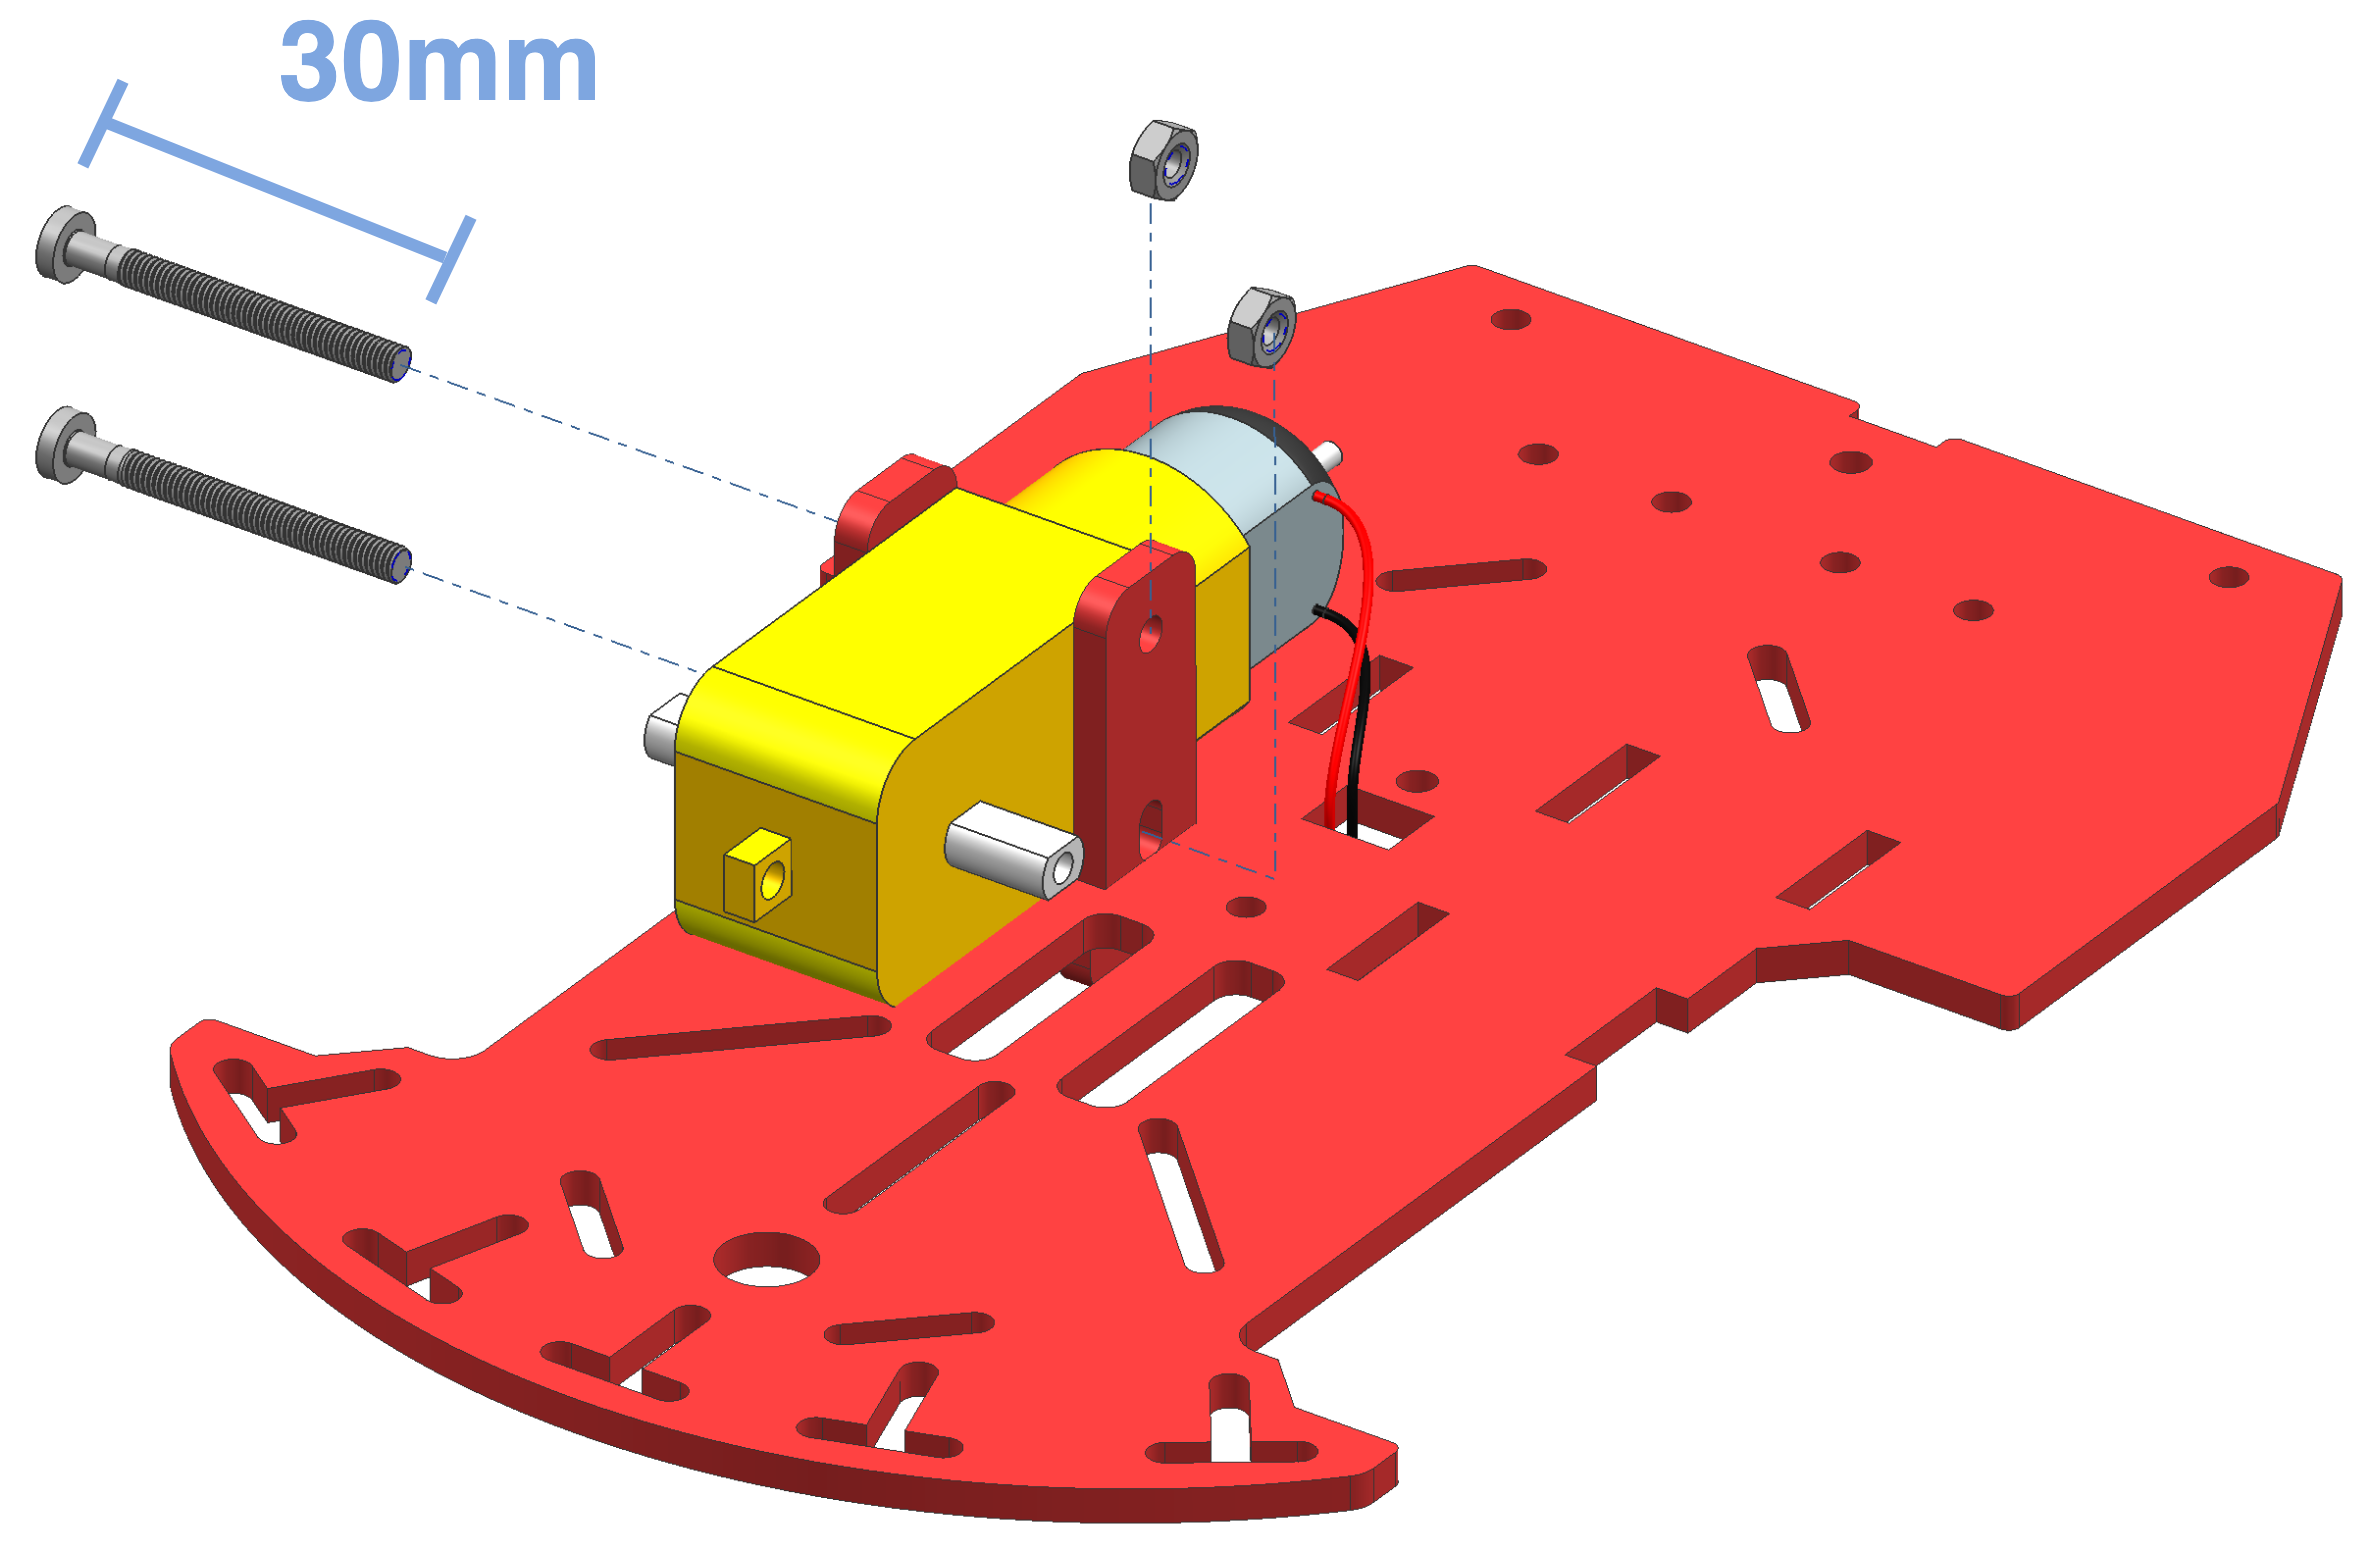
Orient the motors that their wires are pointing to the inside (i.e., towards the center of the plate).
Use your screwdriver.
Use 2 M3x30 screws and 2 M3 nuts to secure the motor to the motor supports. Pass the screws through the holes from the outside inwards, then tighten the screws to secure the holders to the bottom plate of the chassis.
You might find aligning the holes to be a little bit hard. It is easier to first get the top screw aligned and place the screw in, and then push in the side support piece in to place. If that still doesn’t work, get the bottom screw and the side support in first, align it, and secure with nuts. Then try to push the top screw through. You might have to use the screw to expand the hole a bit.
Step 2
✎Modified 2020-04-03 by Rafael Froehlich
Do the same for the second motor as well as shown in Figure 16.5 and Figure 16.6
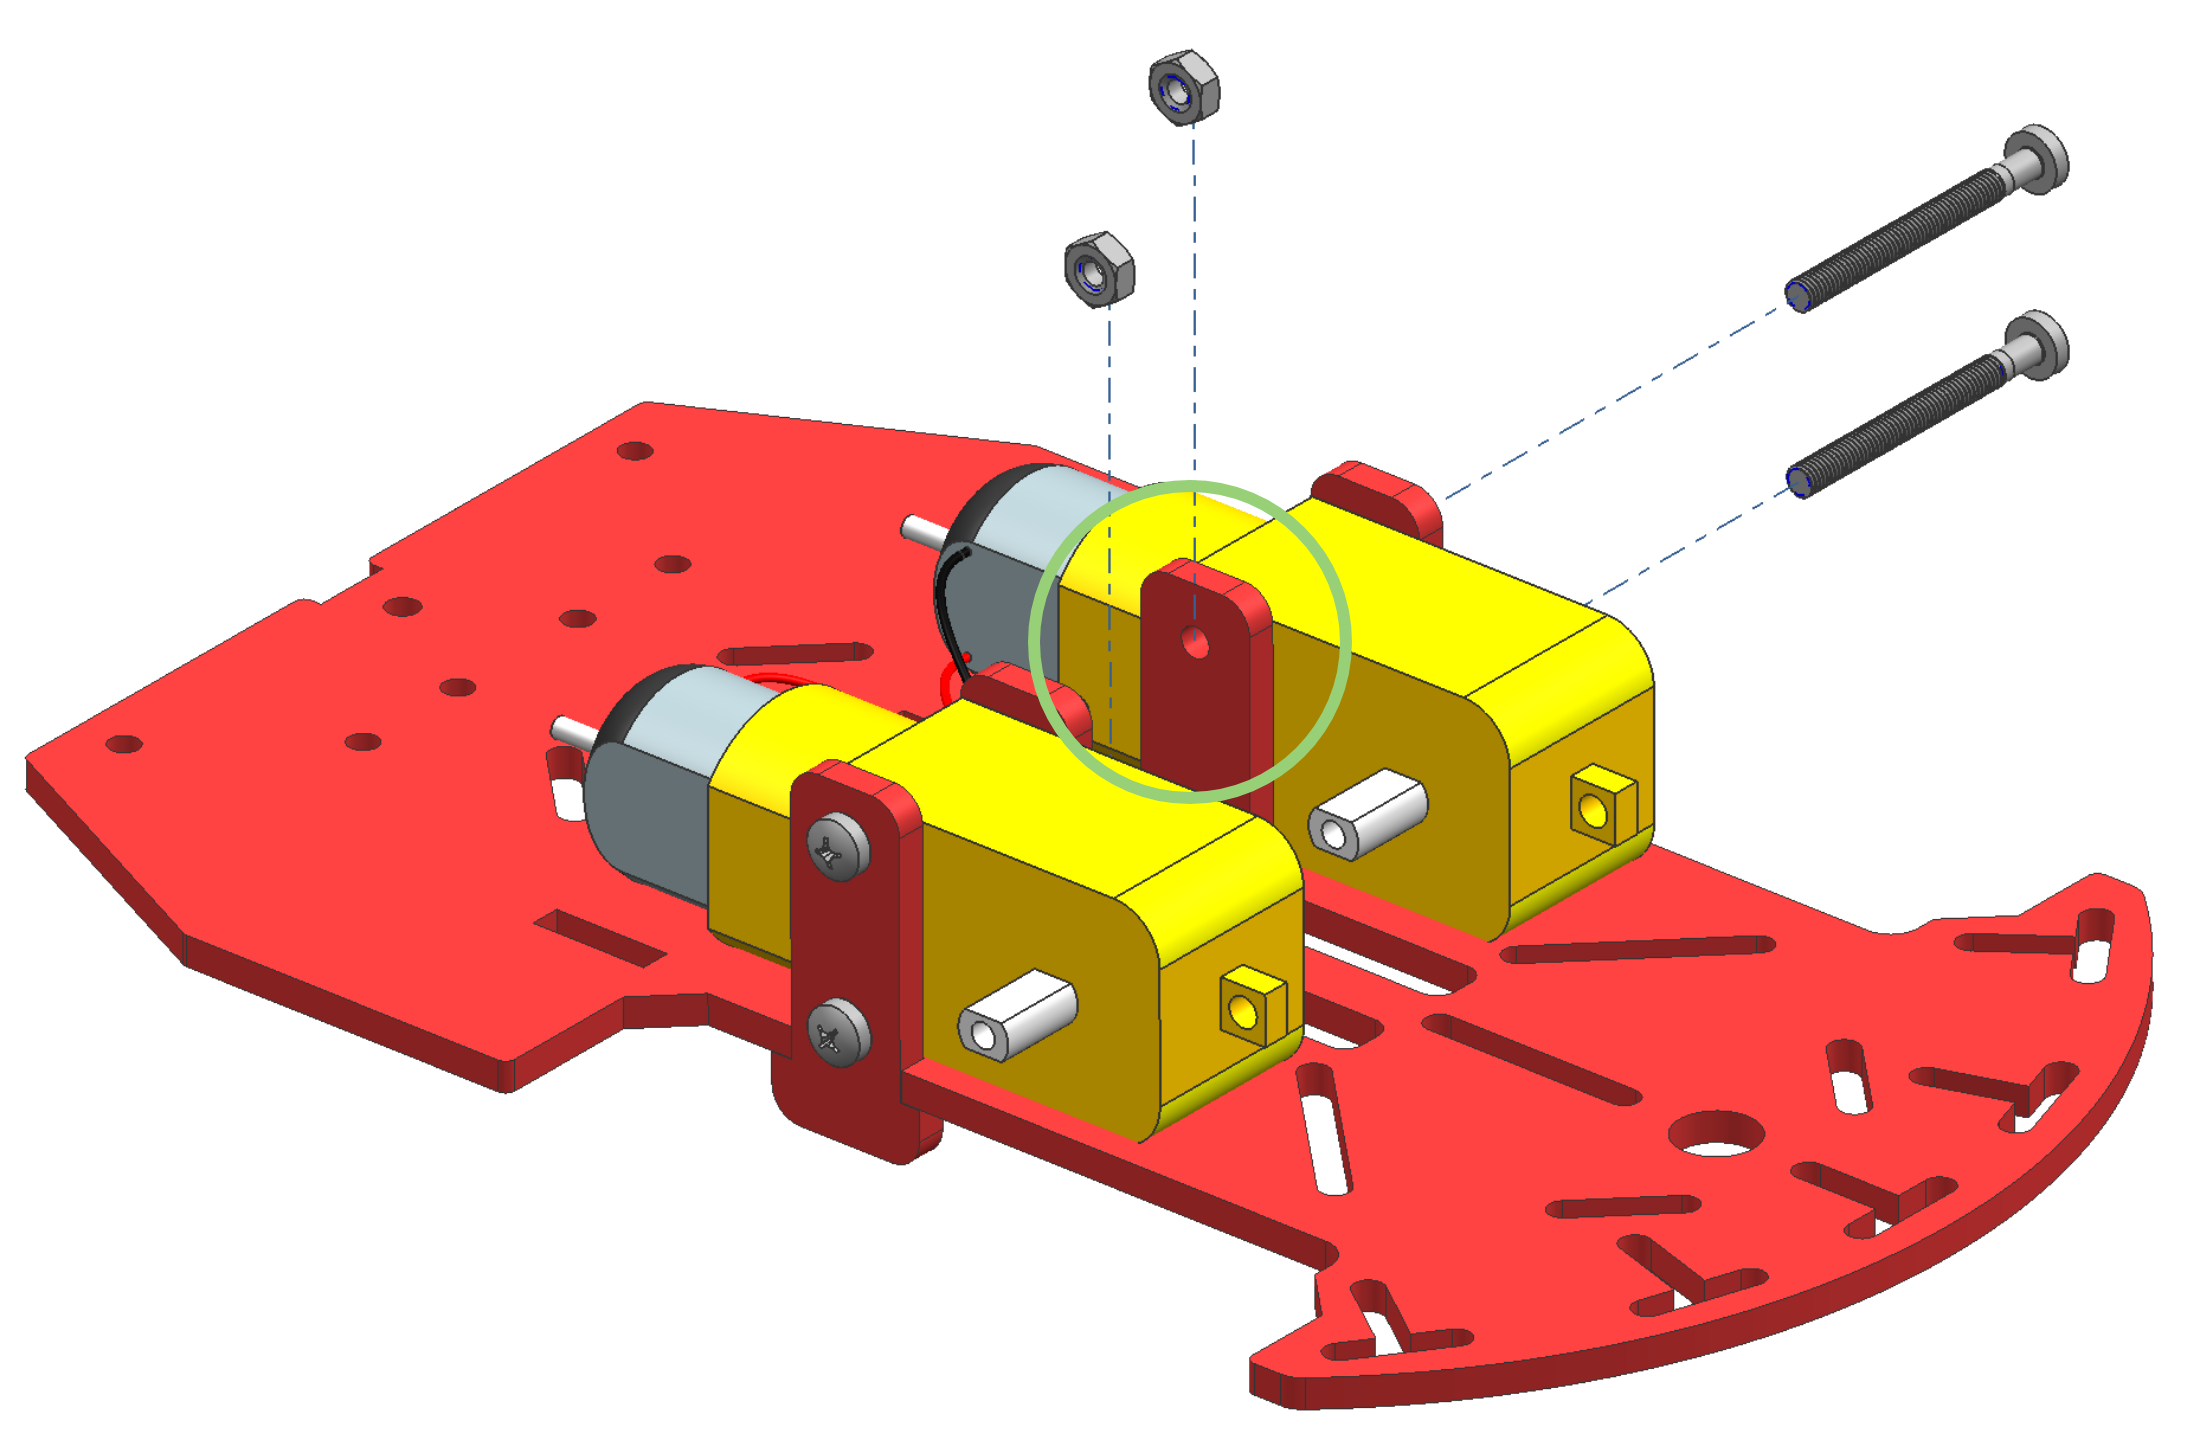
Tighten the motors firmly, as a wobbly motor might cause troubles later on.
Step 3
✎Modified 2020-04-03 by Rafael Froehlich
Wire the cables of the two motors through the bottom plate of the chassis and make sure they are well separated (Figure 16.7).
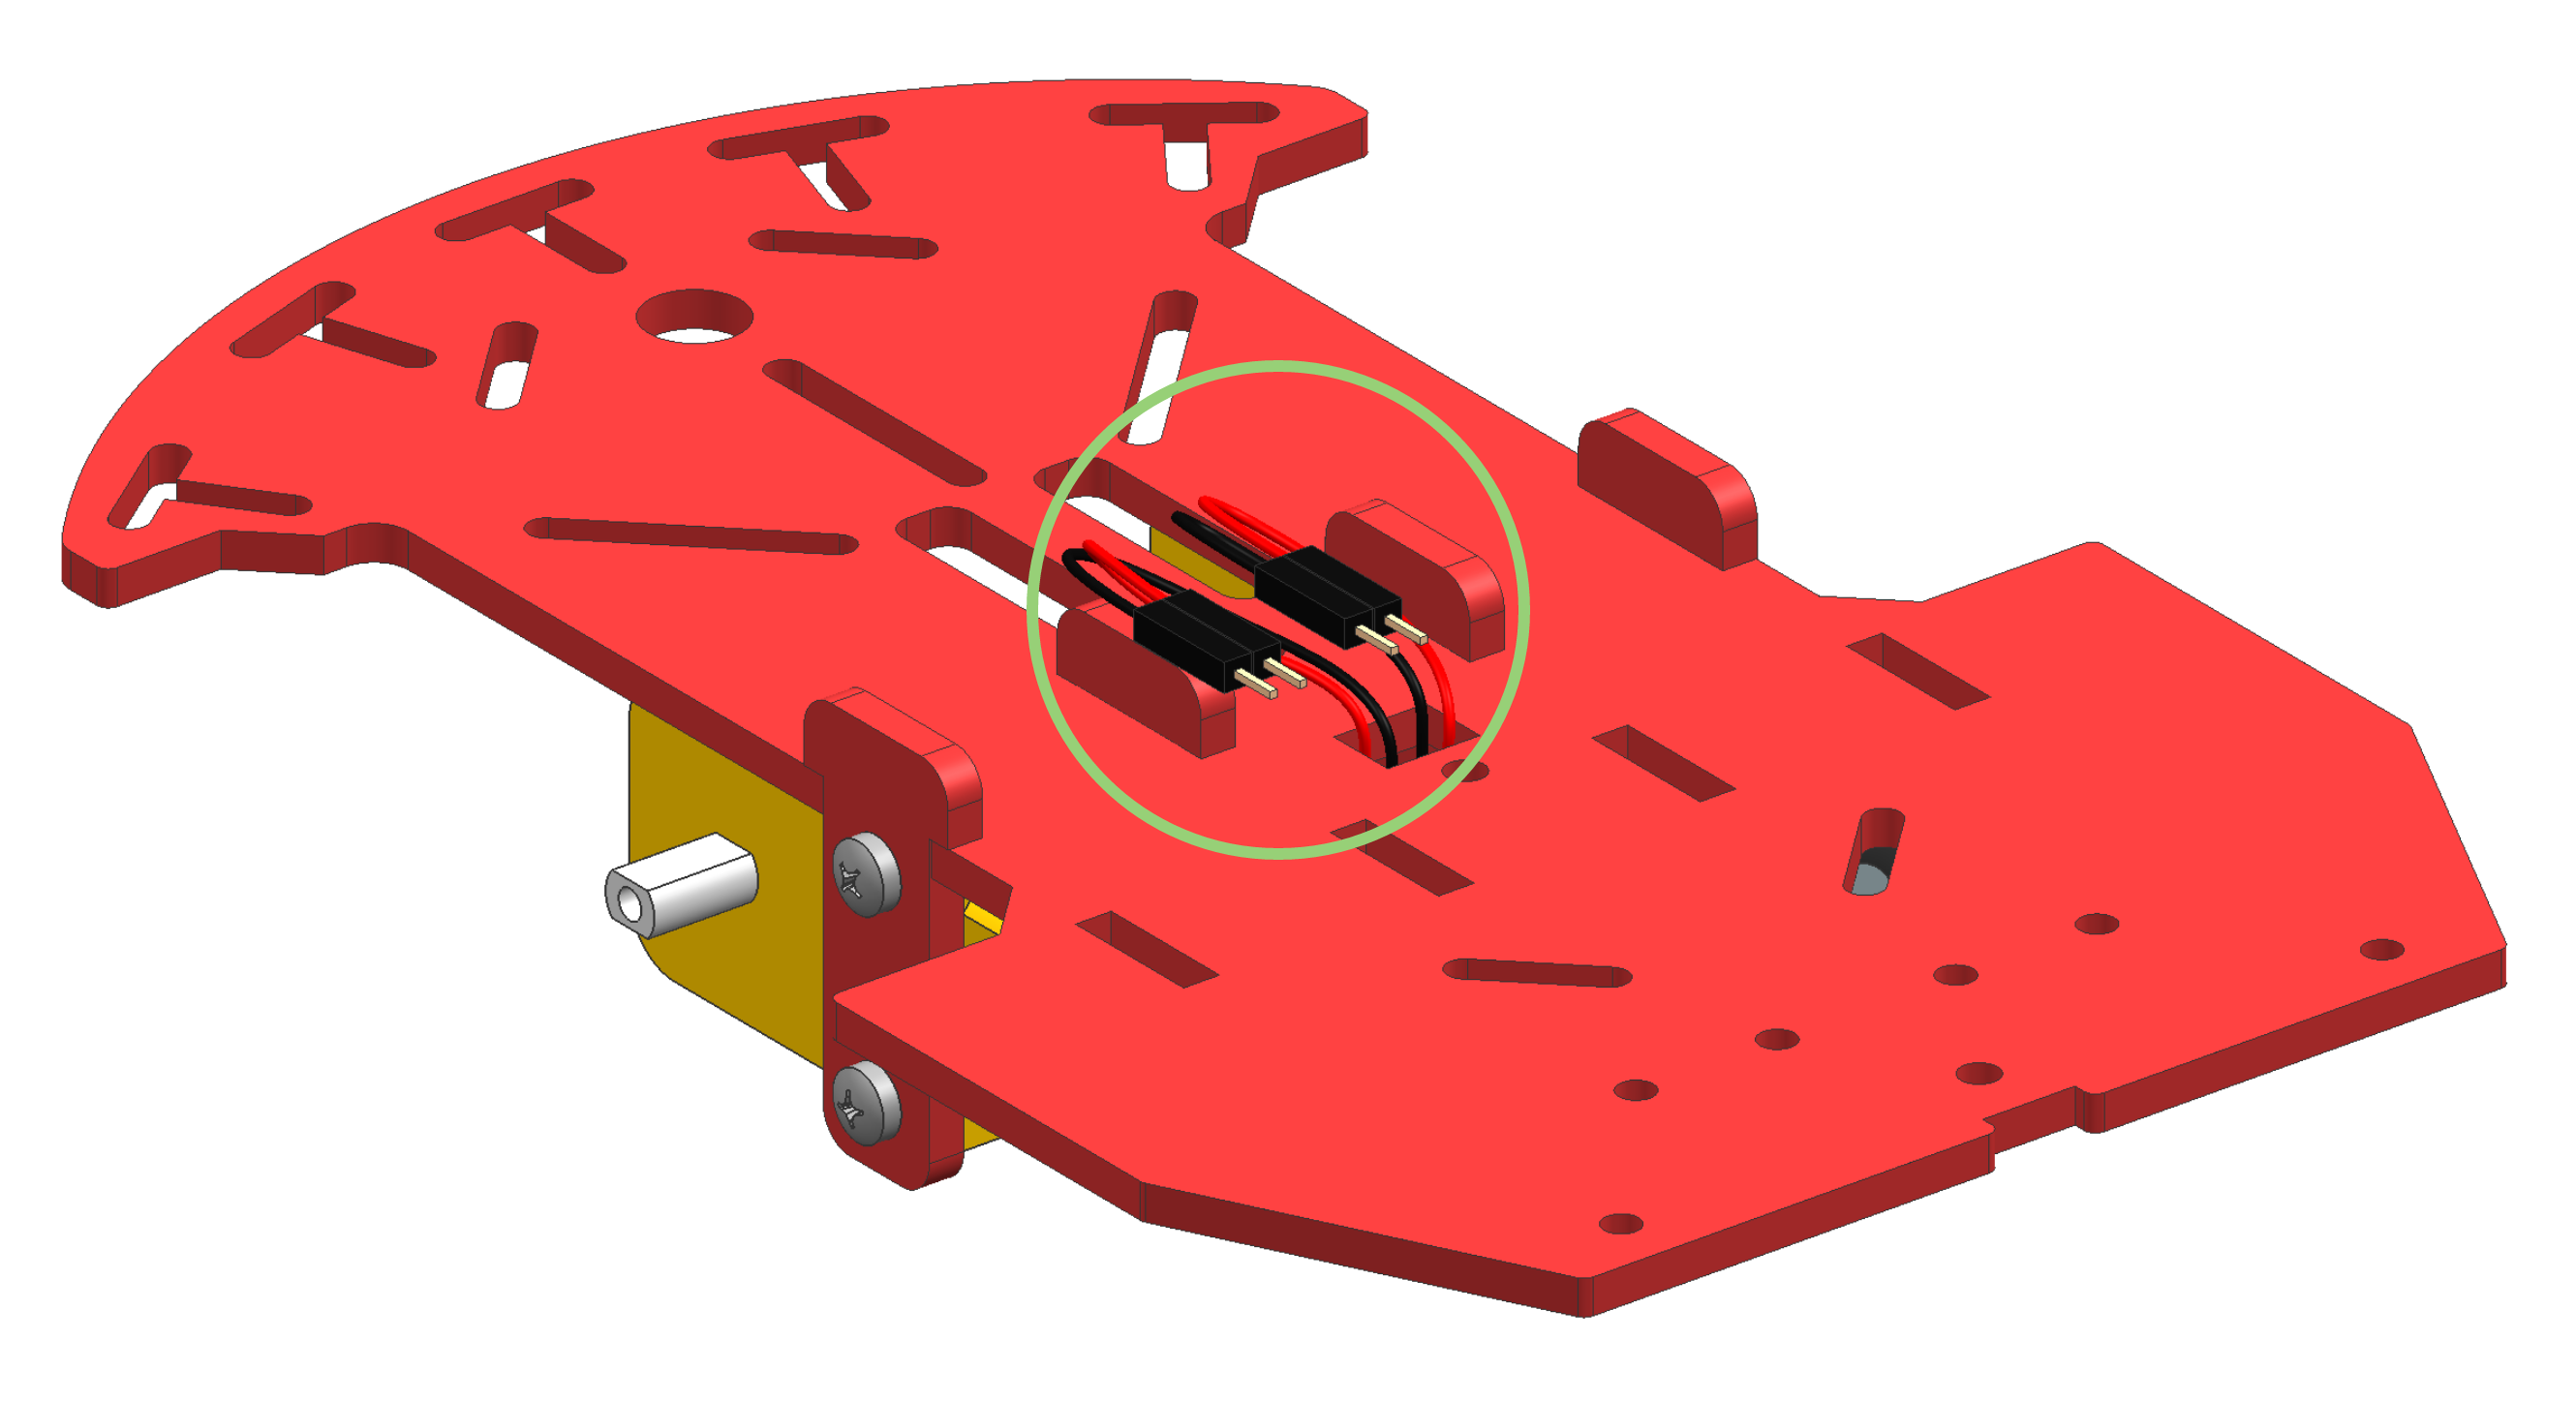
Bottom chassis
✎Modified 2020-04-03 by Rafael Froehlich
The Duckiebot is driven by controlling the wheels attached to the DC motors. Still, it requires a passive support on the back. In this configuration an omni-directional wheel is attached to the bottom plate of the chassis to provide such support.
From the Duckiebox package take the following components: - Steel omni-directional wheel (1x) - M3x25 metal spacers (2x) - M3x10 metal screws (2x) - M3x10 nylon screws (2x)
Step 4
✎Modified 2020-03-07 by rafaelfroehlich
Assemble the omni-directional wheel as shown in figure Figure 16.8.
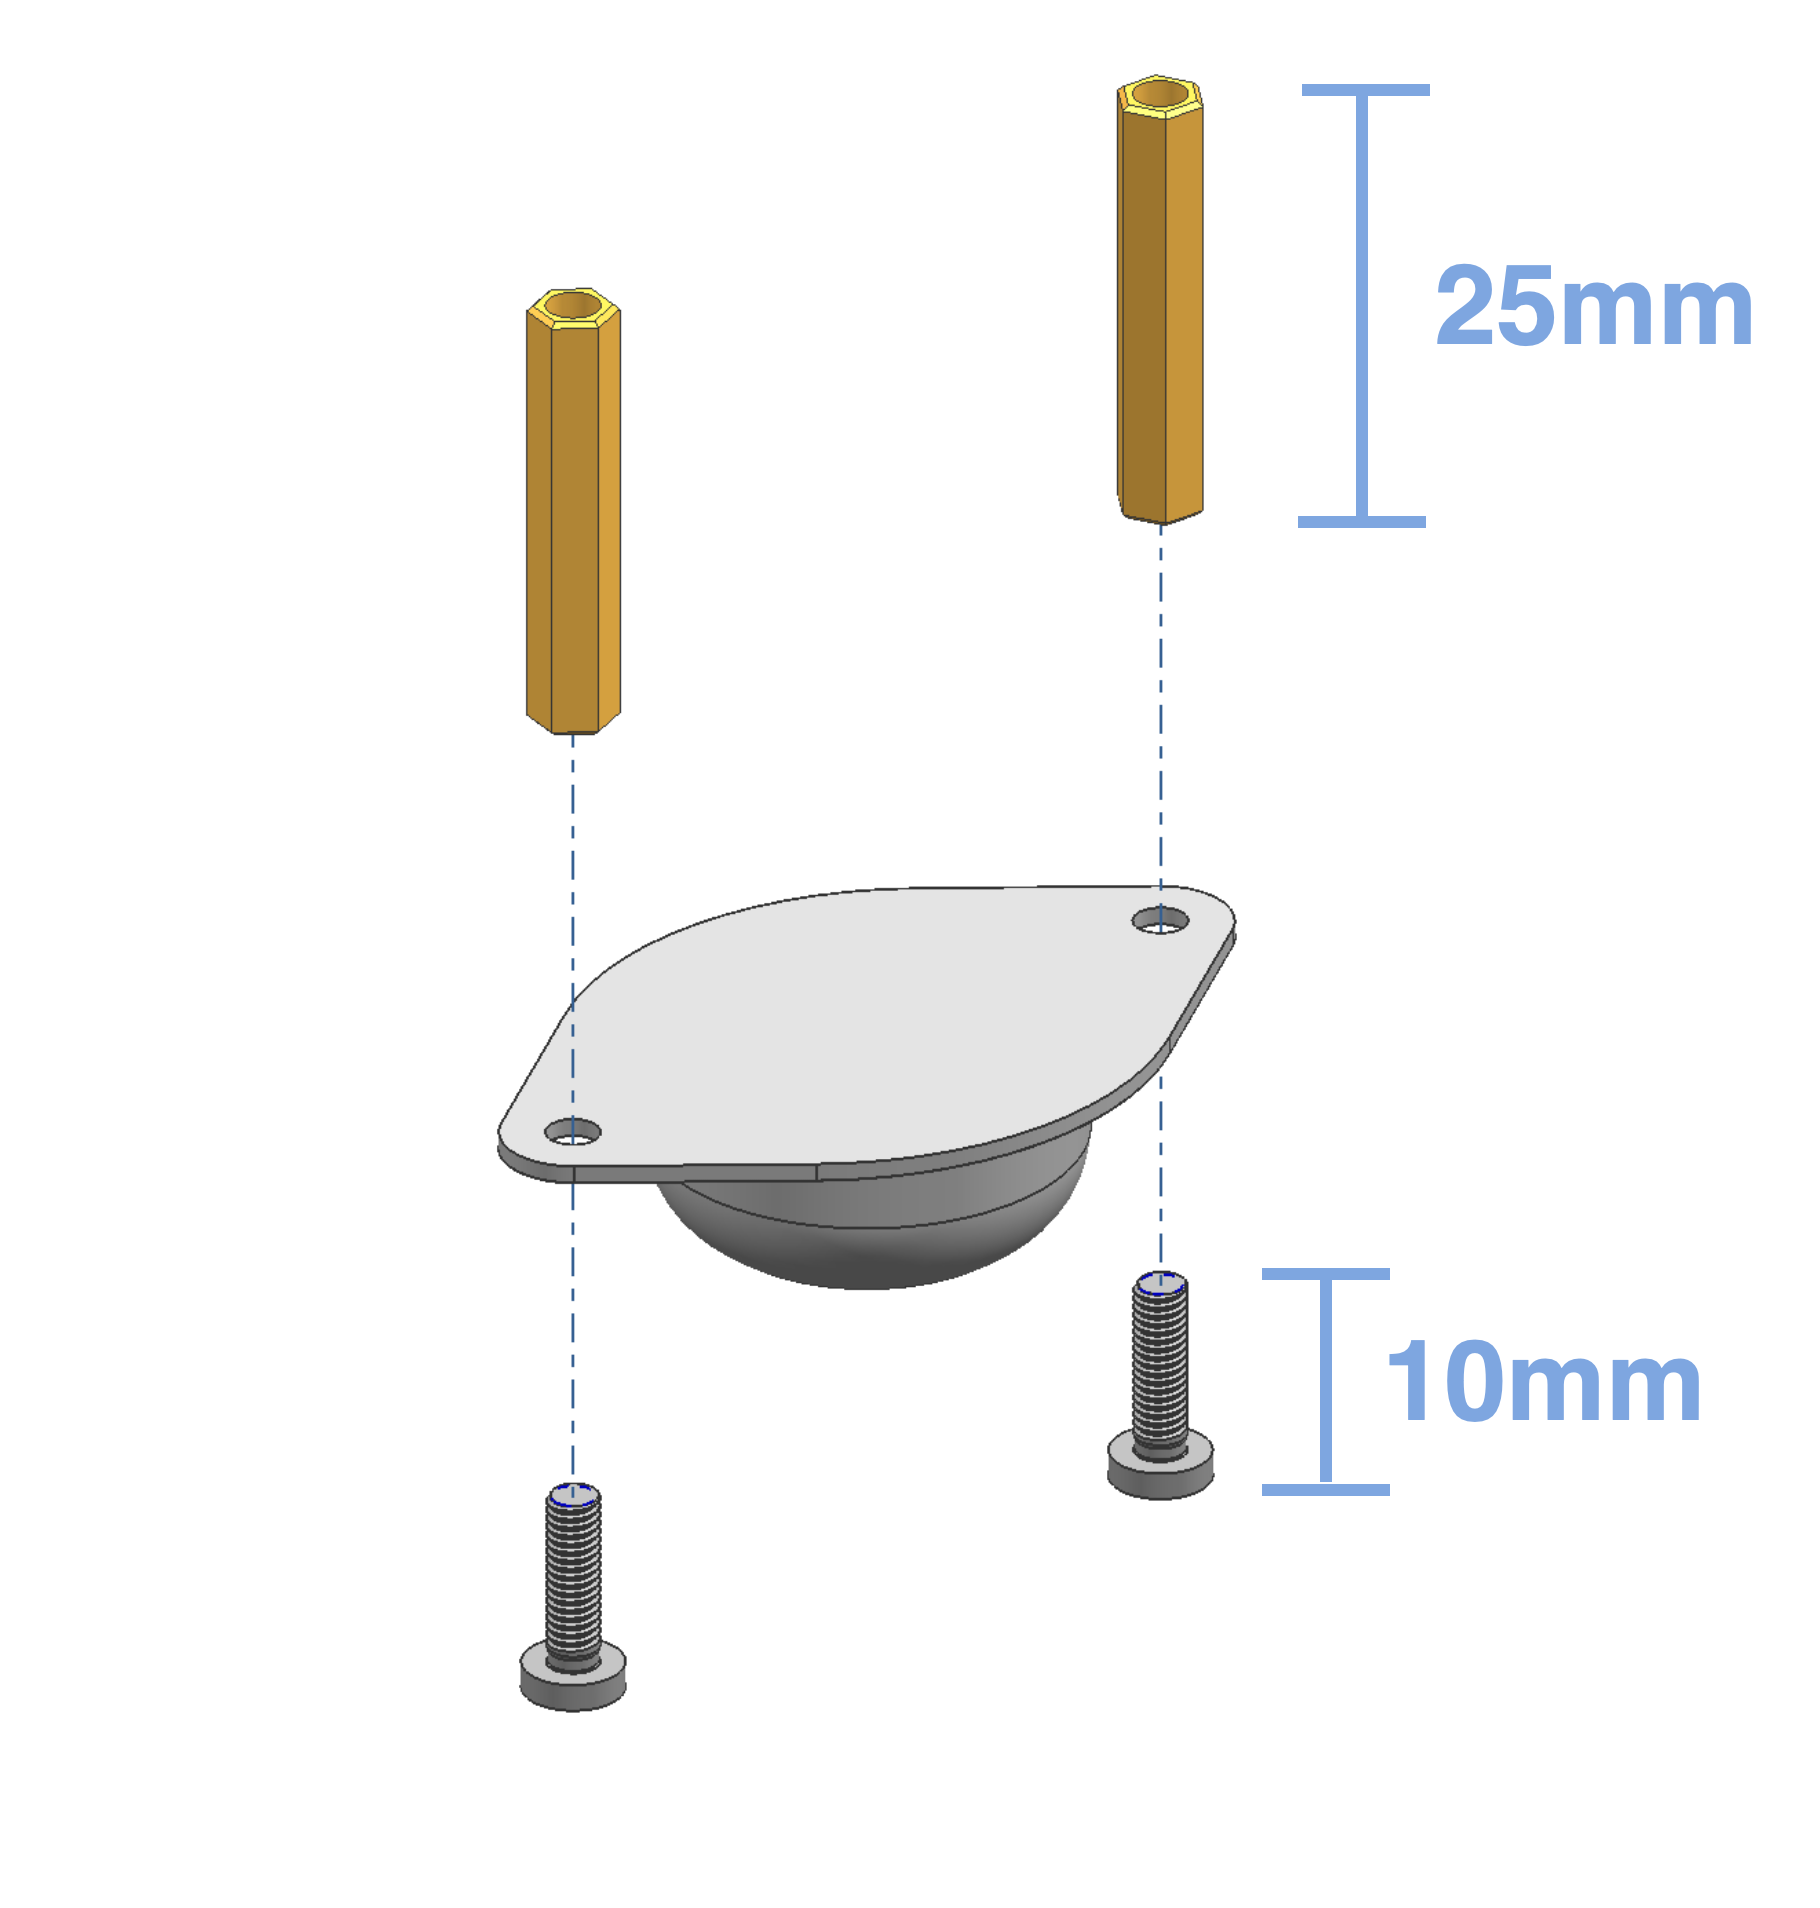
Step 5
✎Modified 2020-03-07 by rafaelfroehlich
Then mount it to the bottom plate of the Duckiebot as shown in figure Figure 16.9.
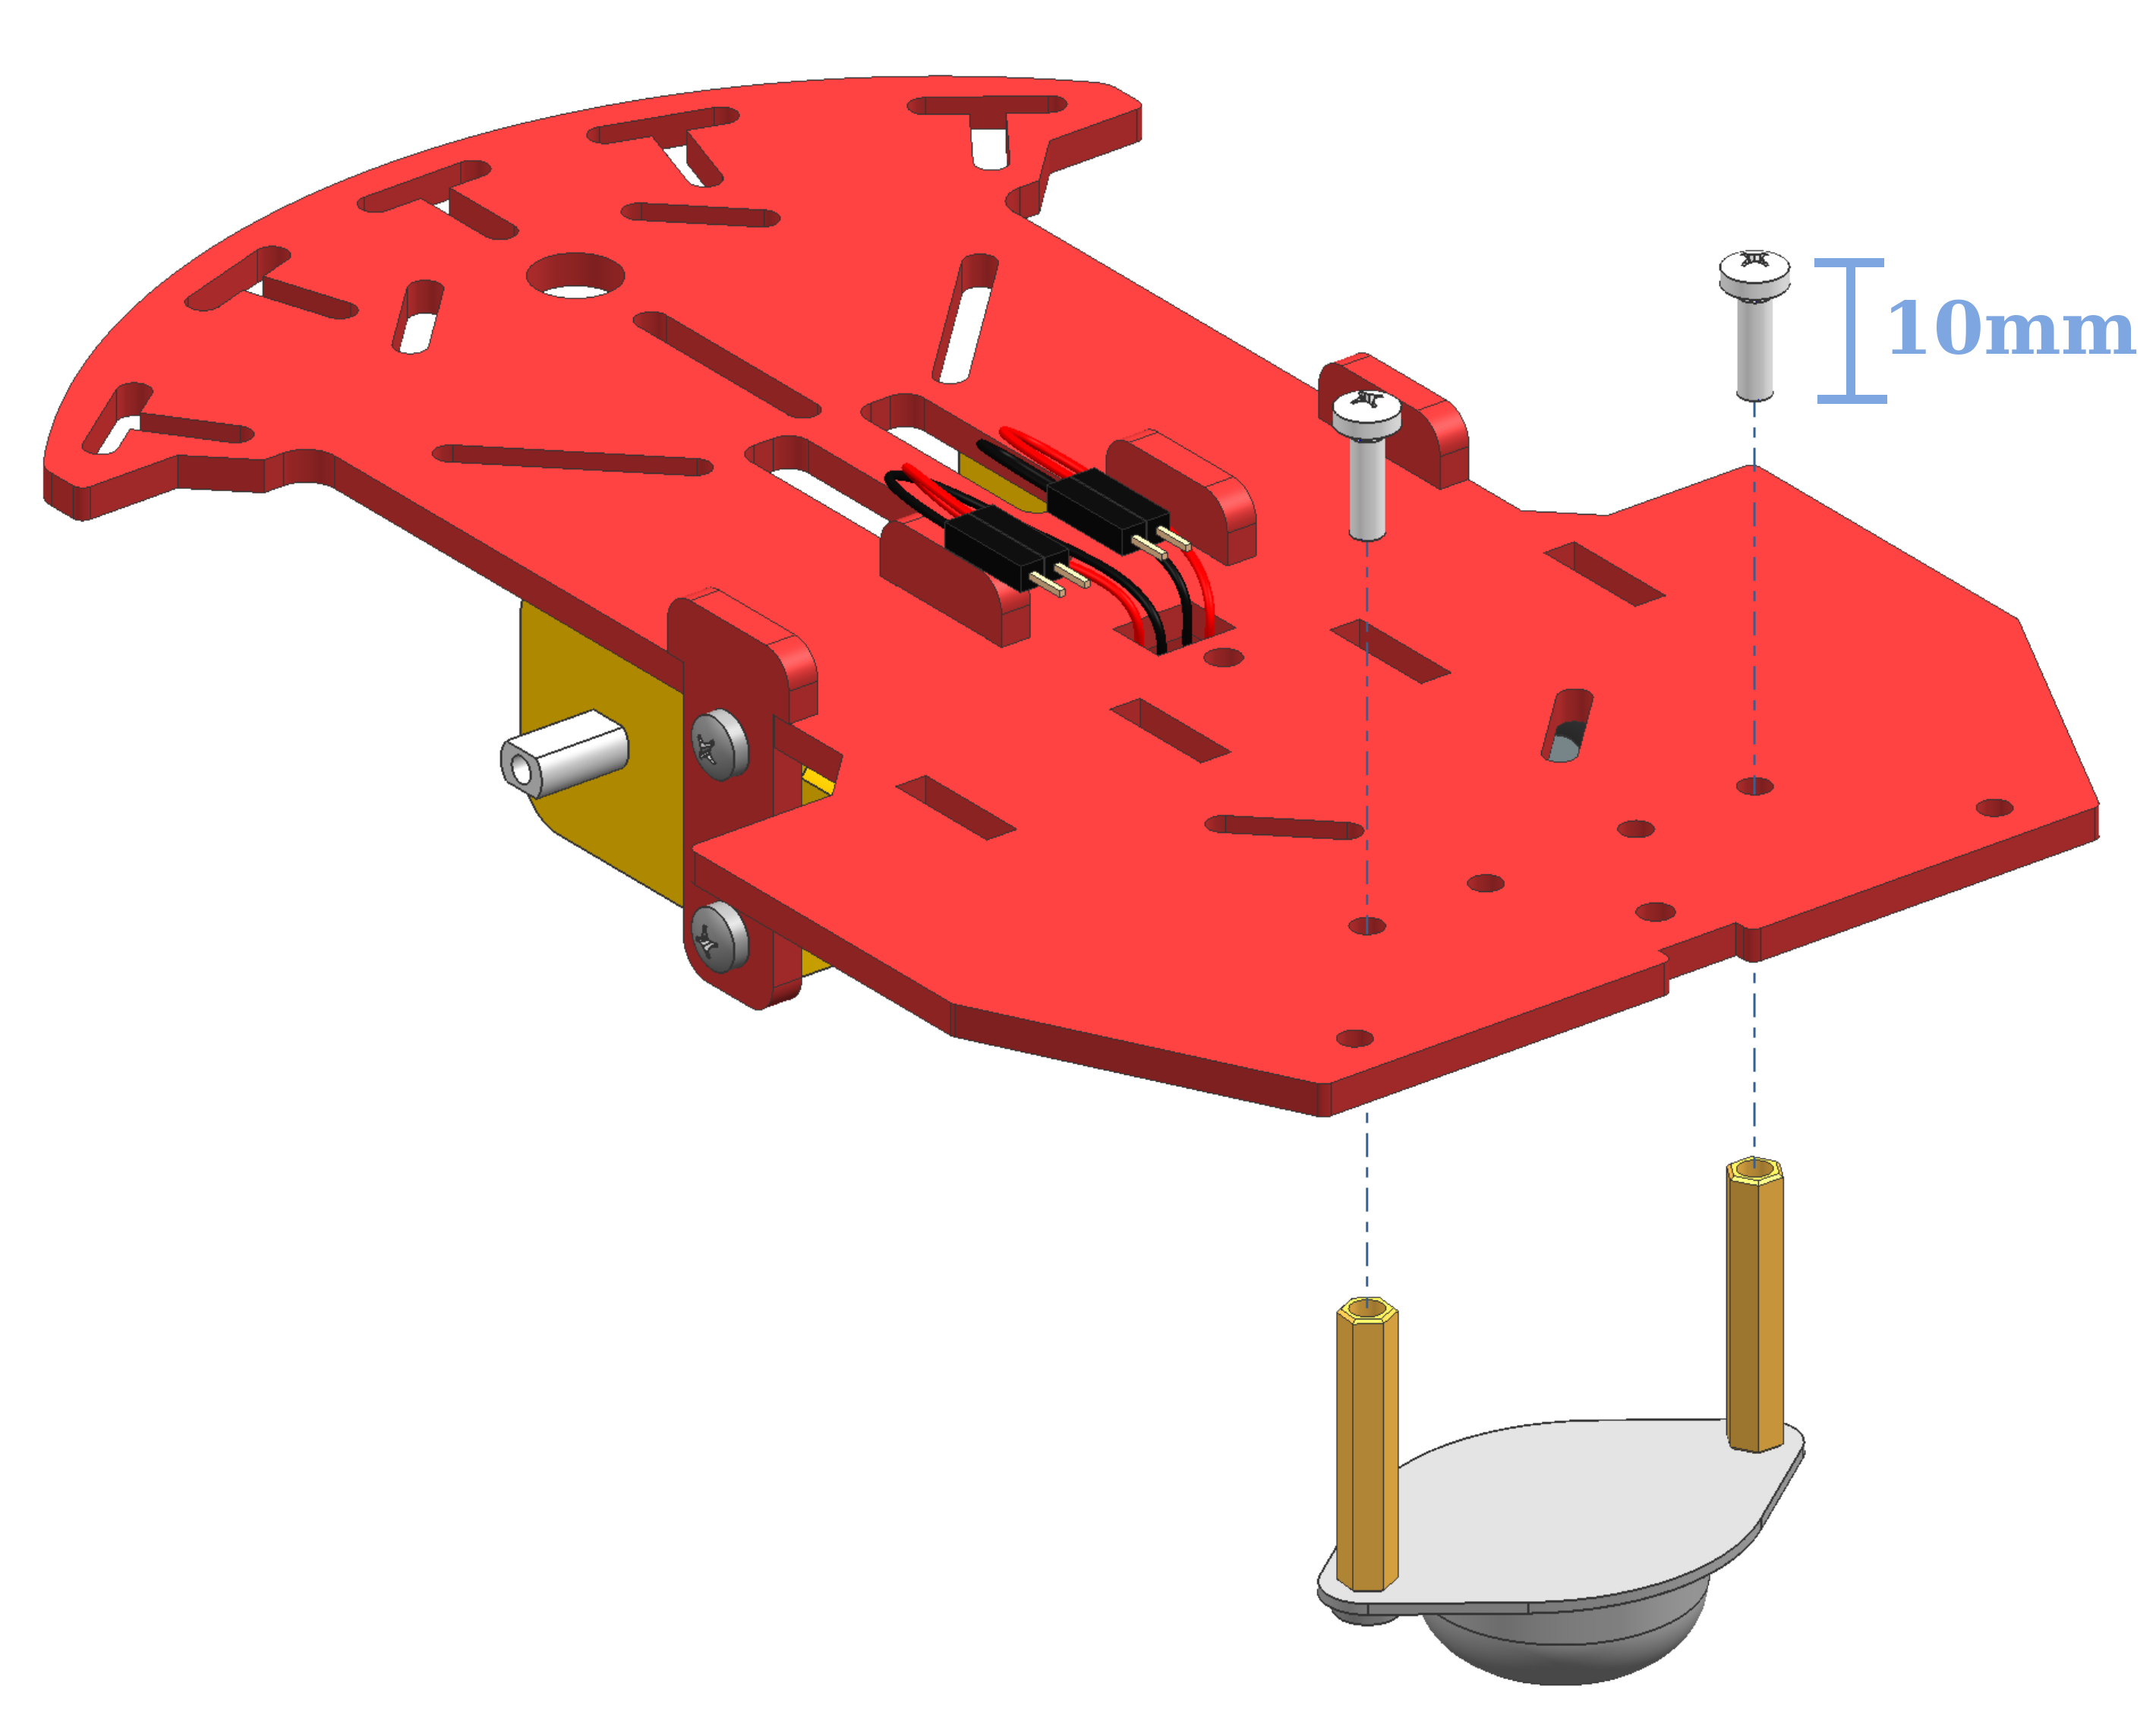
Sometimes you might need a bit of force to get the screw and the standoffs fully connected.
Step 6
✎Modified 2020-03-07 by rafaelfroehlich
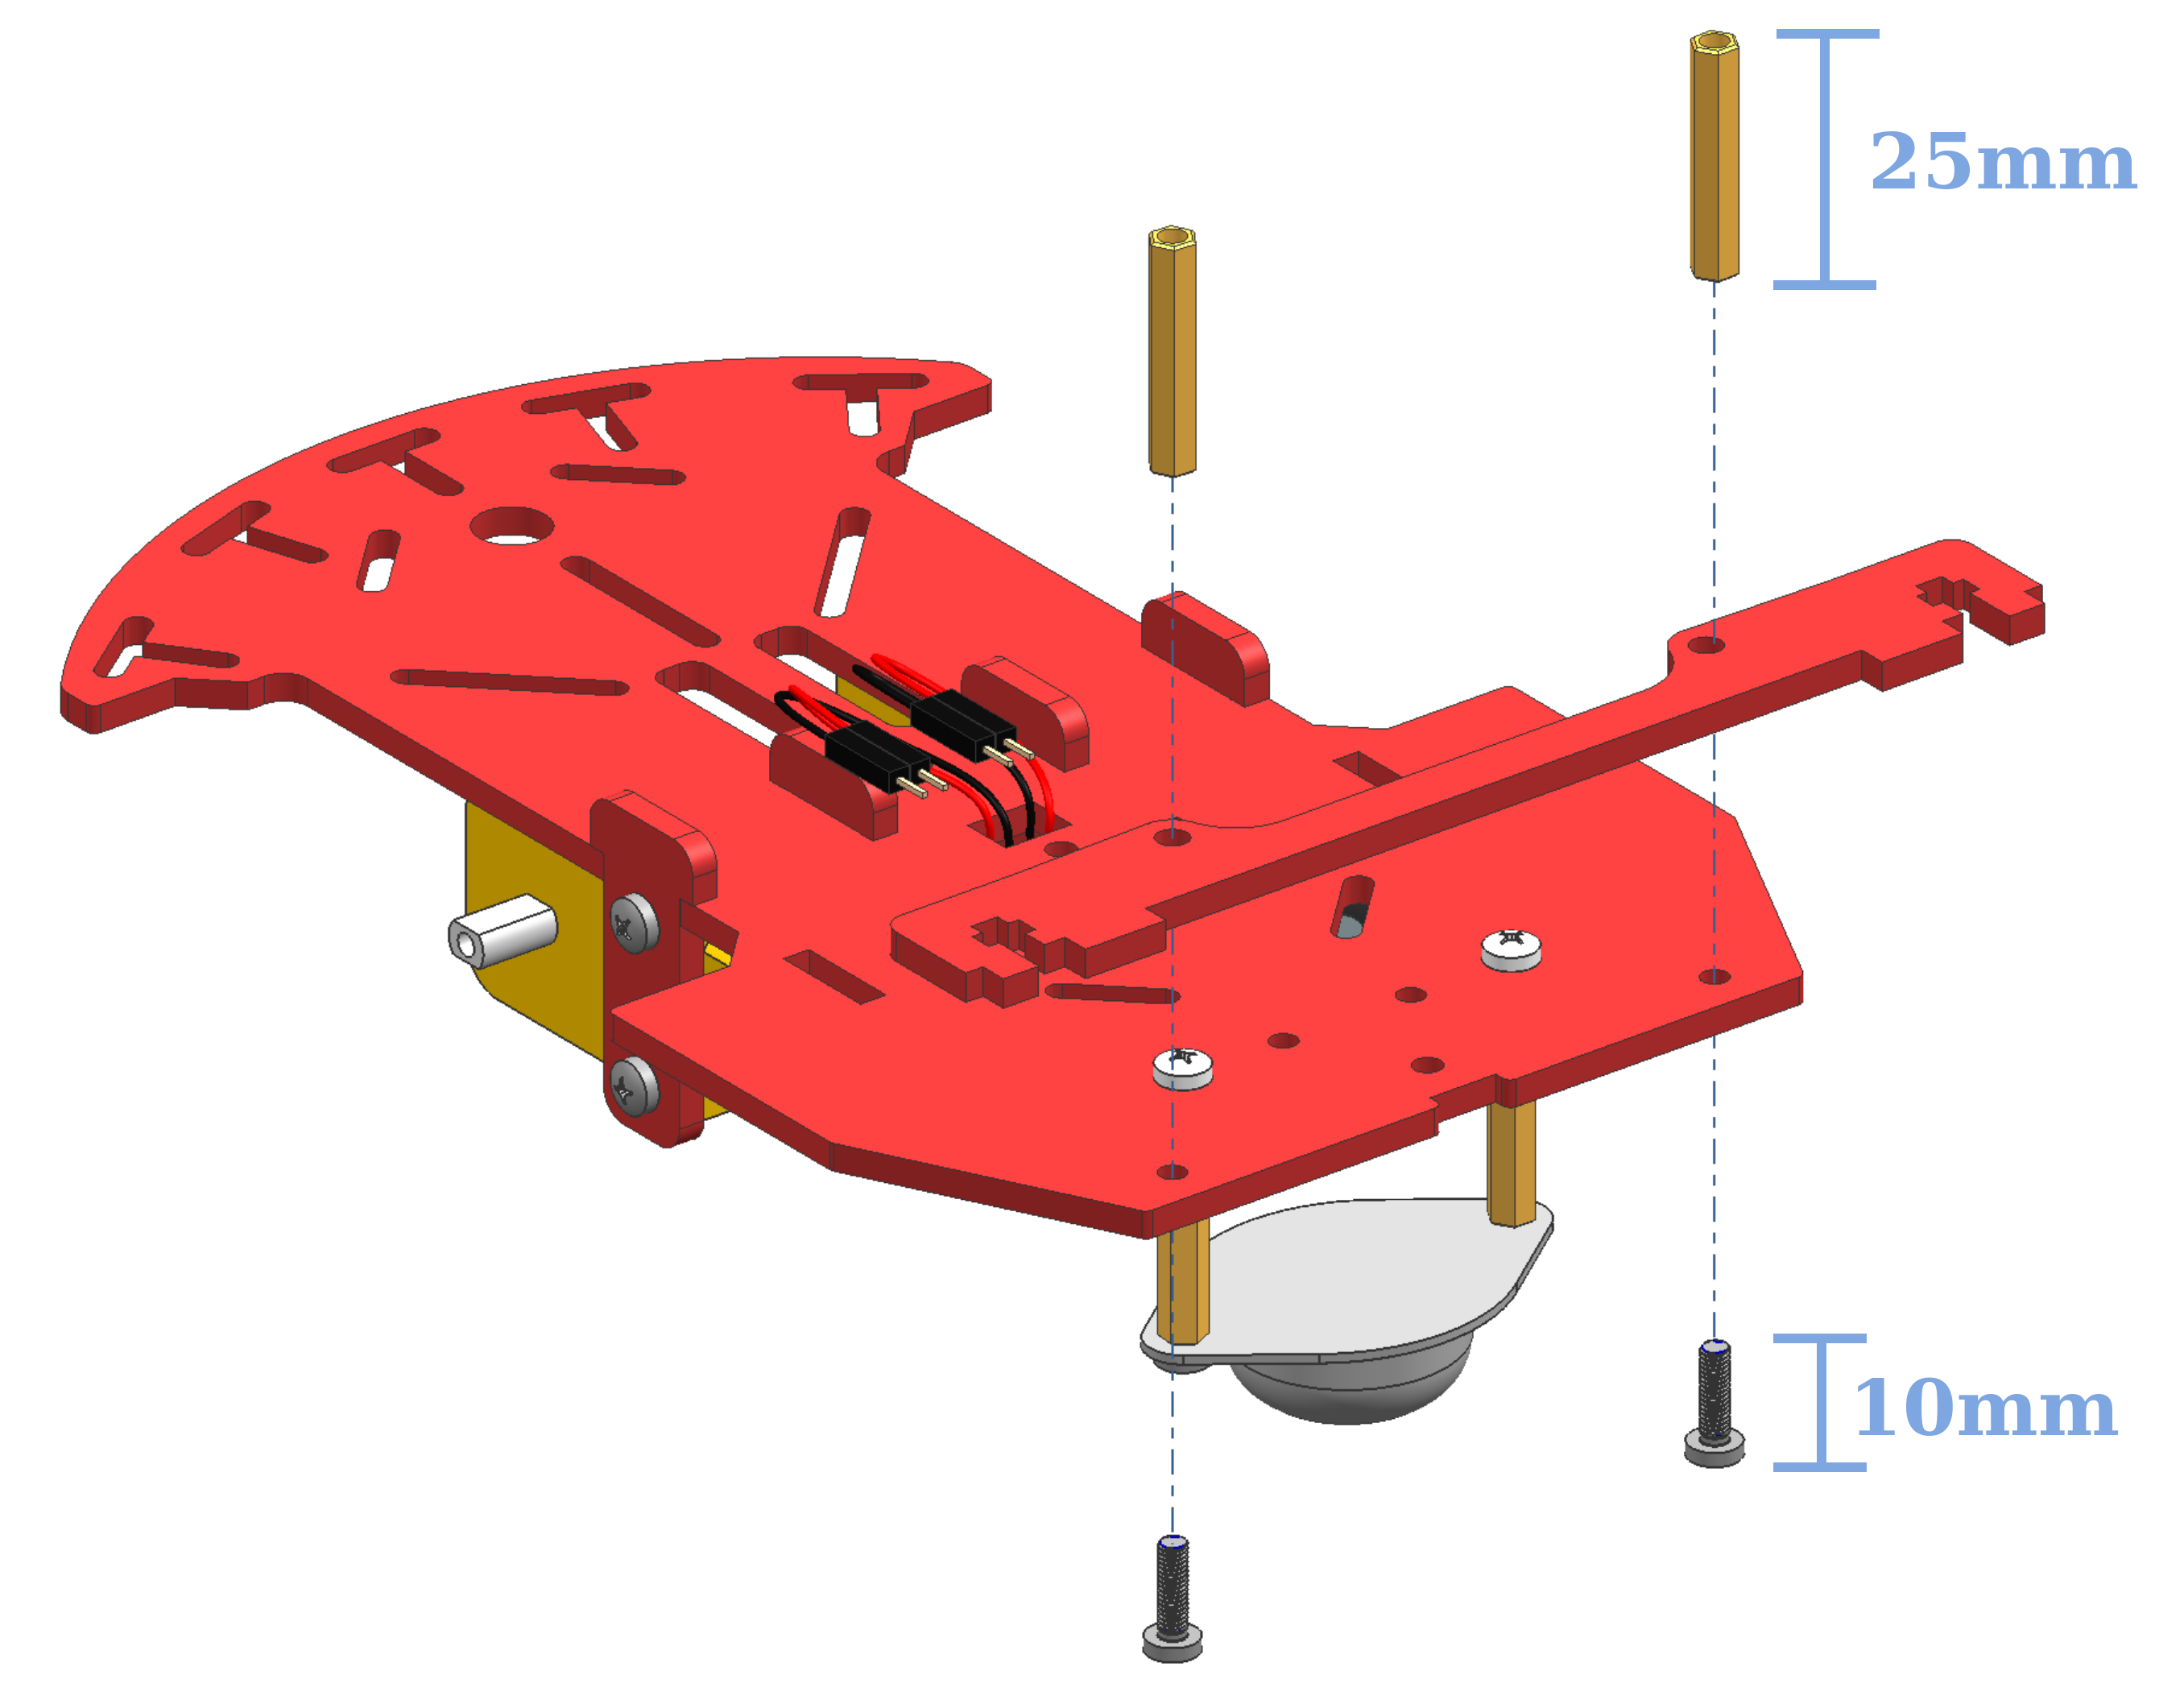
From the Duckiebot kit take the following components:
- M3x10 screws (4x)
- M3x25 metal spacers (2x)
- M3x30 metal spacers (2x)
- 1x Rear bumper bracer
and mount the rear bracer to the bottom plate with the 25cm spacers (Figure 16.10)!
Step 7
✎Modified 2020-04-03 by Rafael Froehlich
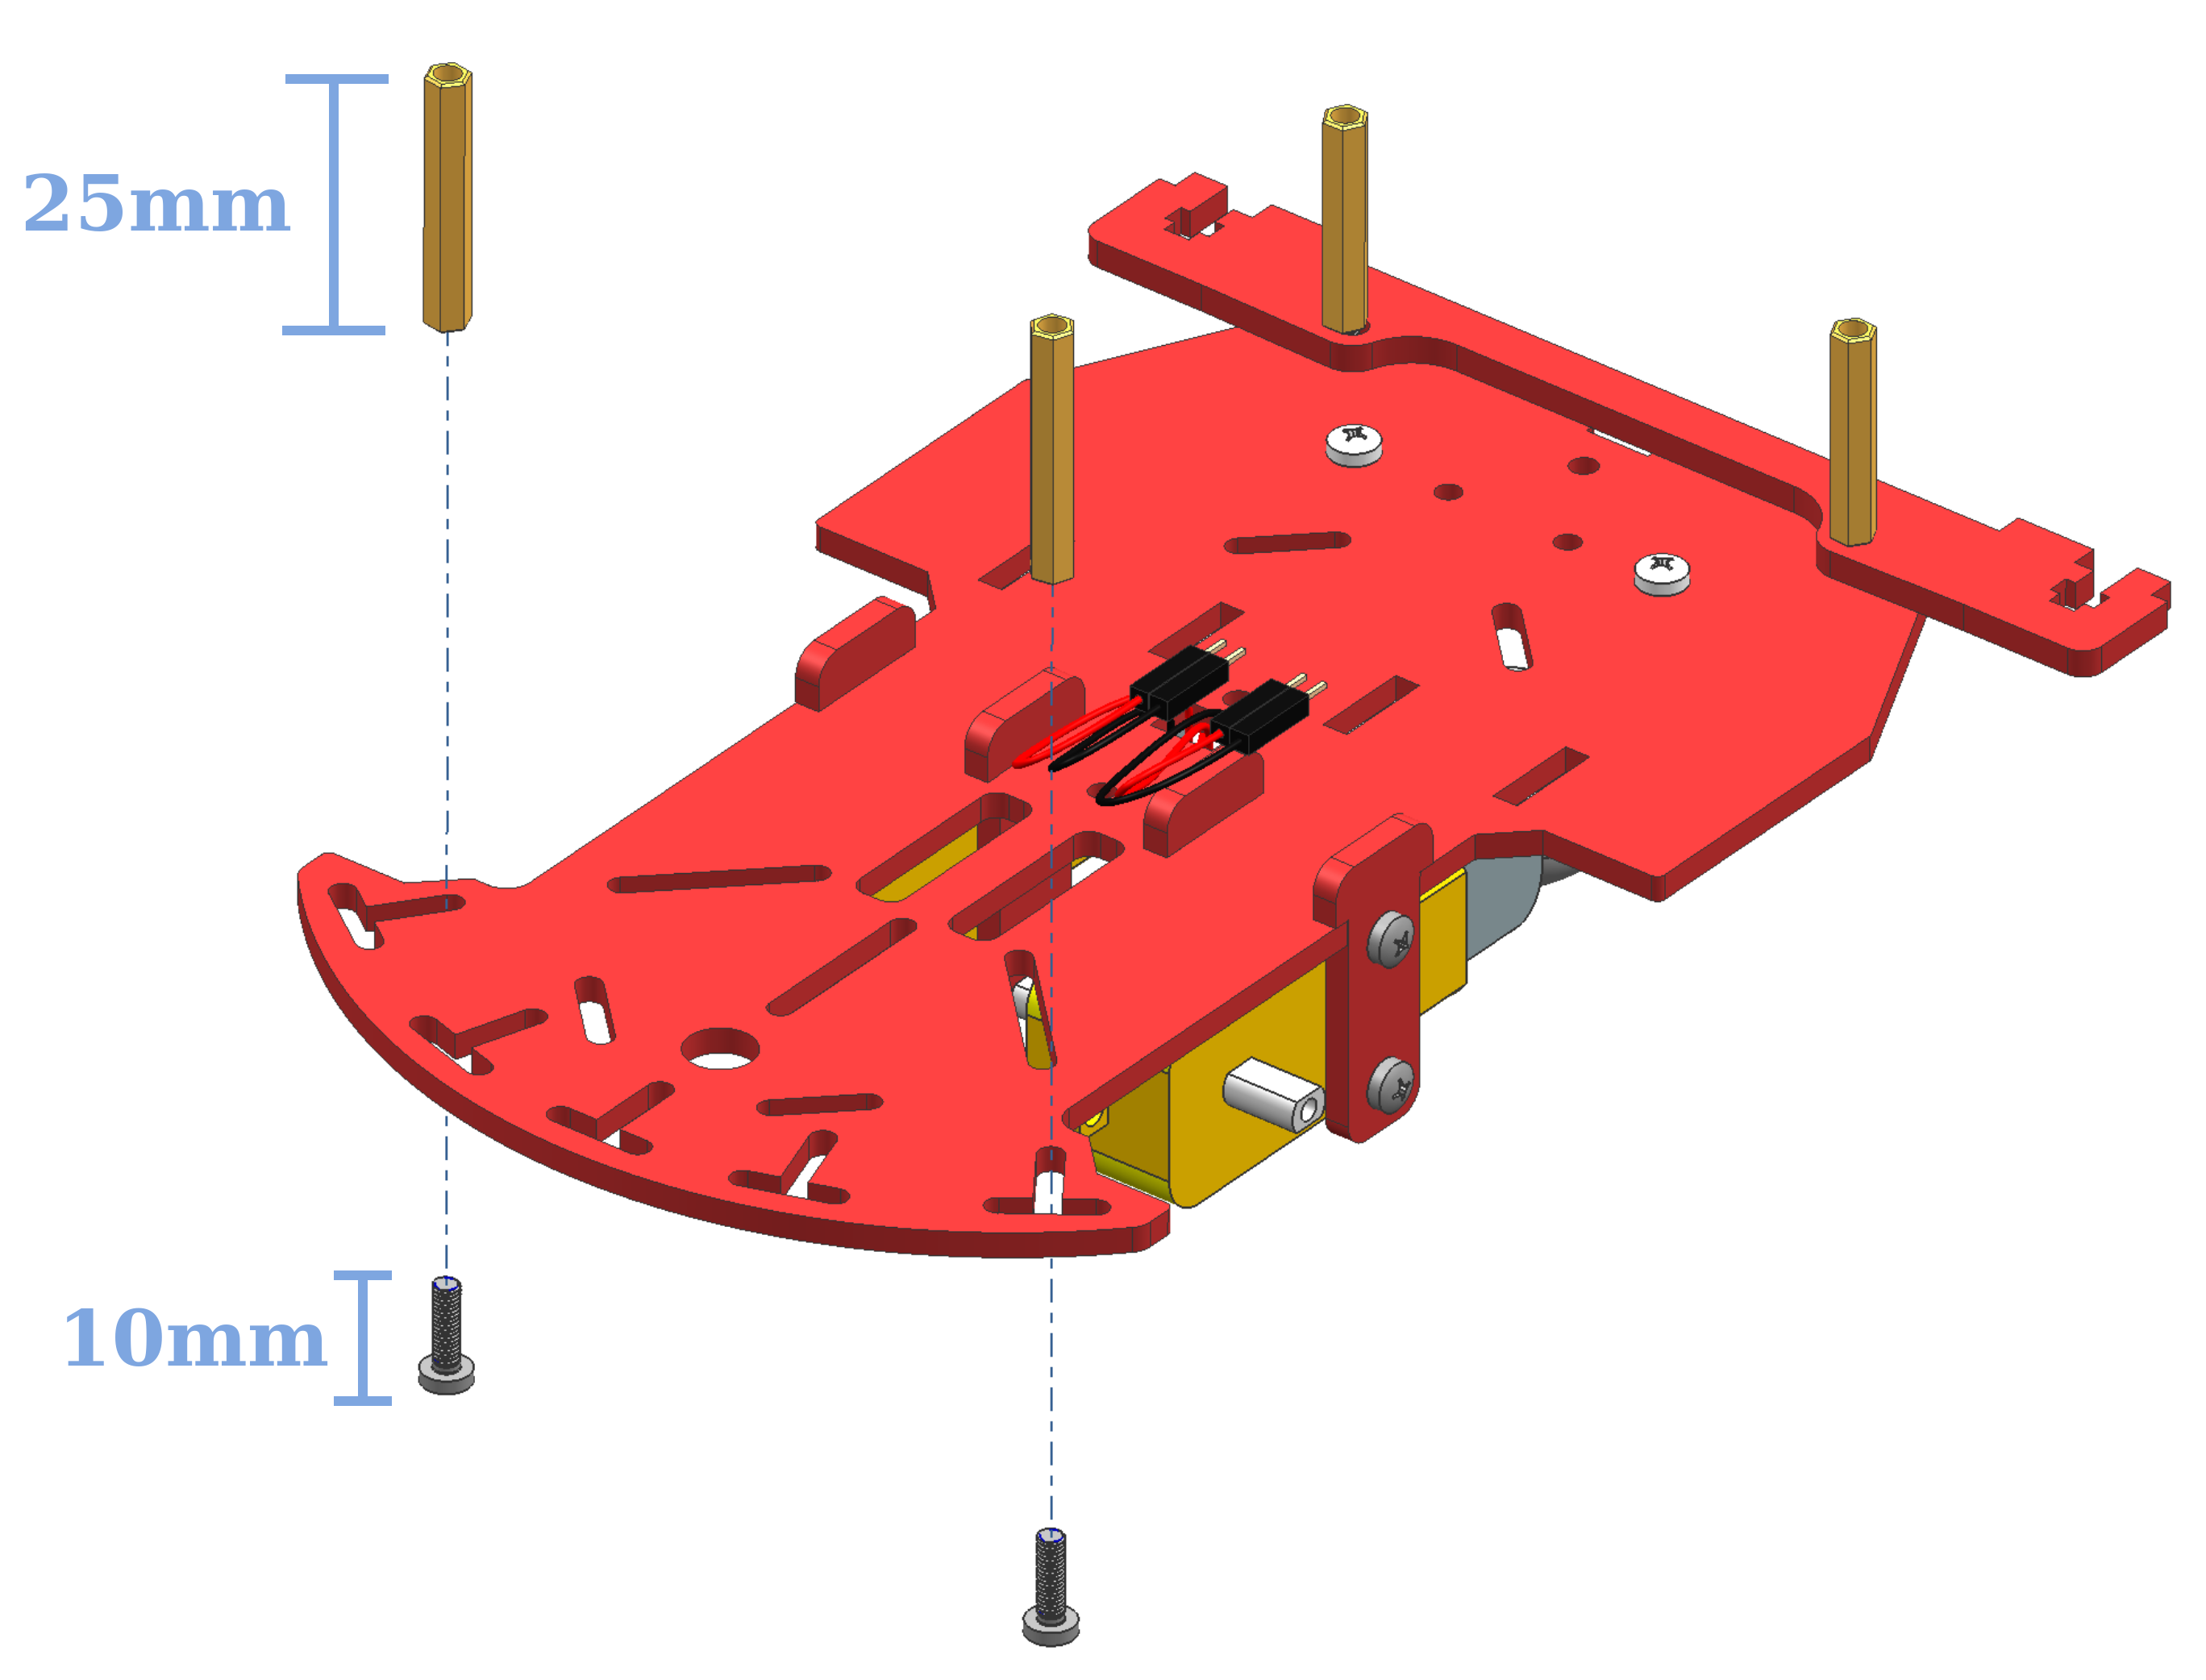
Now use the M3x30 standoffs (longer ones) for the front of the Duckiebot (Figure 16.11).
Step 8
✎Modified 2020-04-03 by Rafael Froehlich
From the Duckiebot kit take the following components:
- Wheels (2x)
Figure 16.12 shows how to mount the big yellow driving wheels to the bottom chassis.
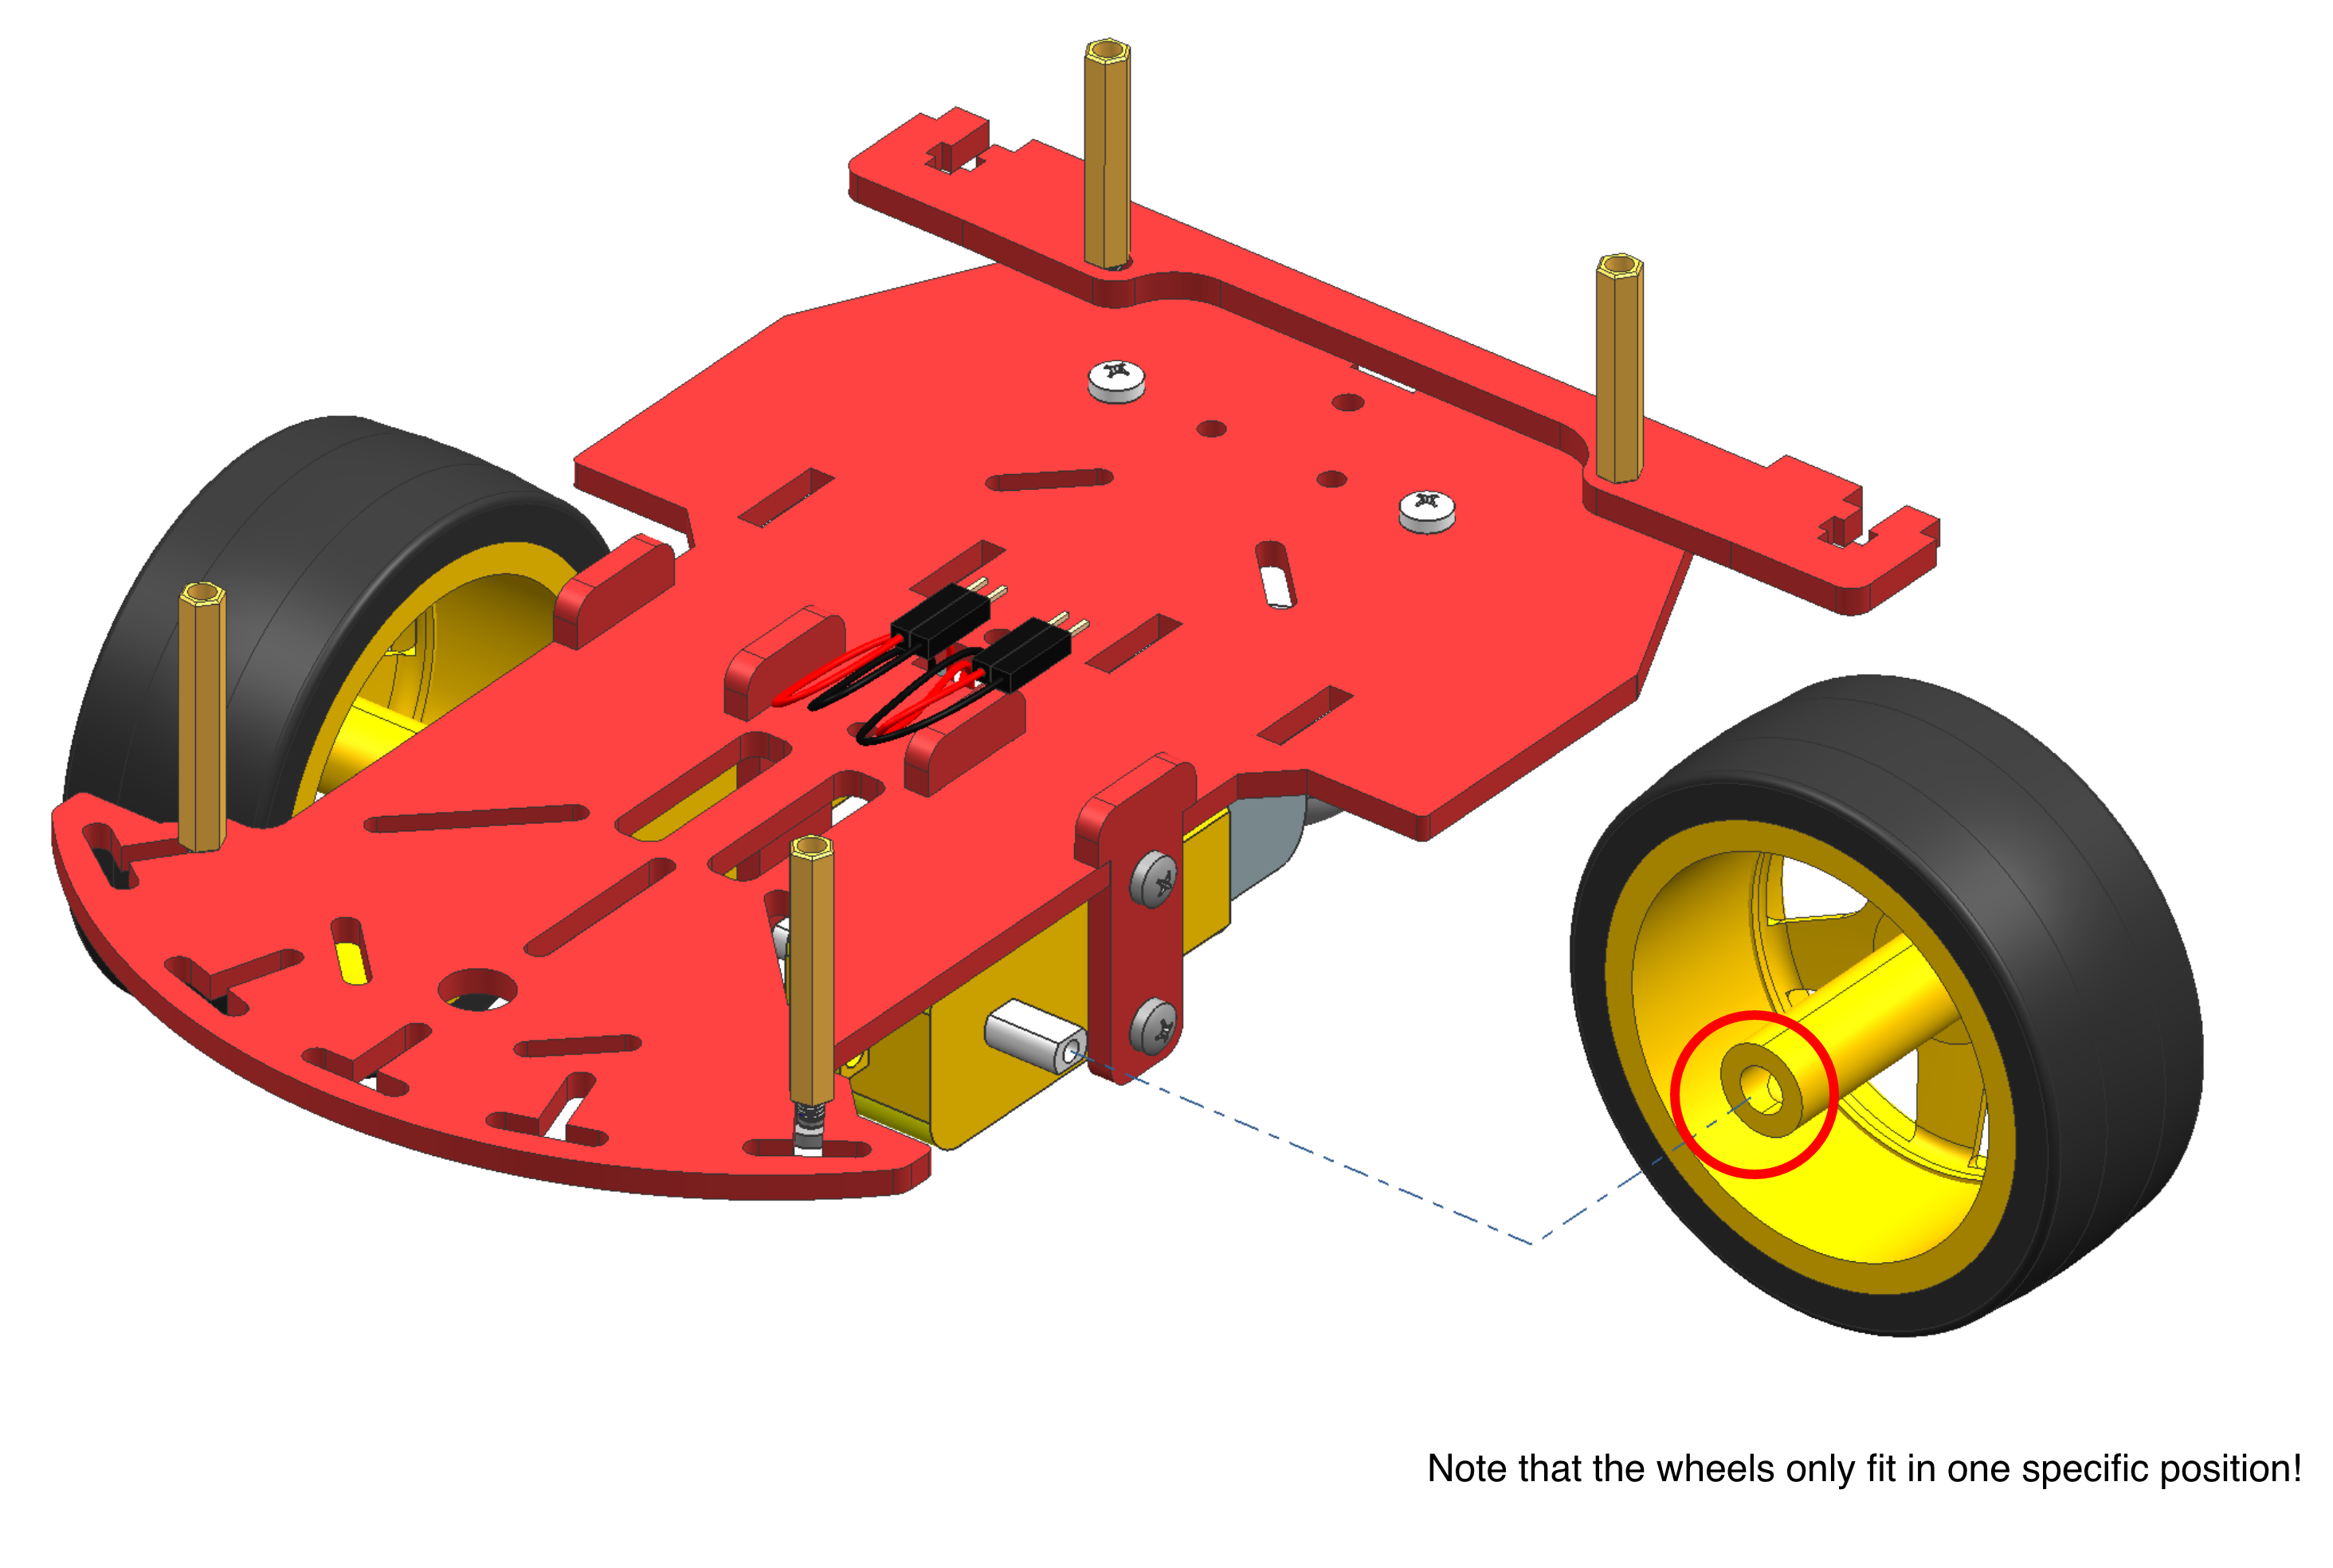
Mind that there is a particular orientation at which the wheels will fit. Don’t force them too much!
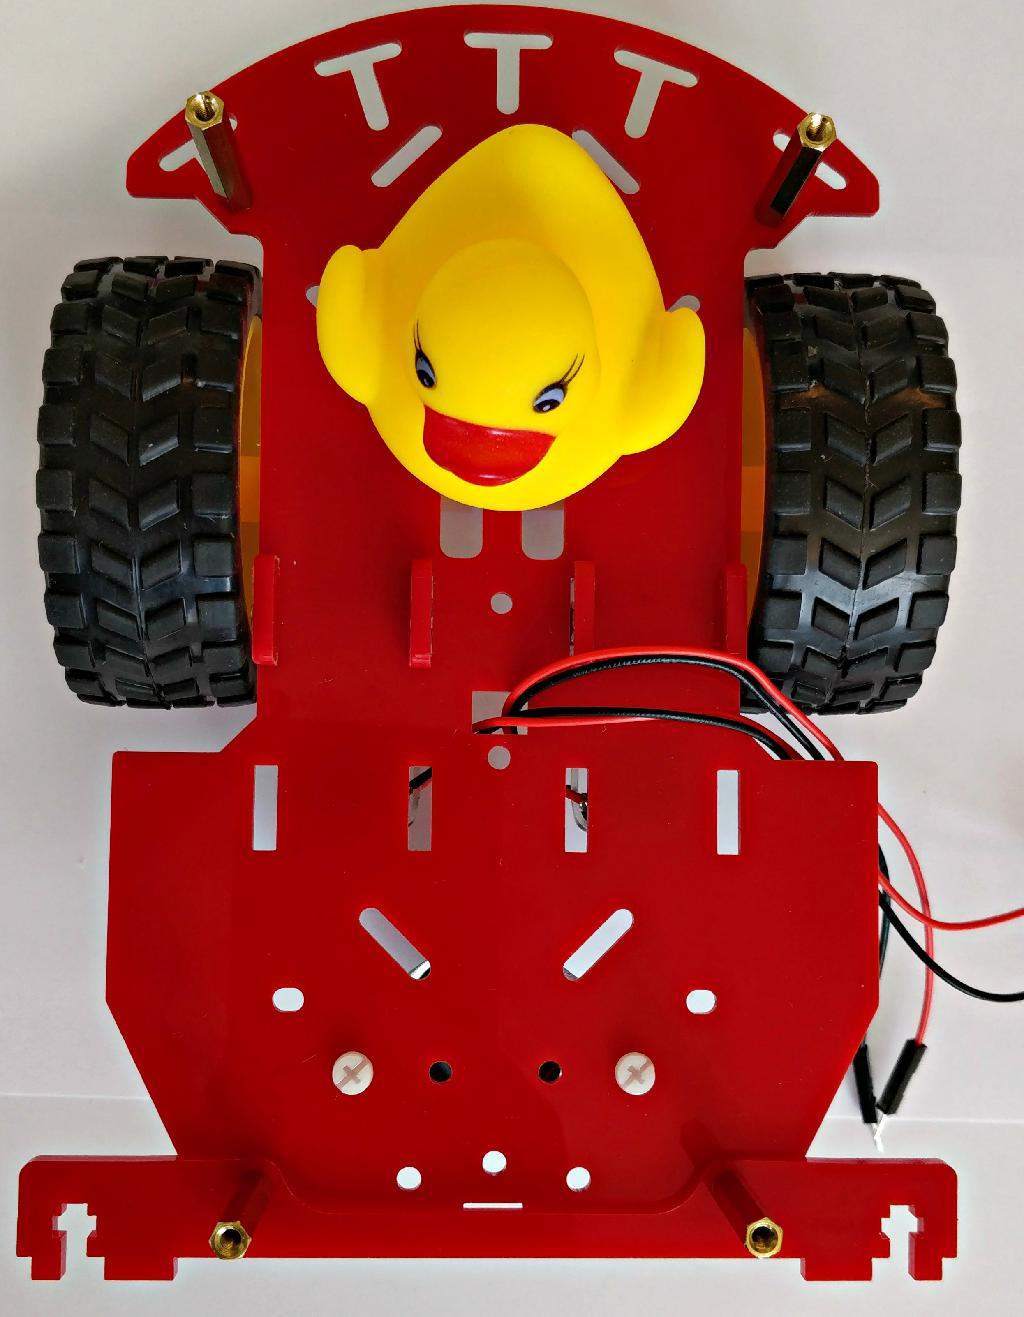
Figure 16.13 shows how the assembly should look like after mounting the wheels.
Computation unit
✎Modified 2020-04-03 by Rafael Froehlich
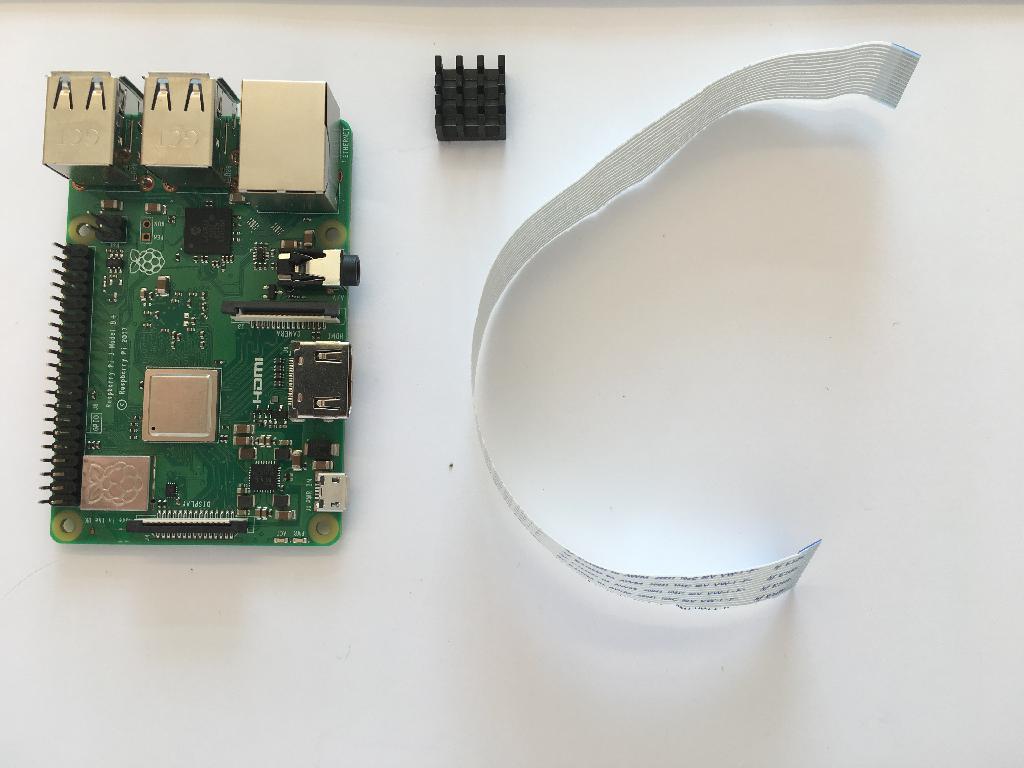
From the Duckiebot kit take the following components:
- Raspberry Pi 3B+ (1x)
- Heat sink (1x) (or 2x if there are two of them)
- Camera cable (1x) (This should be in the same box as the camera)
- Micro SD card (1x)
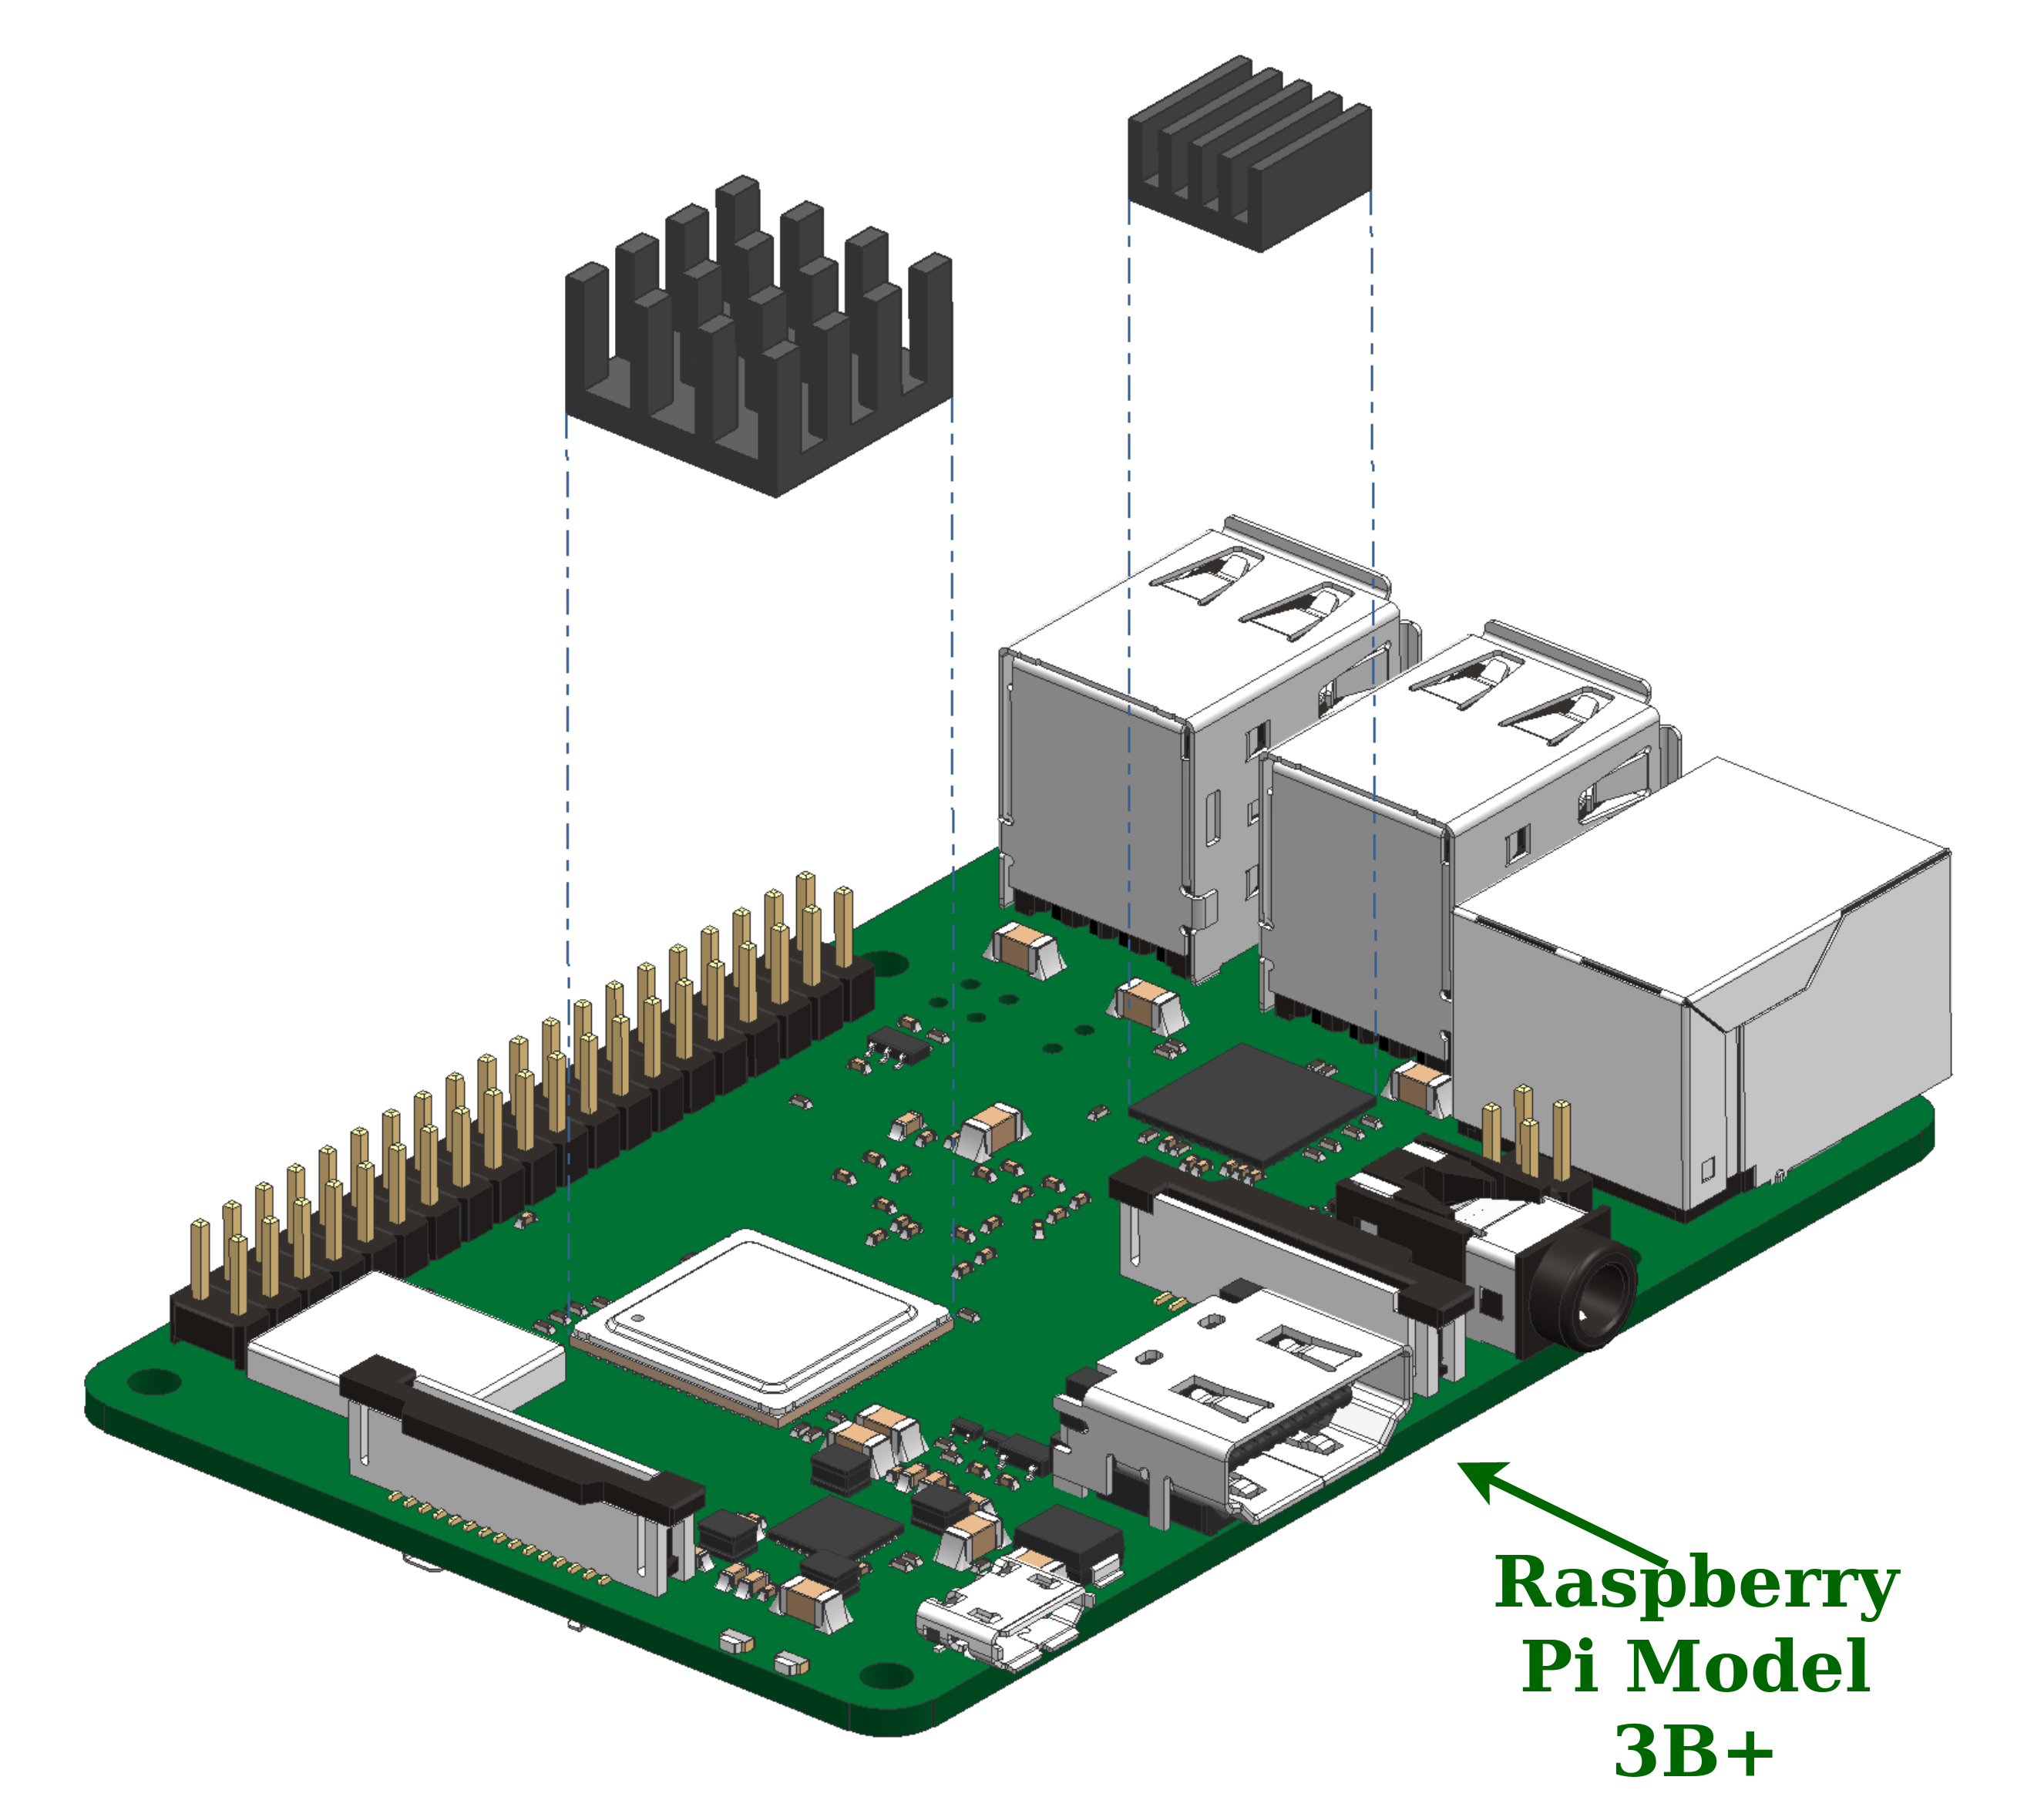
You probably have two heat sinks, make sure you use the bigger one for sure. The smaller one can be used as shown in the following pictures or apply it on the USB port you will later use for the external 32GB USB dongle.
You will notice there is a camera cable already attached to the camera. We won’t use this one since it is a bit short. You will find a longer camera cable inside the same box as the camera.
Figure 16.14 shows the components needed to complete the following steps.
Step 9
✎Modified 2020-03-07 by rafaelfroehlich
Peel the cover from the bottom of the heat sink and place it on the Raspberry Pi microchip, as shown in Figure 16.15. Make sure to put it on the
Step 10
✎Modified 2020-04-03 by Rafael Froehlich
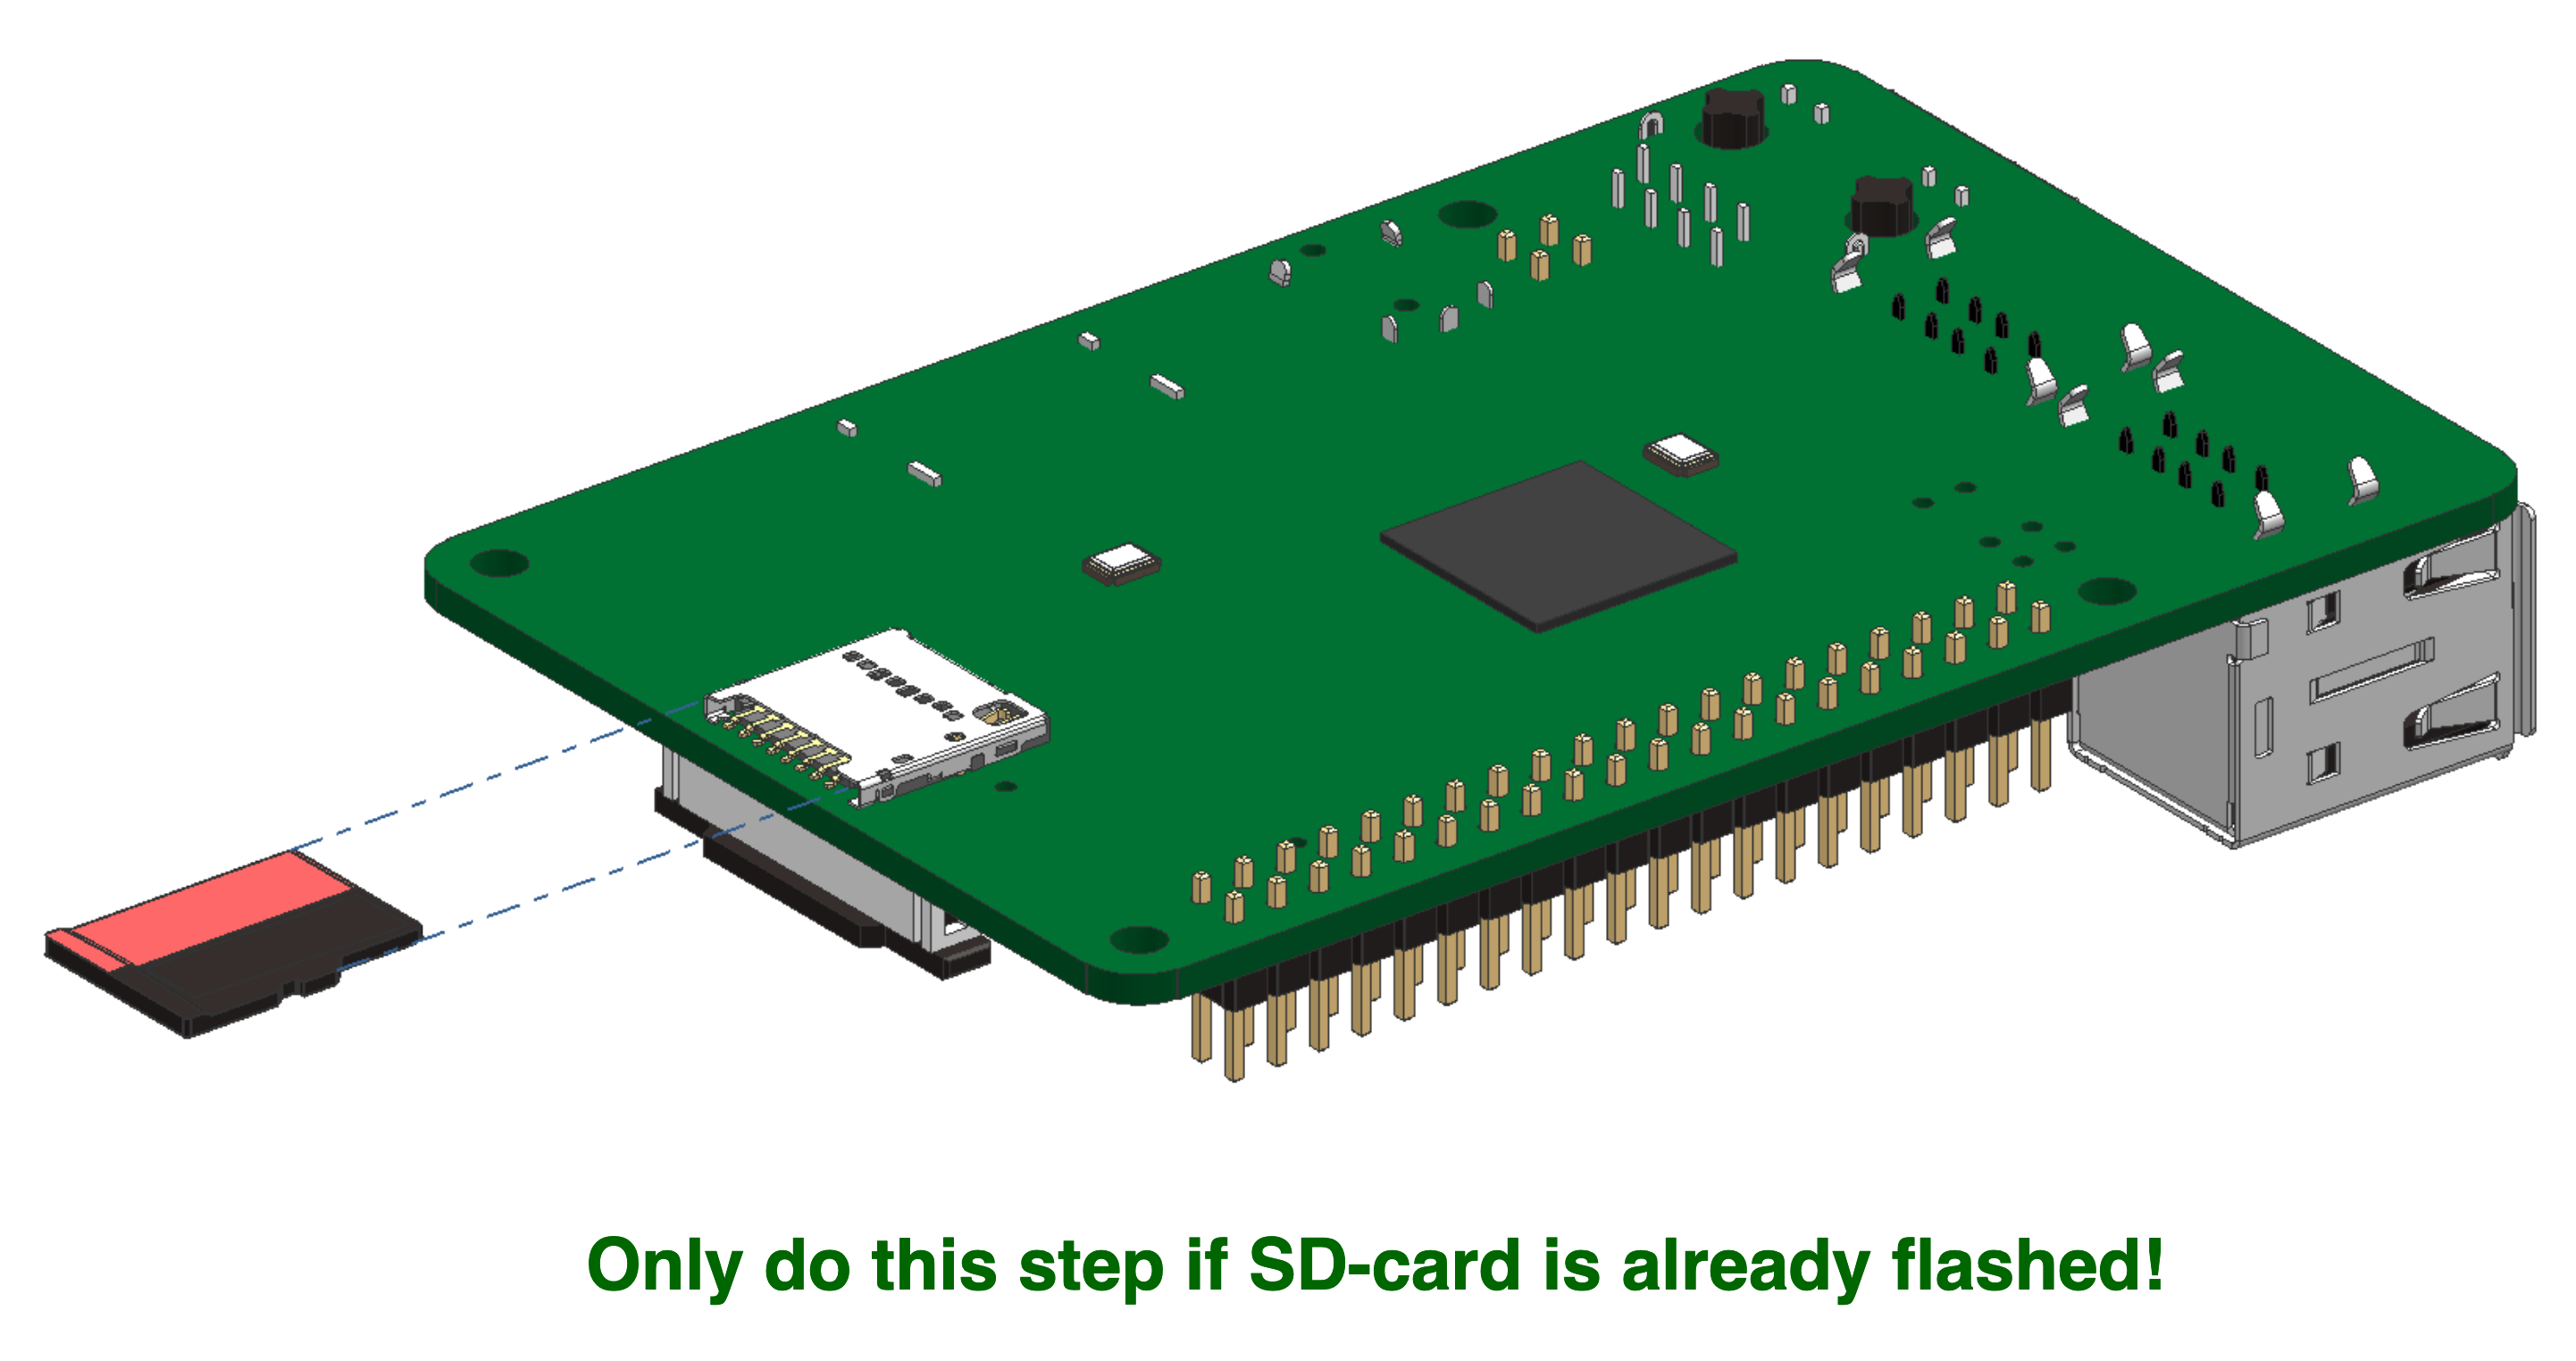
Insert the SD card in the slot as shown in figure Figure 16.16.
If the card is not flashed yet, do the initialization first: Unit C-3 - Setup - Duckiebot SD Card, but only until the section Section 3.2 - Burn the SD card, because you will need the fully assembled Duckiebot for the following steps of the Duckiebot Initialization.
Step 11
✎Modified 2020-03-07 by rafaelfroehlich
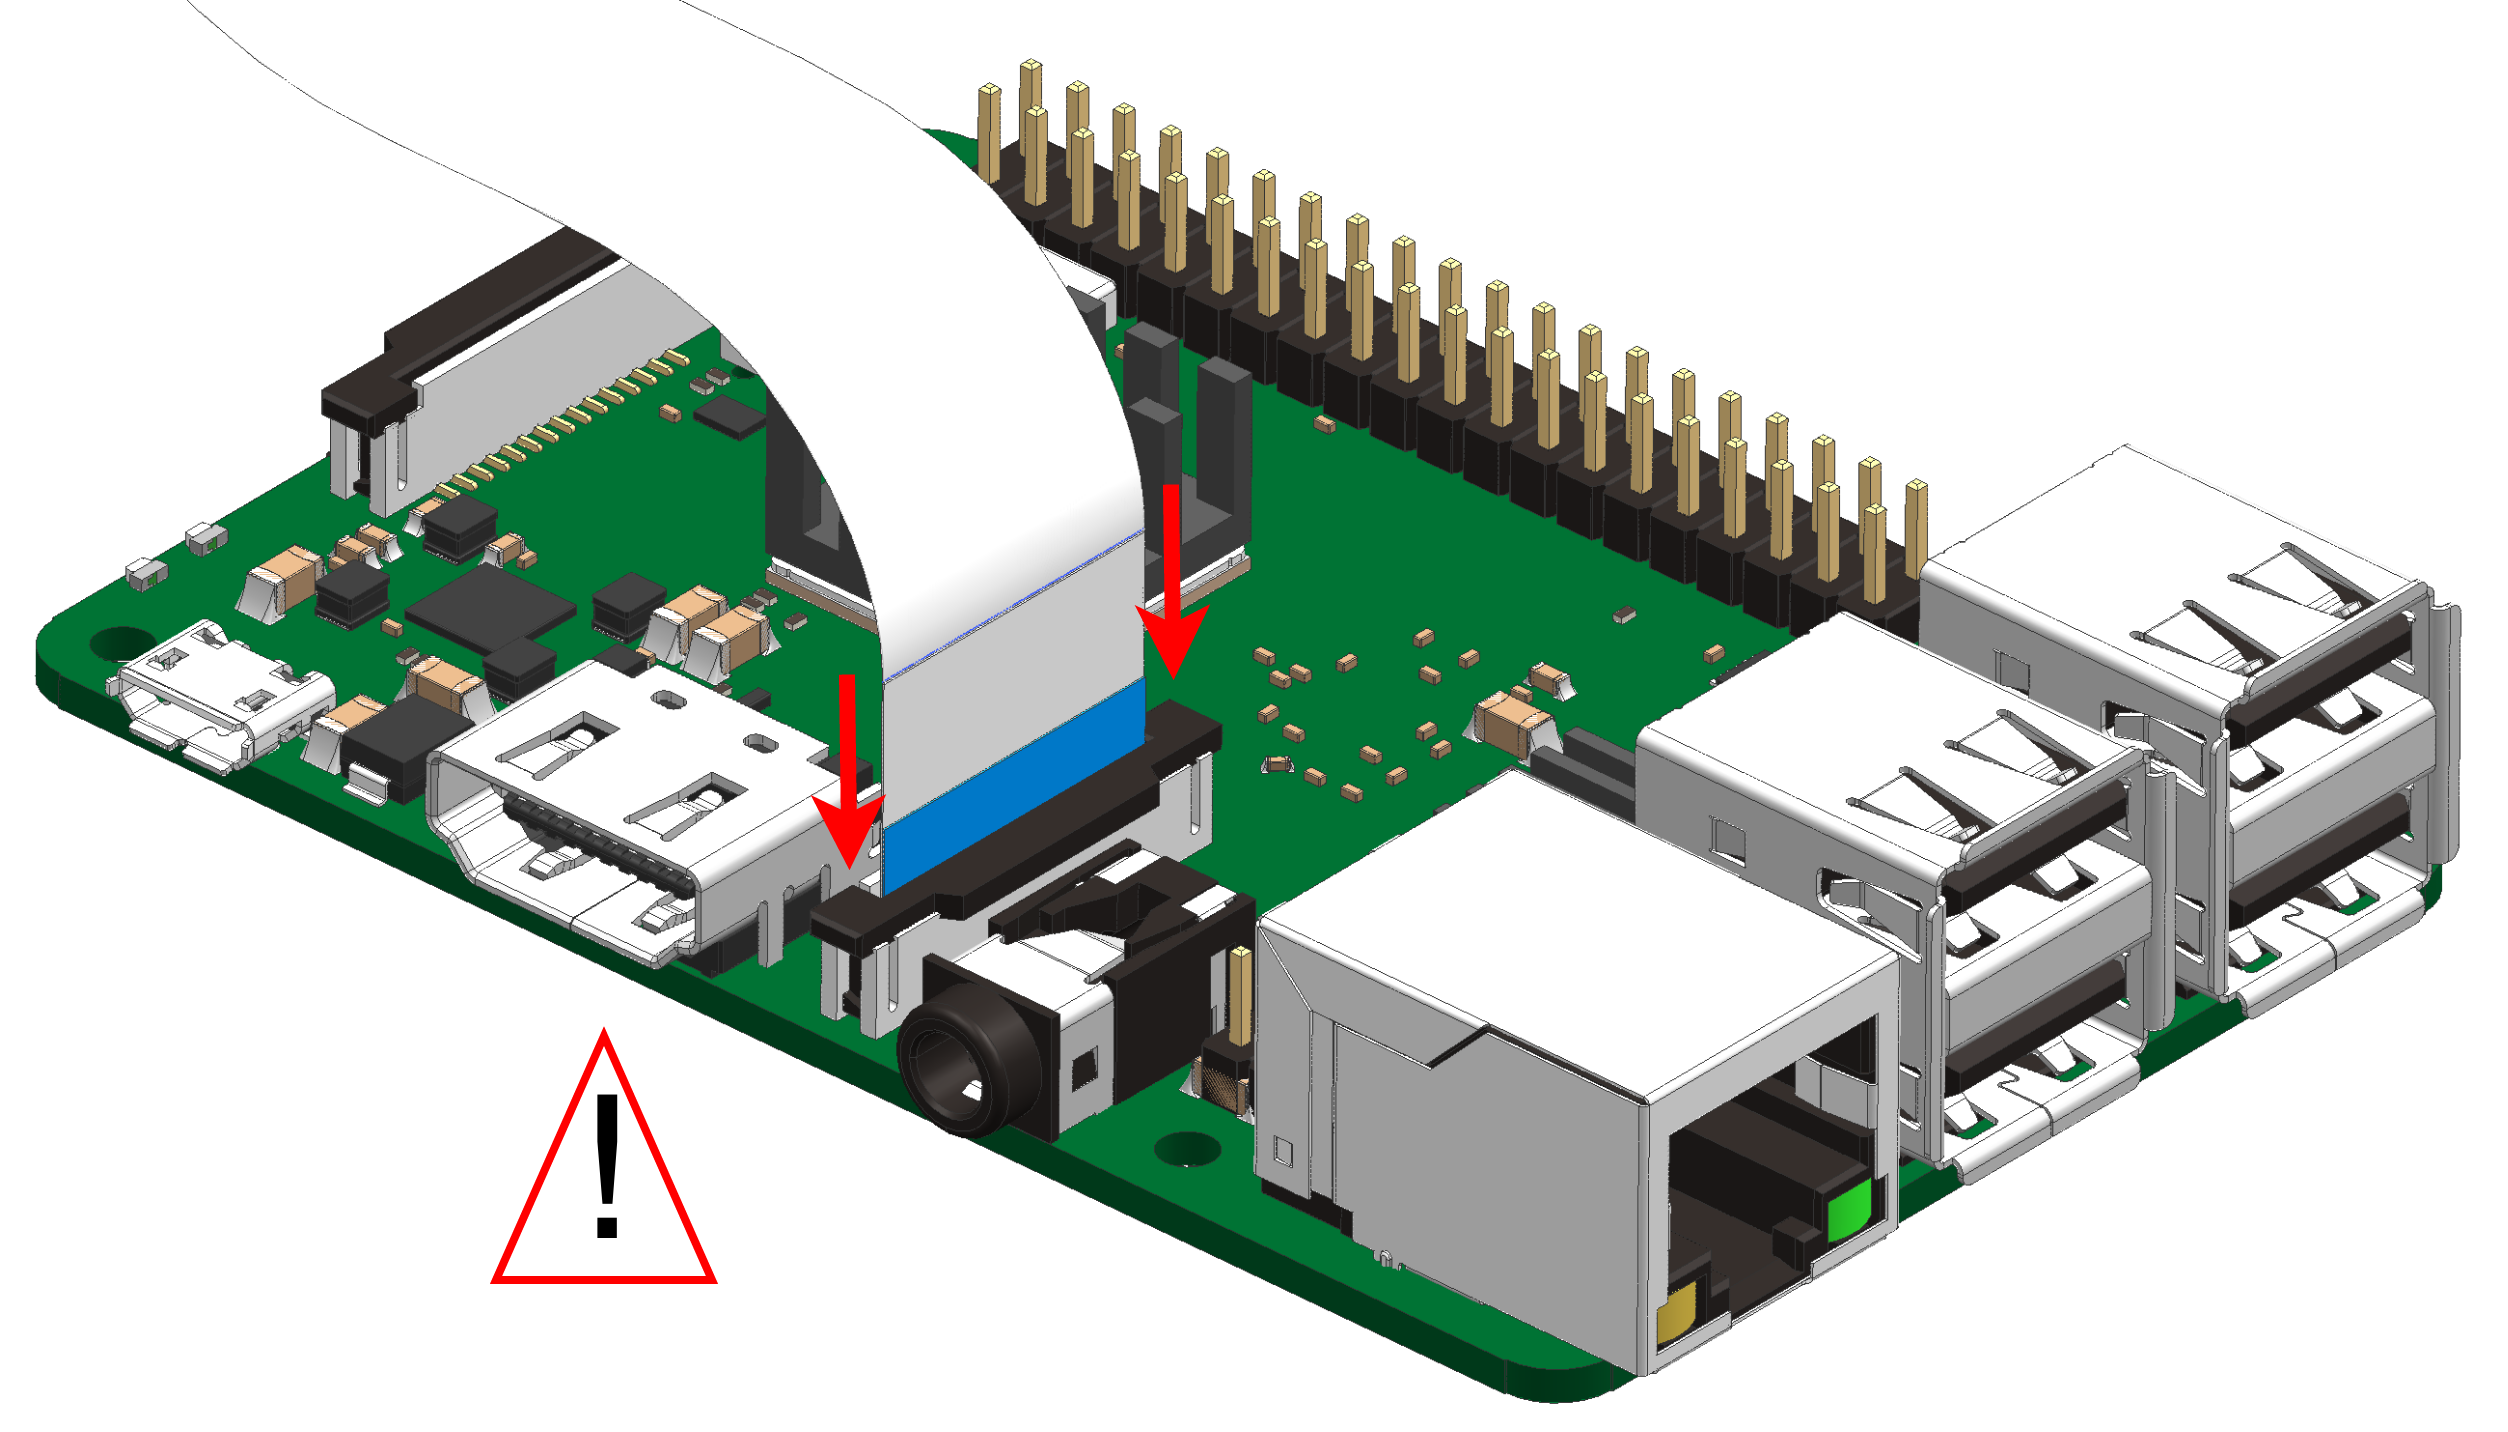
Make sure that the visible metal connectors of the camera cable match the ones in the Raspberry Pi (Figure 16.17), then plug in the cable and push down the black wings to fasten the connection, making sure it “clicks”.
Please be aware that different camera cables have the text on different sides and with different orientation, do not use it as a landmark.
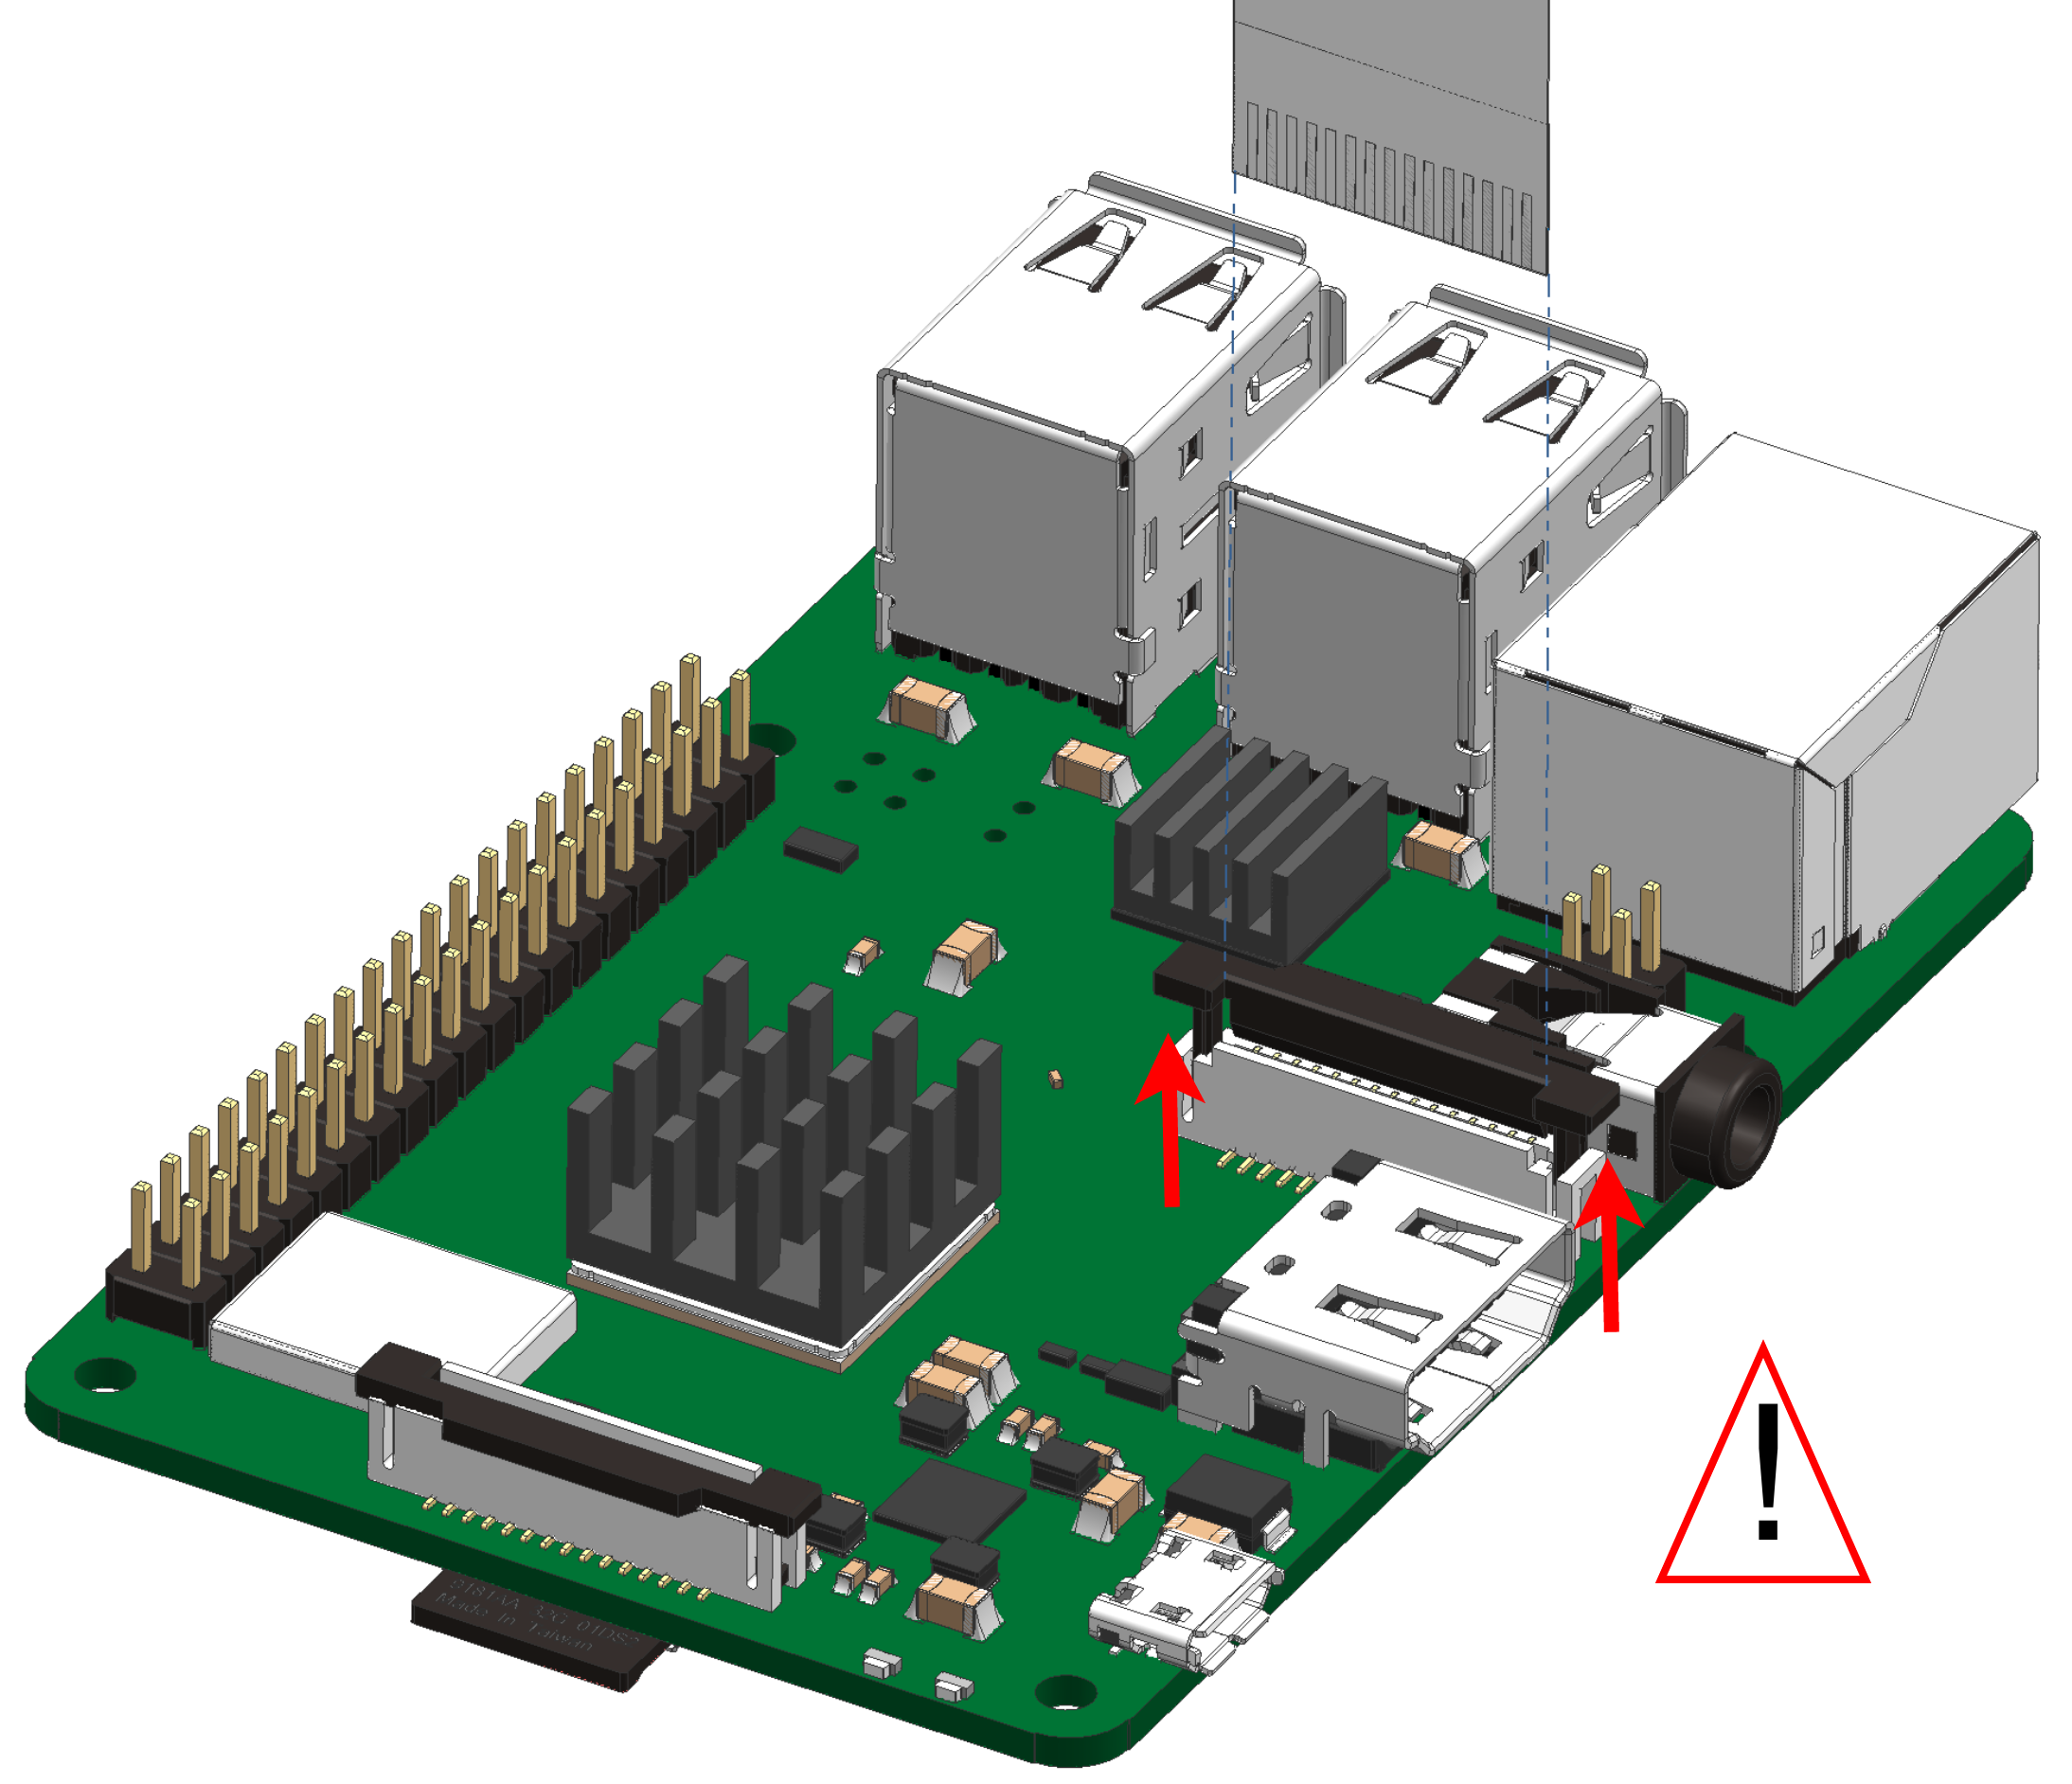
Then close the camera plug once the cable is pushed in properly. You can check by pulling at the cable once you have closed the plug and you mustn’t be able to tear it out at all.
Step 12
✎Modified 2020-04-03 by Rafael Froehlich
From the Duckiebot kit take the following components:
- Duckiebot Hut (1x)
- Top plate of the chassis (1x)
- M2.5x12 nylon spacers (4x)
- M2.5x10 Nylon screws (4x)
- M2.5x4 Nylon spacers (4x)
- M2.5 nylon nuts (4x)
- USB to micro USB cables (2x)
- Set of three female to female(F/F) jumper wires (1x)
Figure 16.19 shows the components needed to complete this part of the tutorial.
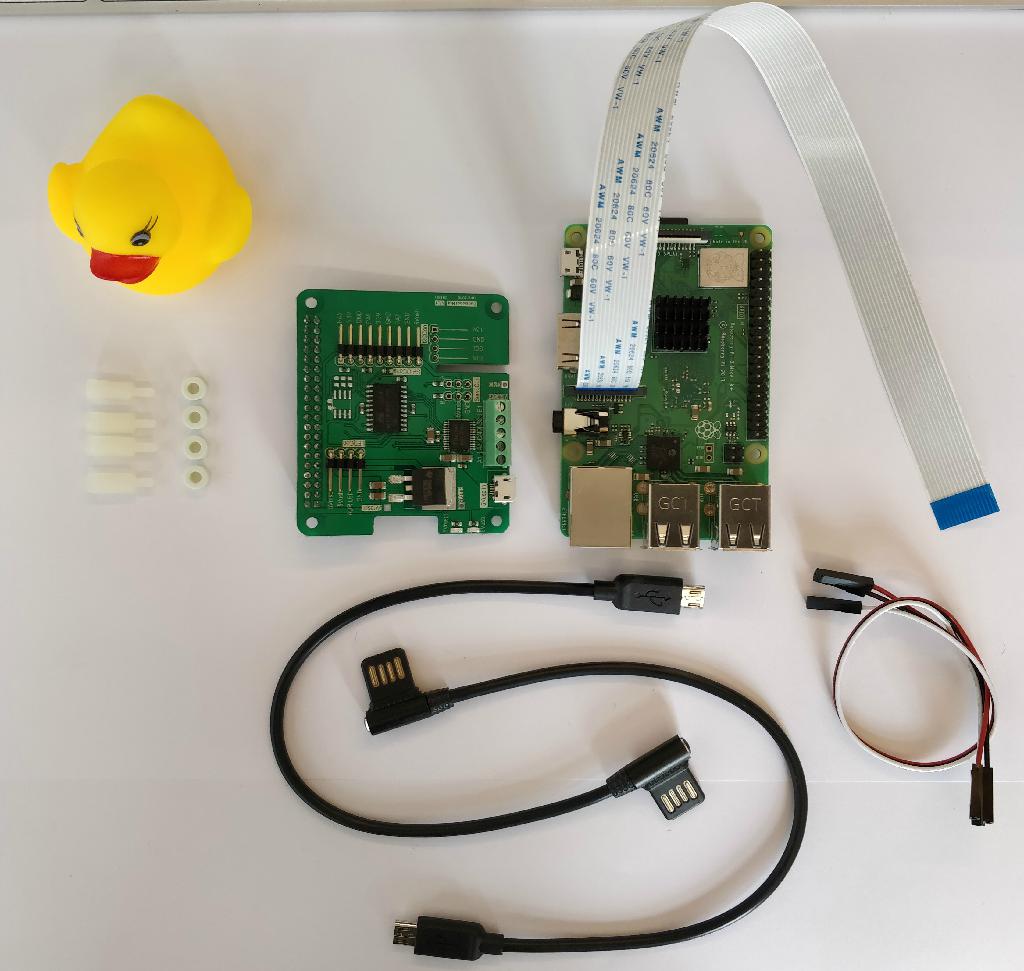
In the newest version of the Hut, the pins are removed. This is to prevent them from being shorted. You will not need them so you can neglect them in the next few pictures.
It is more convenient to not separate the jumper cables, but leave them in two sets of three.
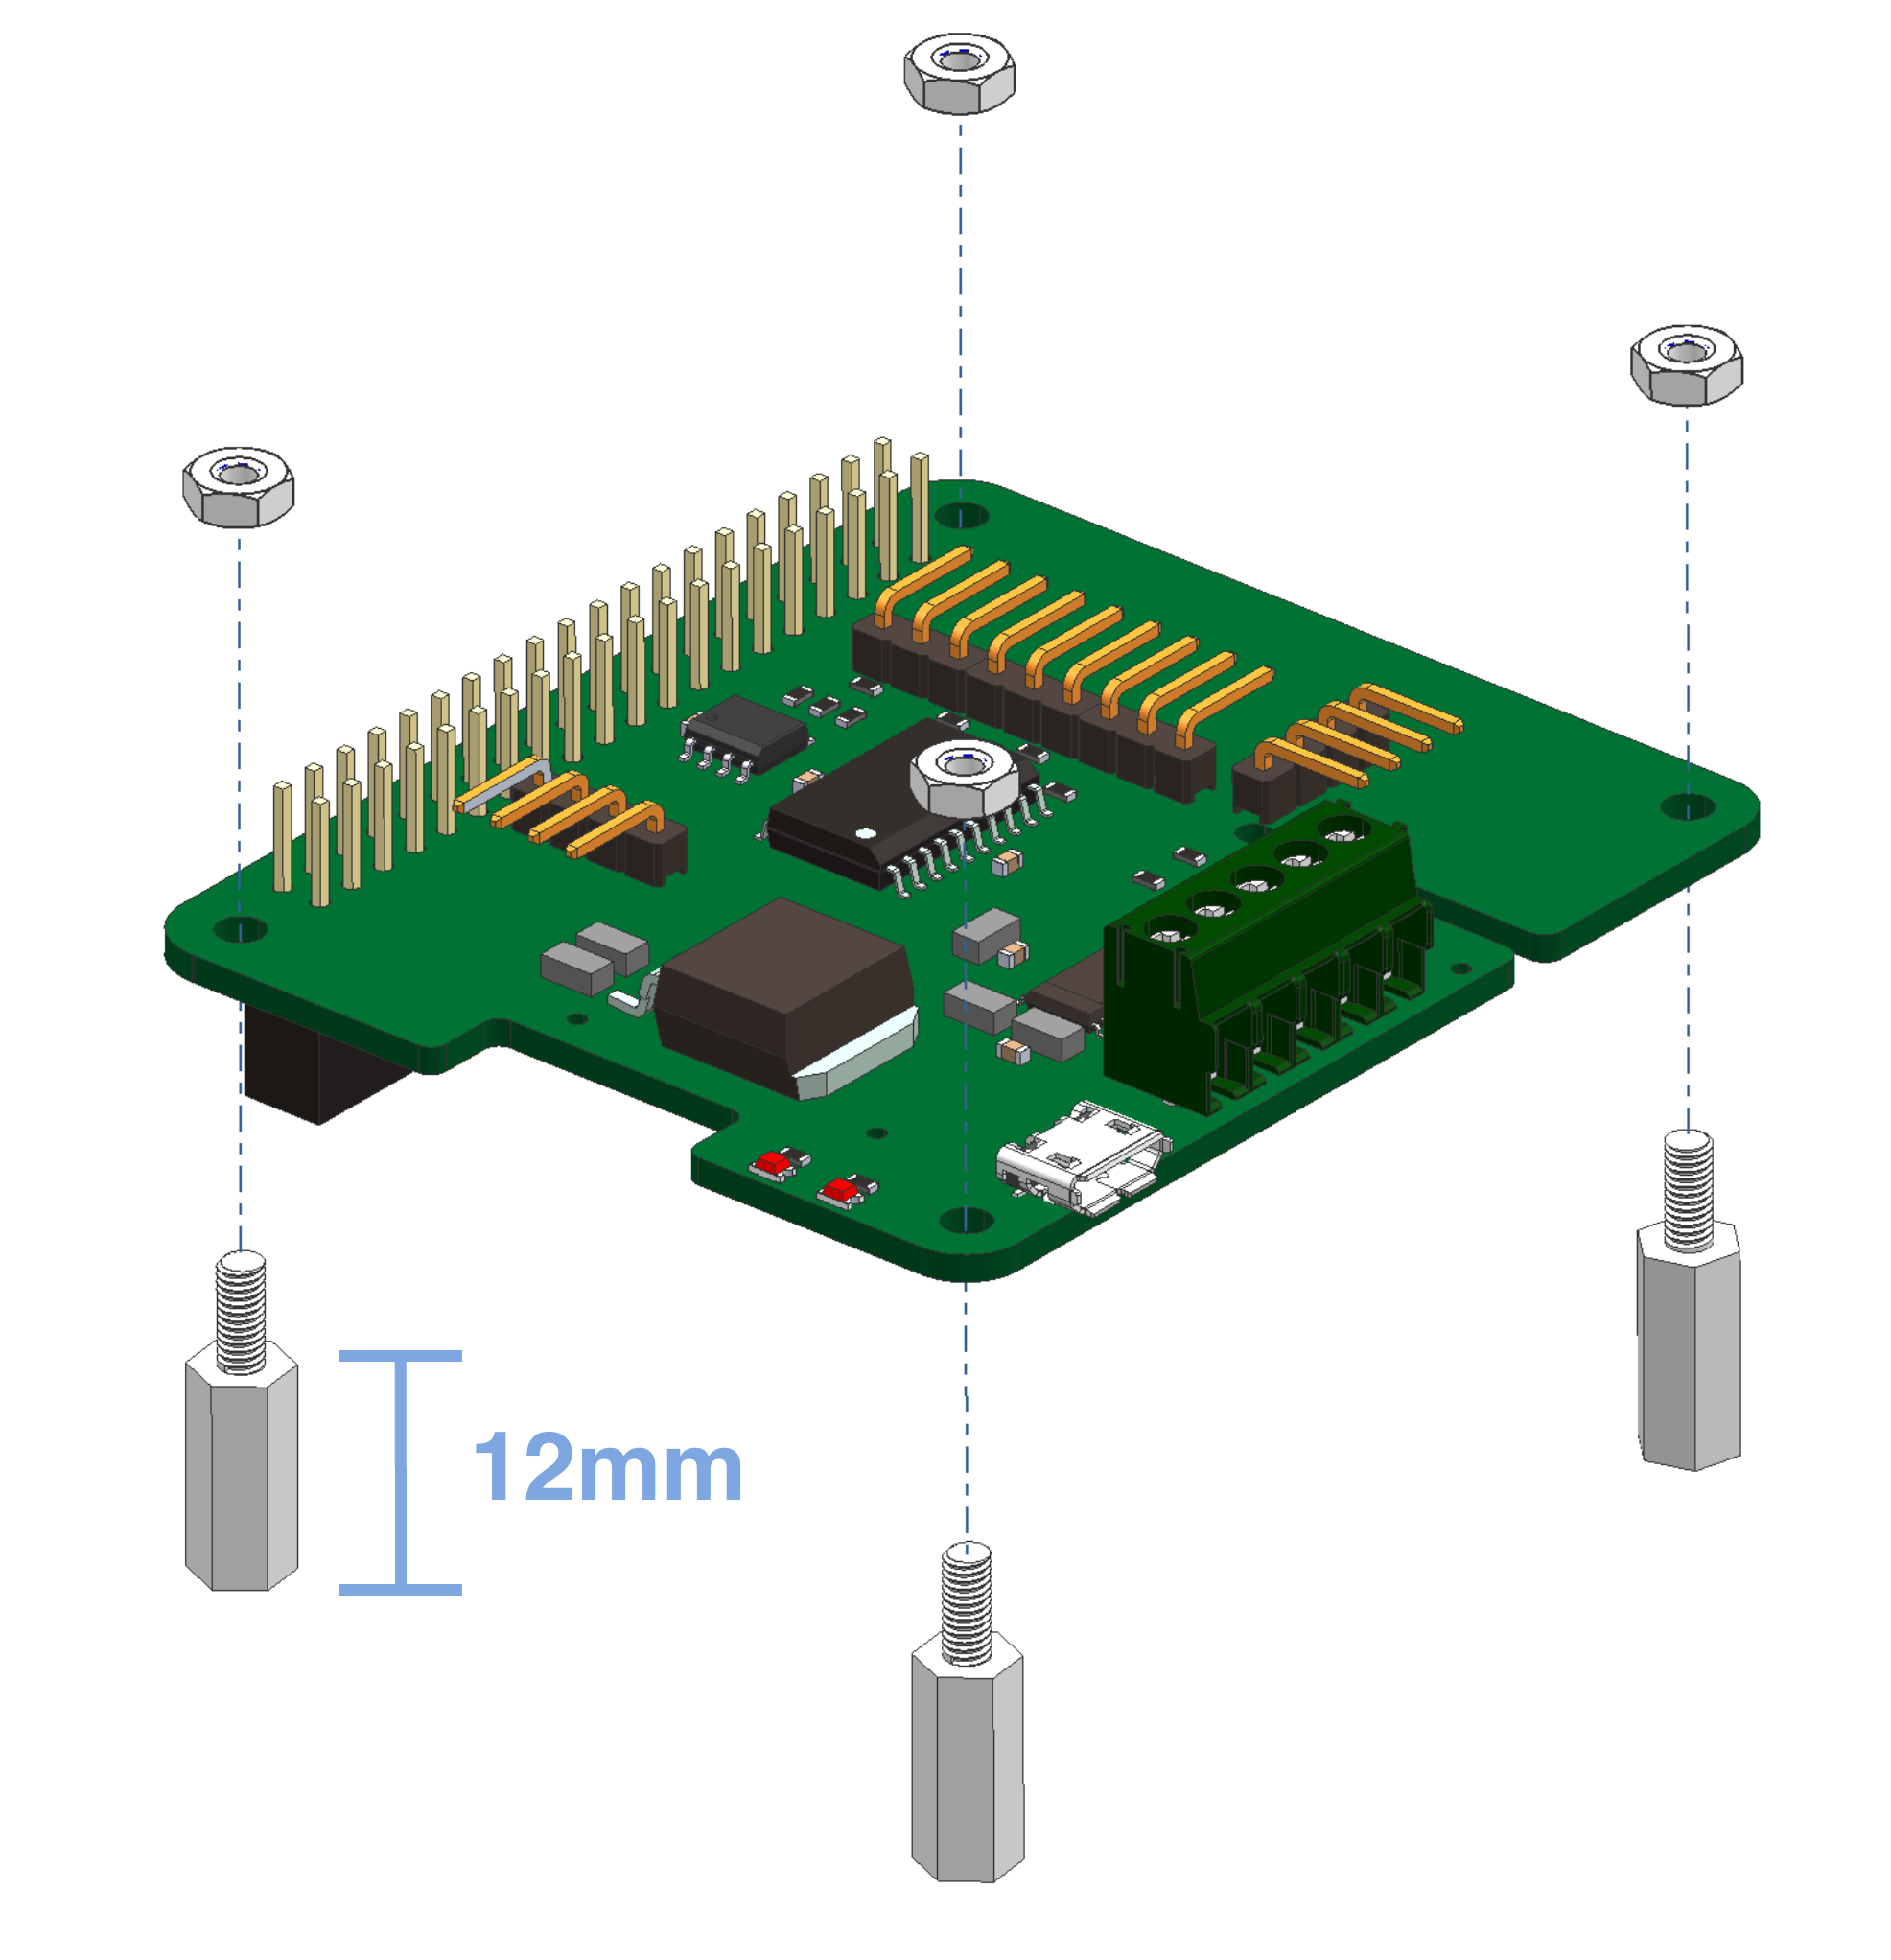
Place the spacers on the bottom part of the Duckiebot hut and secure them using the M2.5 nylon nuts, see figure Figure 16.20
Step 13
✎Modified 2020-03-07 by rafaelfroehlich
Mount the pre-assembled Hut and Raspberry Pi to the top plate with nylon screws as shown in figure Figure 16.21
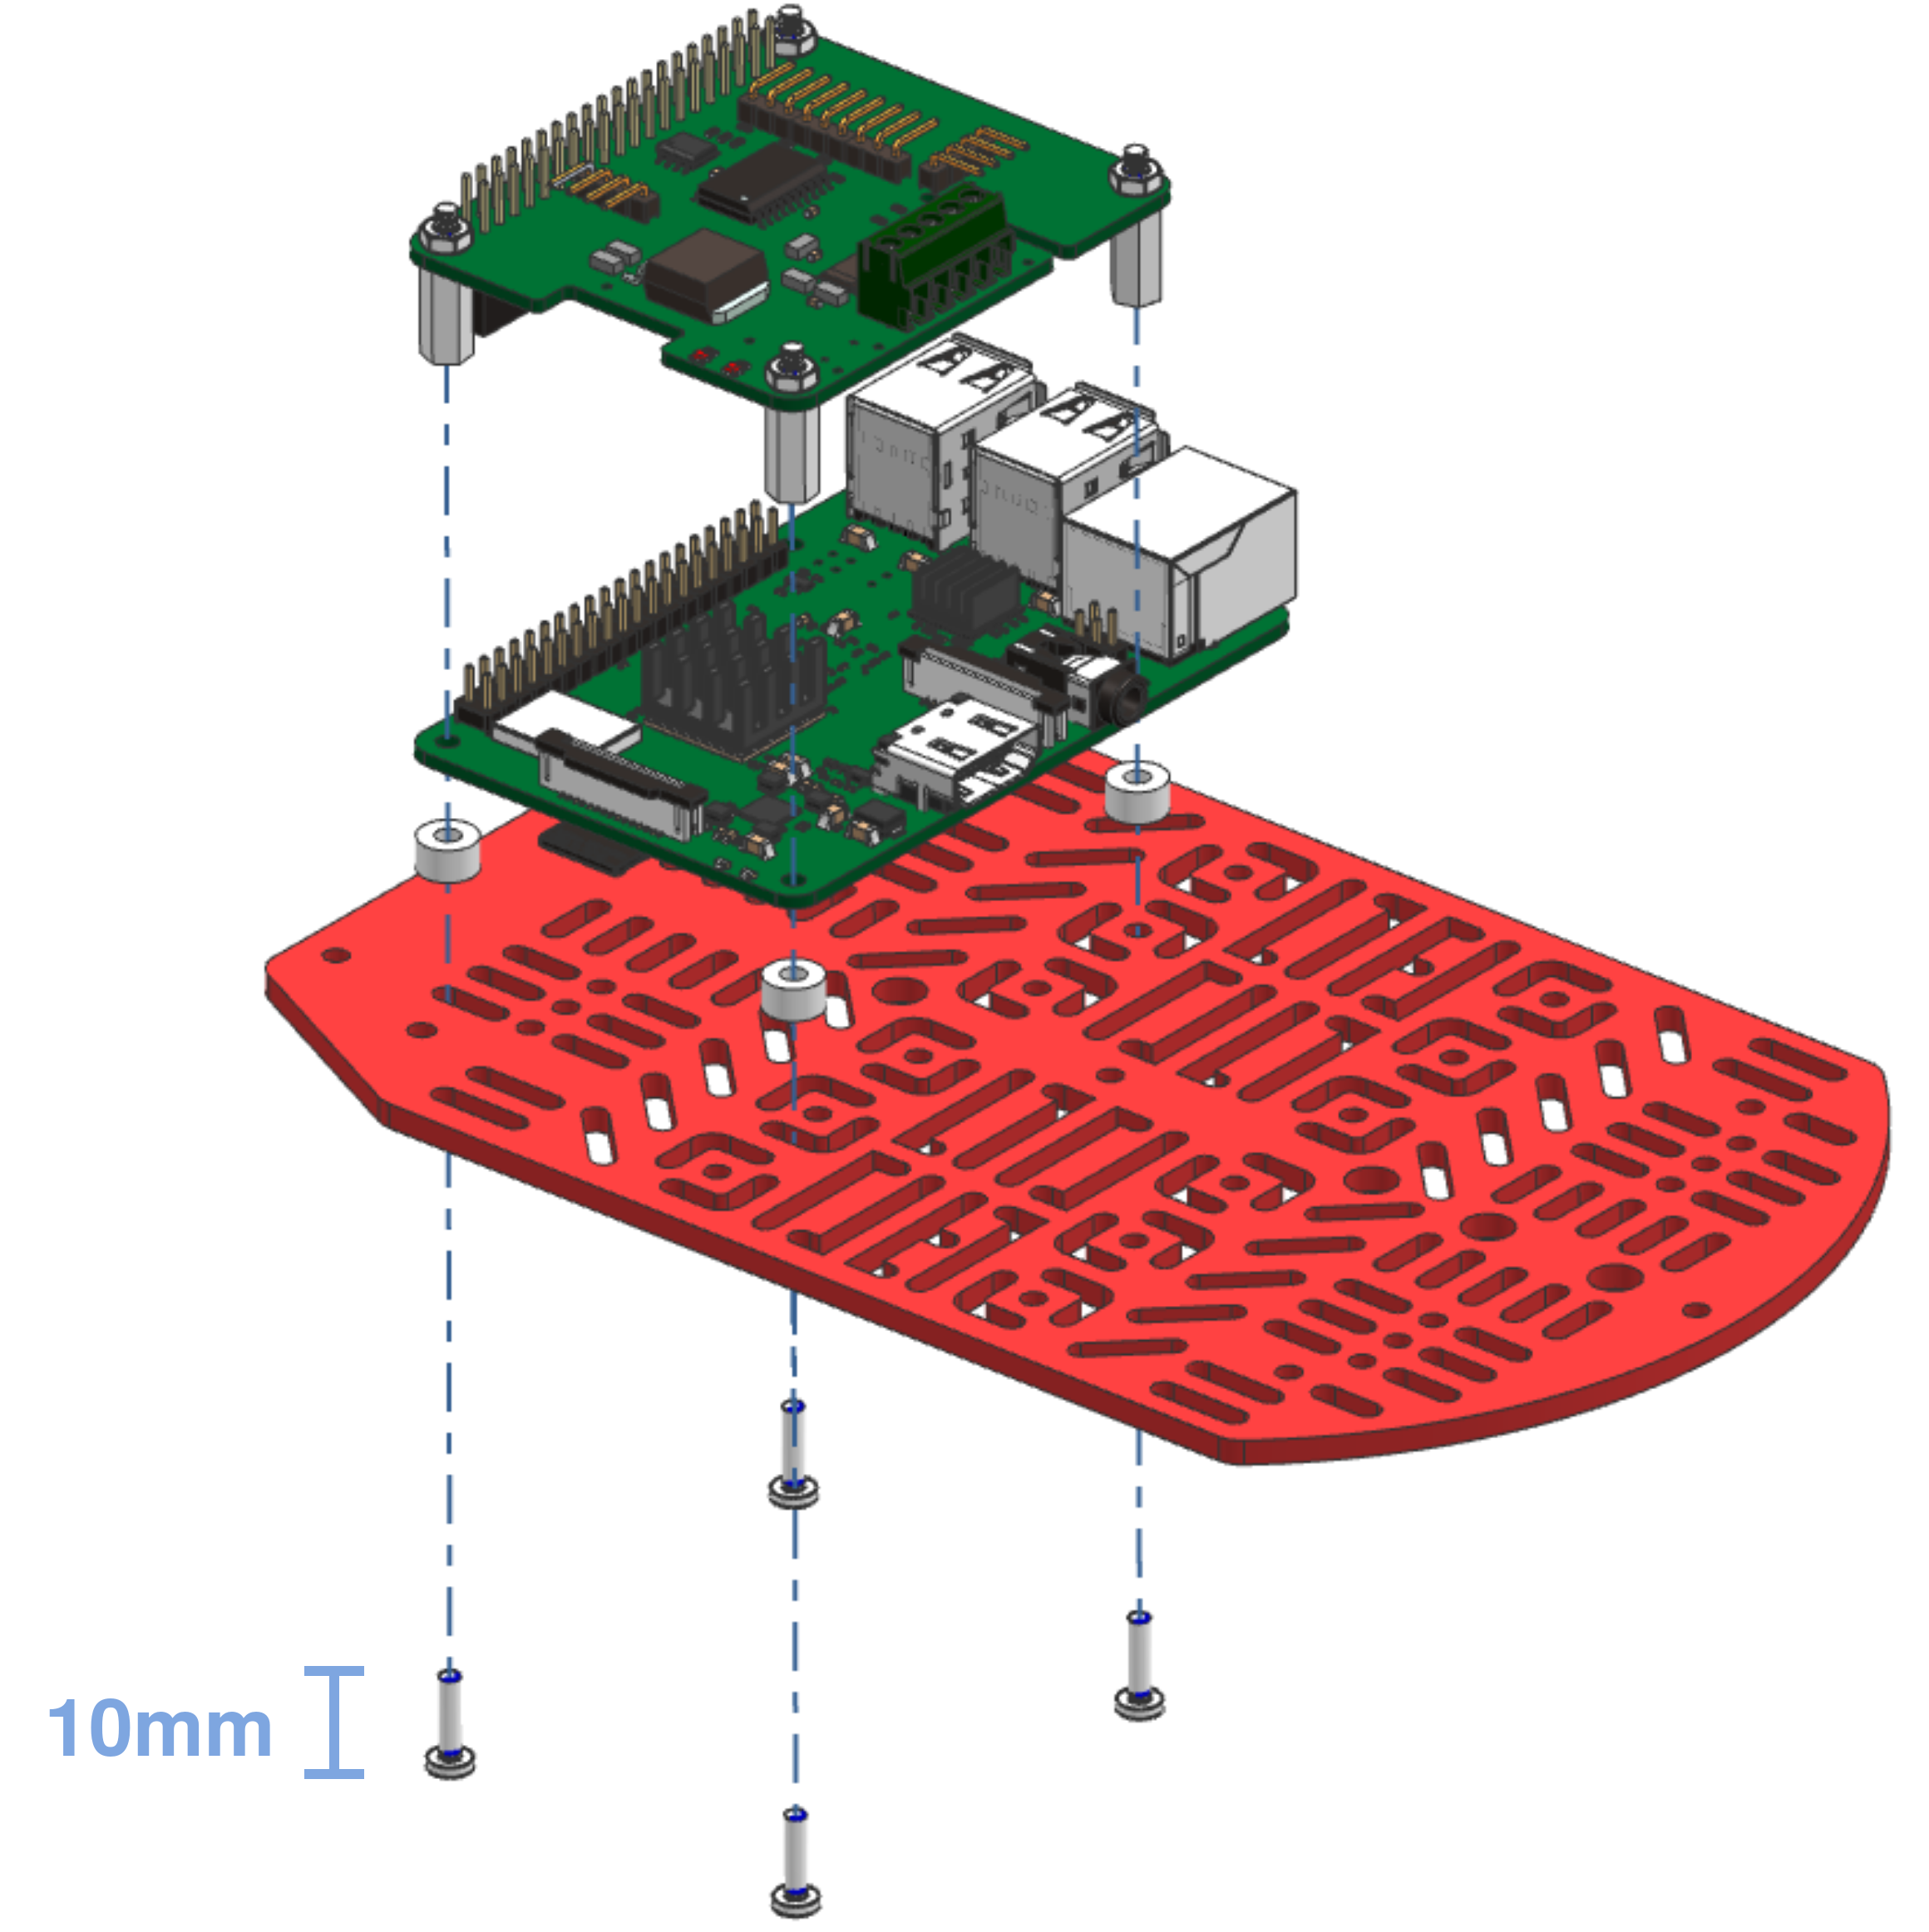
Make sure that the Raspberry Pi GPIO pins fit into the Hut connector.
Step 14
✎Modified 2020-03-07 by rafaelfroehlich
Connect the F/F jumper wire to the pins on the Hut as shown in figure Figure 16.22 and make sure the camera cable is put in the slit of the Hut
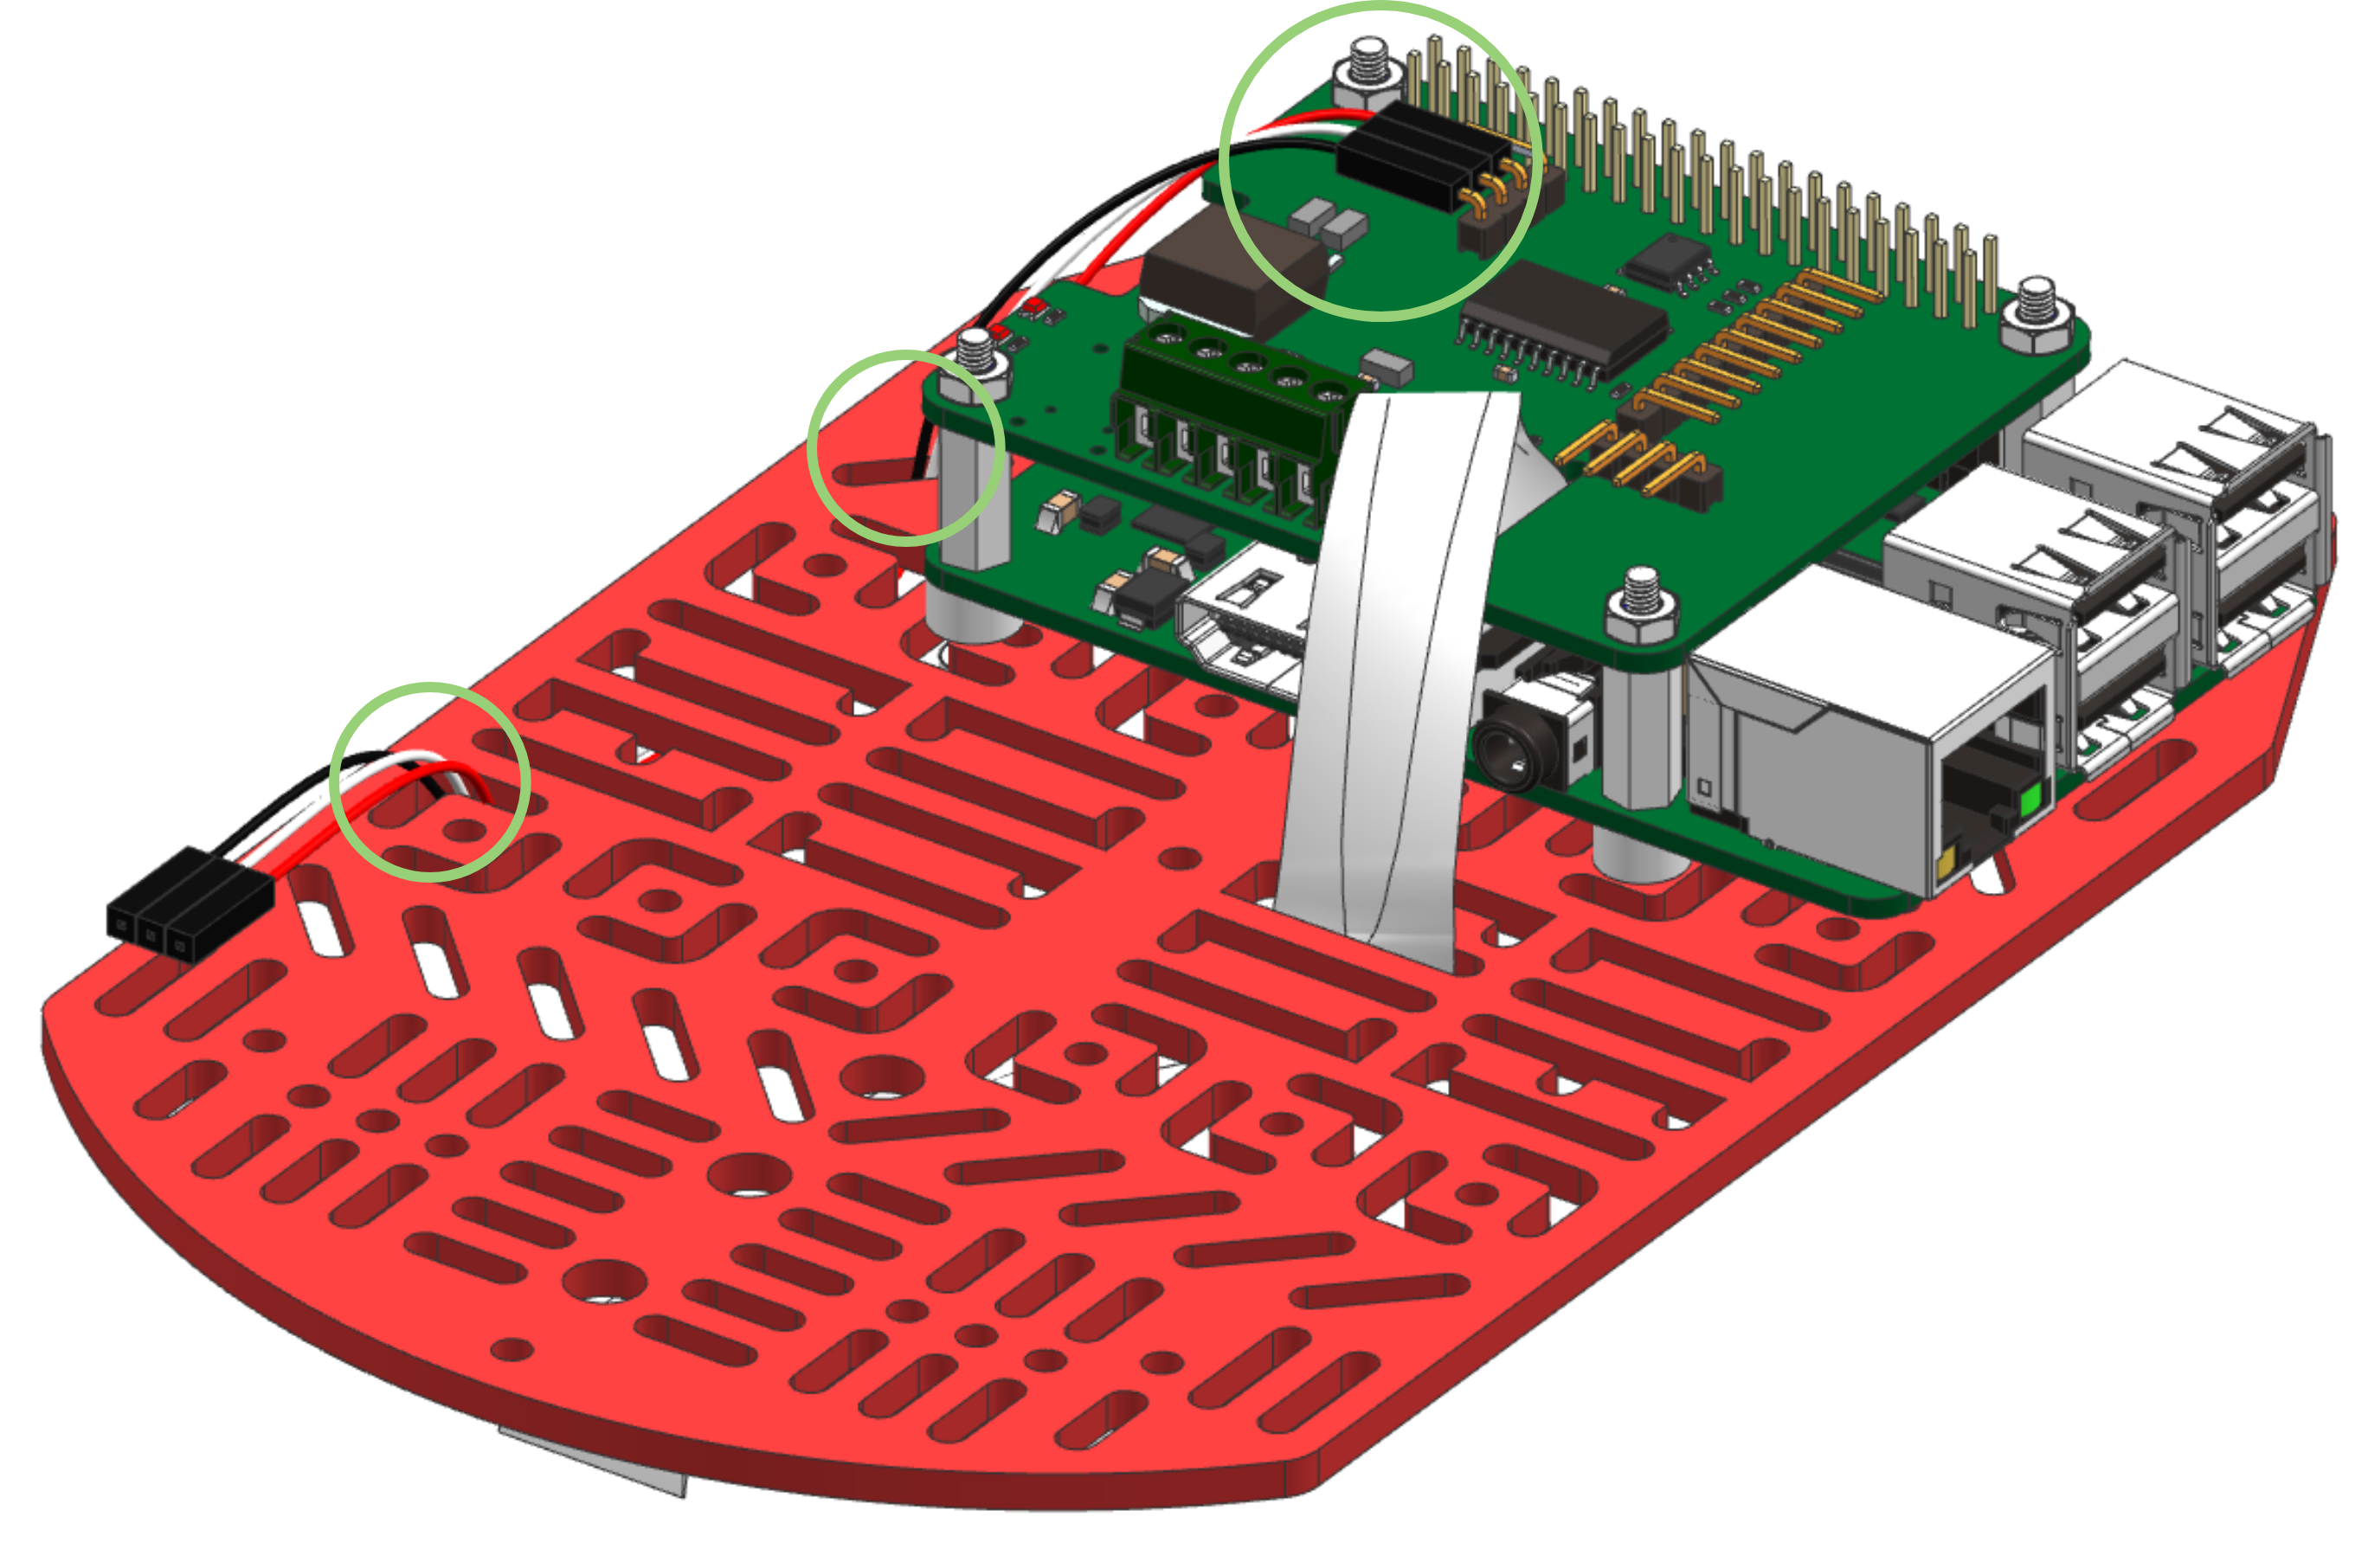
Step 15
✎Modified 2020-04-03 by Rafael Froehlich
Finally, attach the two USB cables to the power plugs on the Hut and Raspberry Pi, as in Figure 16.23.
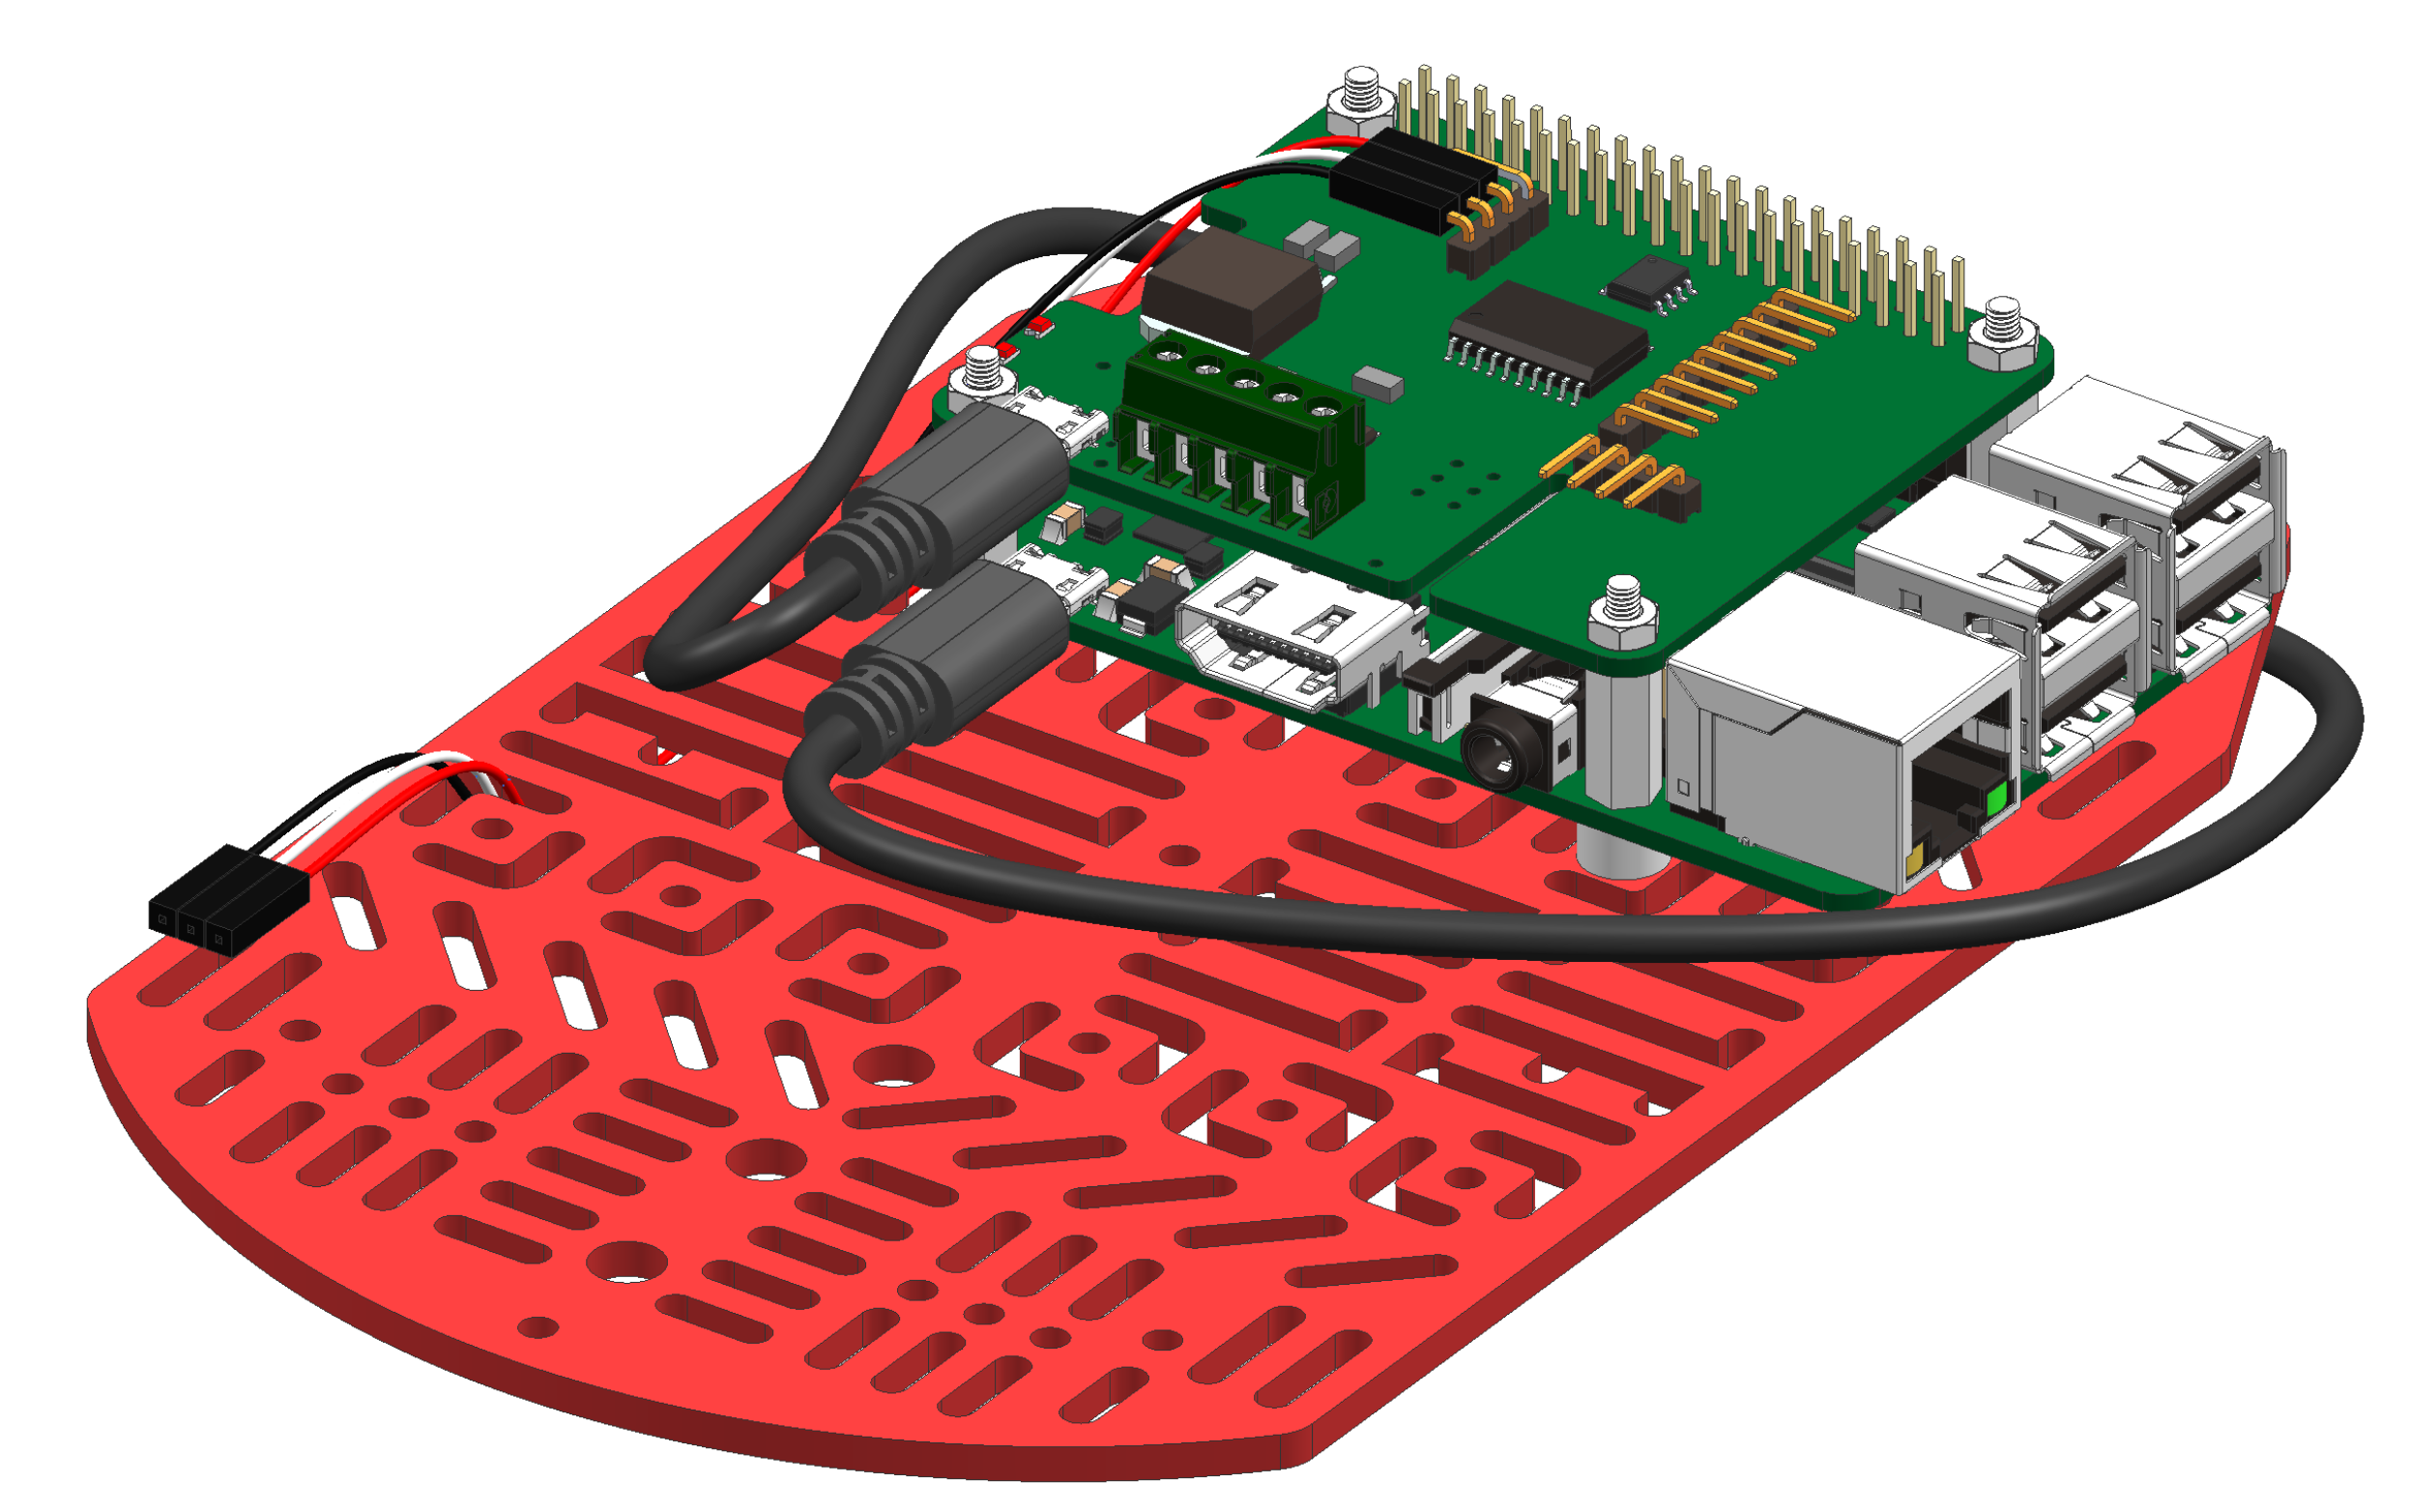
Camera
✎Modified 2020-03-07 by rafaelfroehlich
From the Duckiebox package take the following components:
- Raspberry Pi camera
- Camera mount (1x)
- M3x10 screws (3x)
- M3 nuts (3x)
Step 16
✎Modified 2020-03-07 by rafaelfroehlich
Open the camera cable plug on the Raspberry Pi camera as shown in figure Figure 16.24.
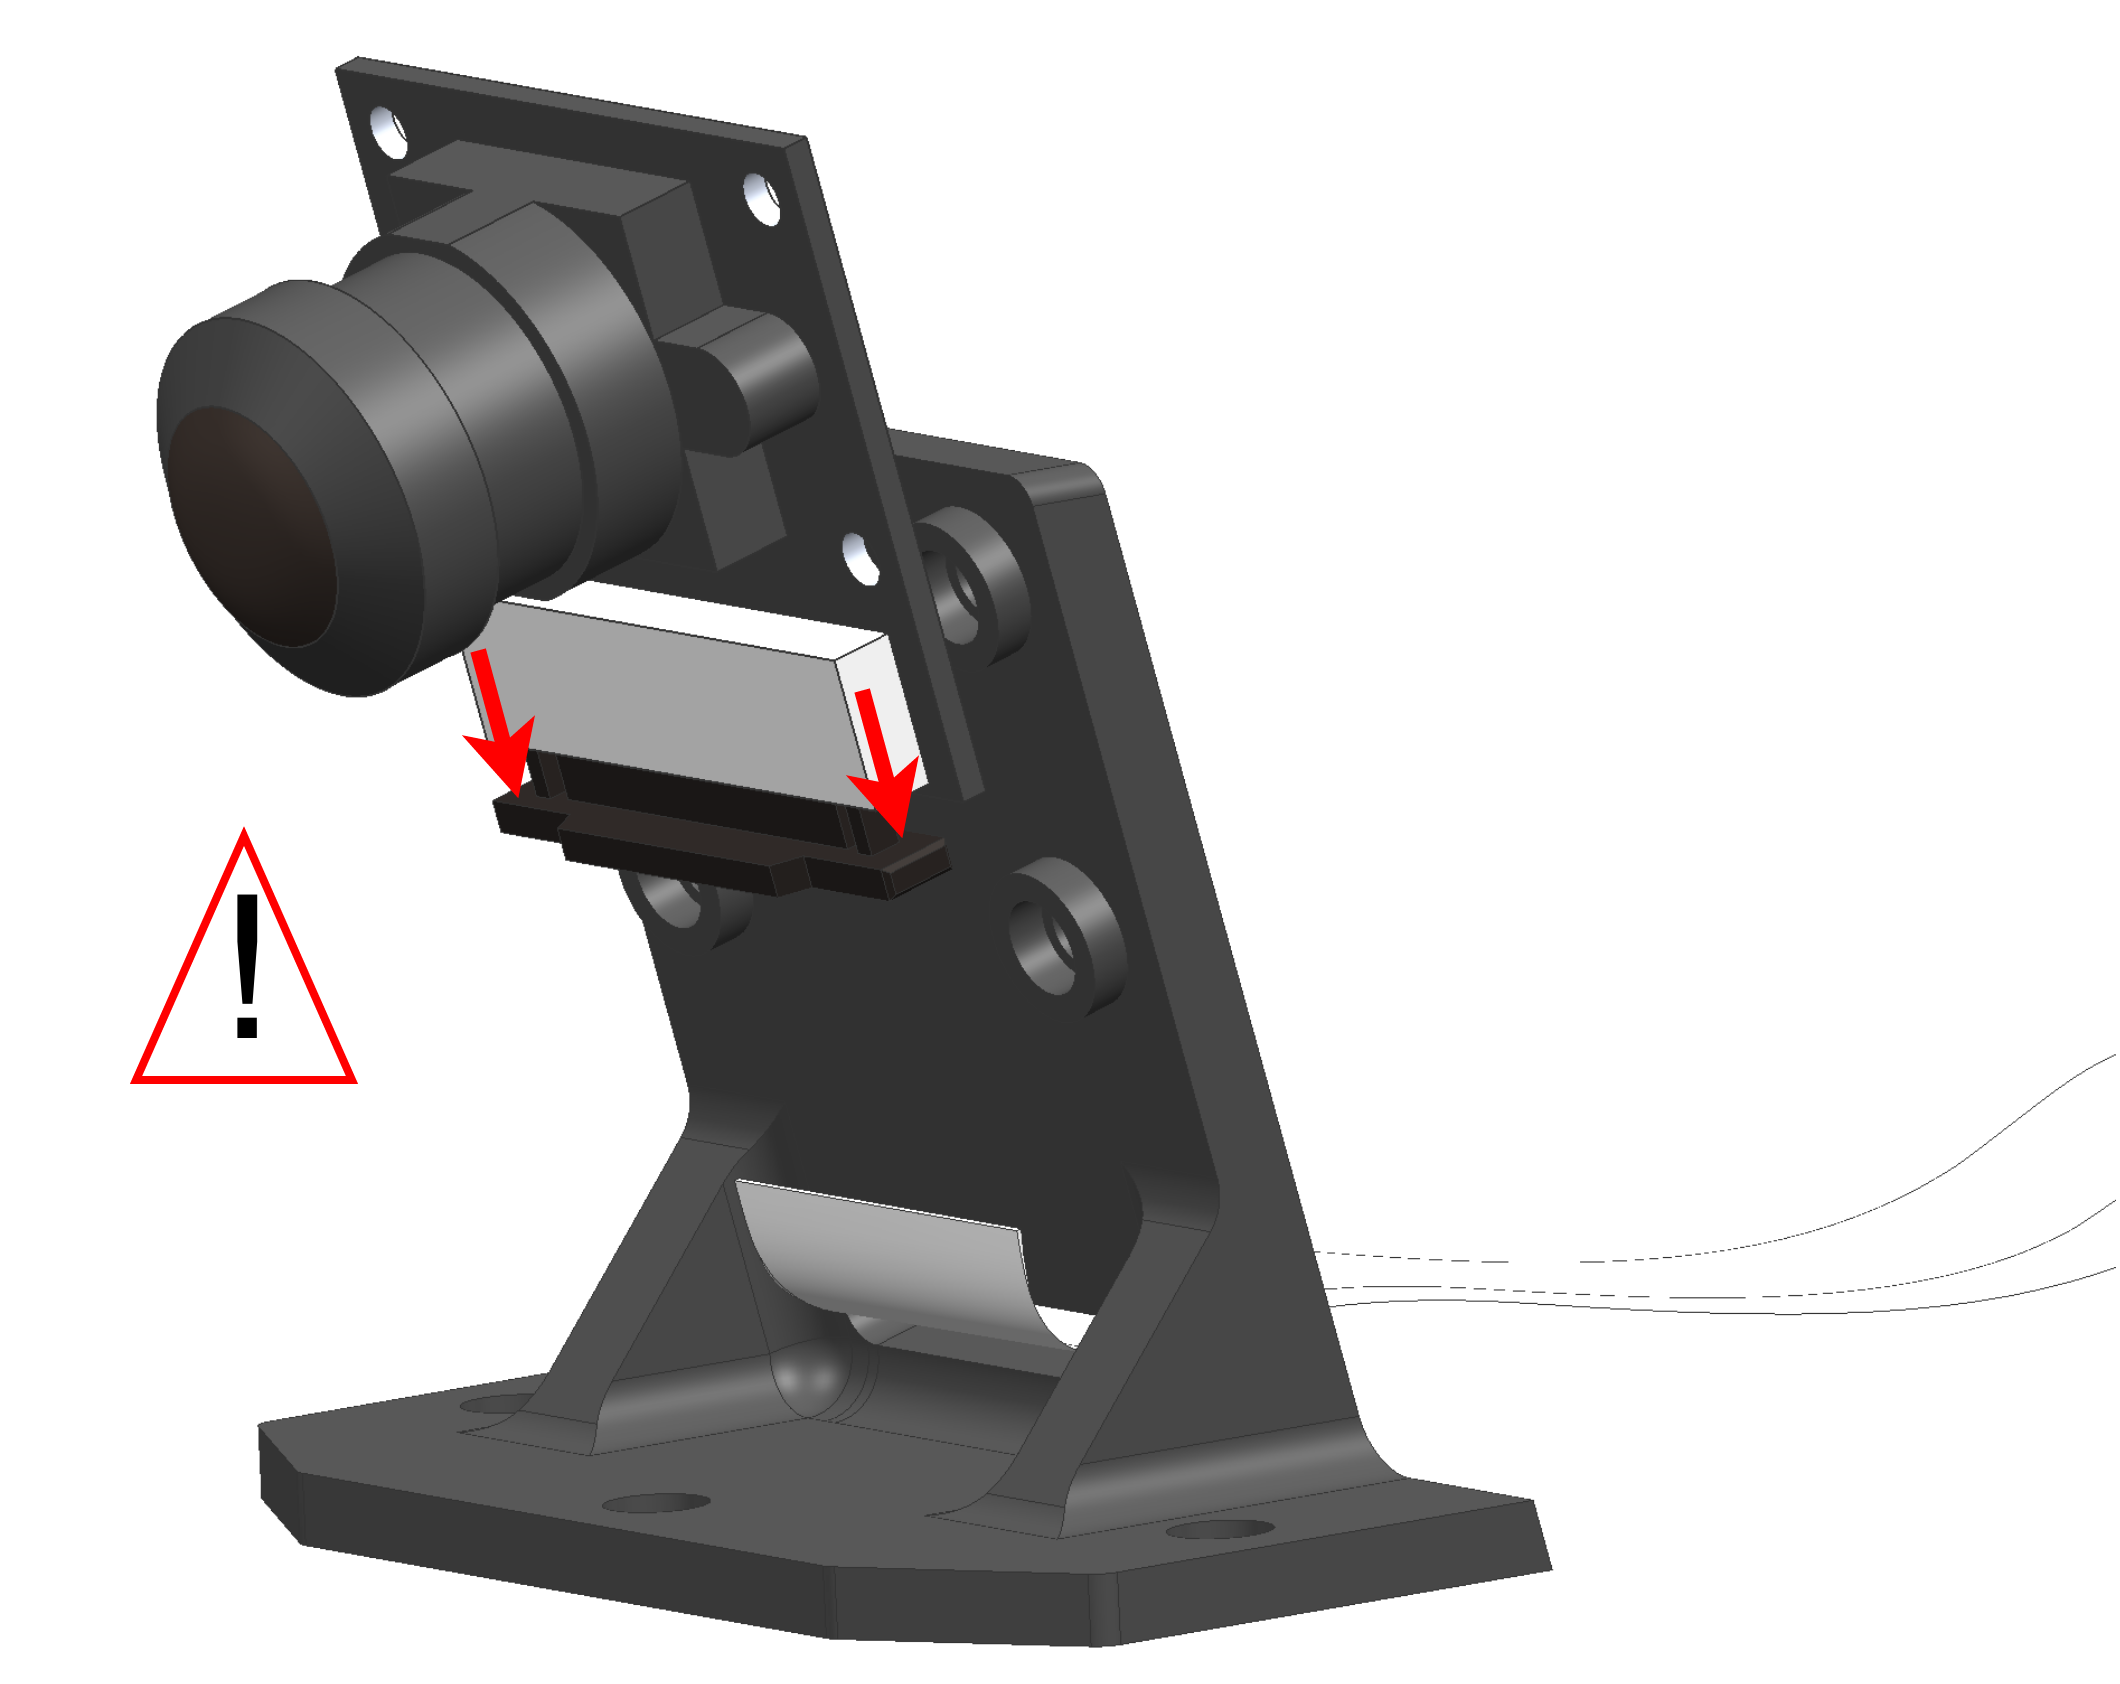
Make sure the cable is routed through the camera mount as well!
Close the plug once the cable is pushed in completely as in Figure 16.25
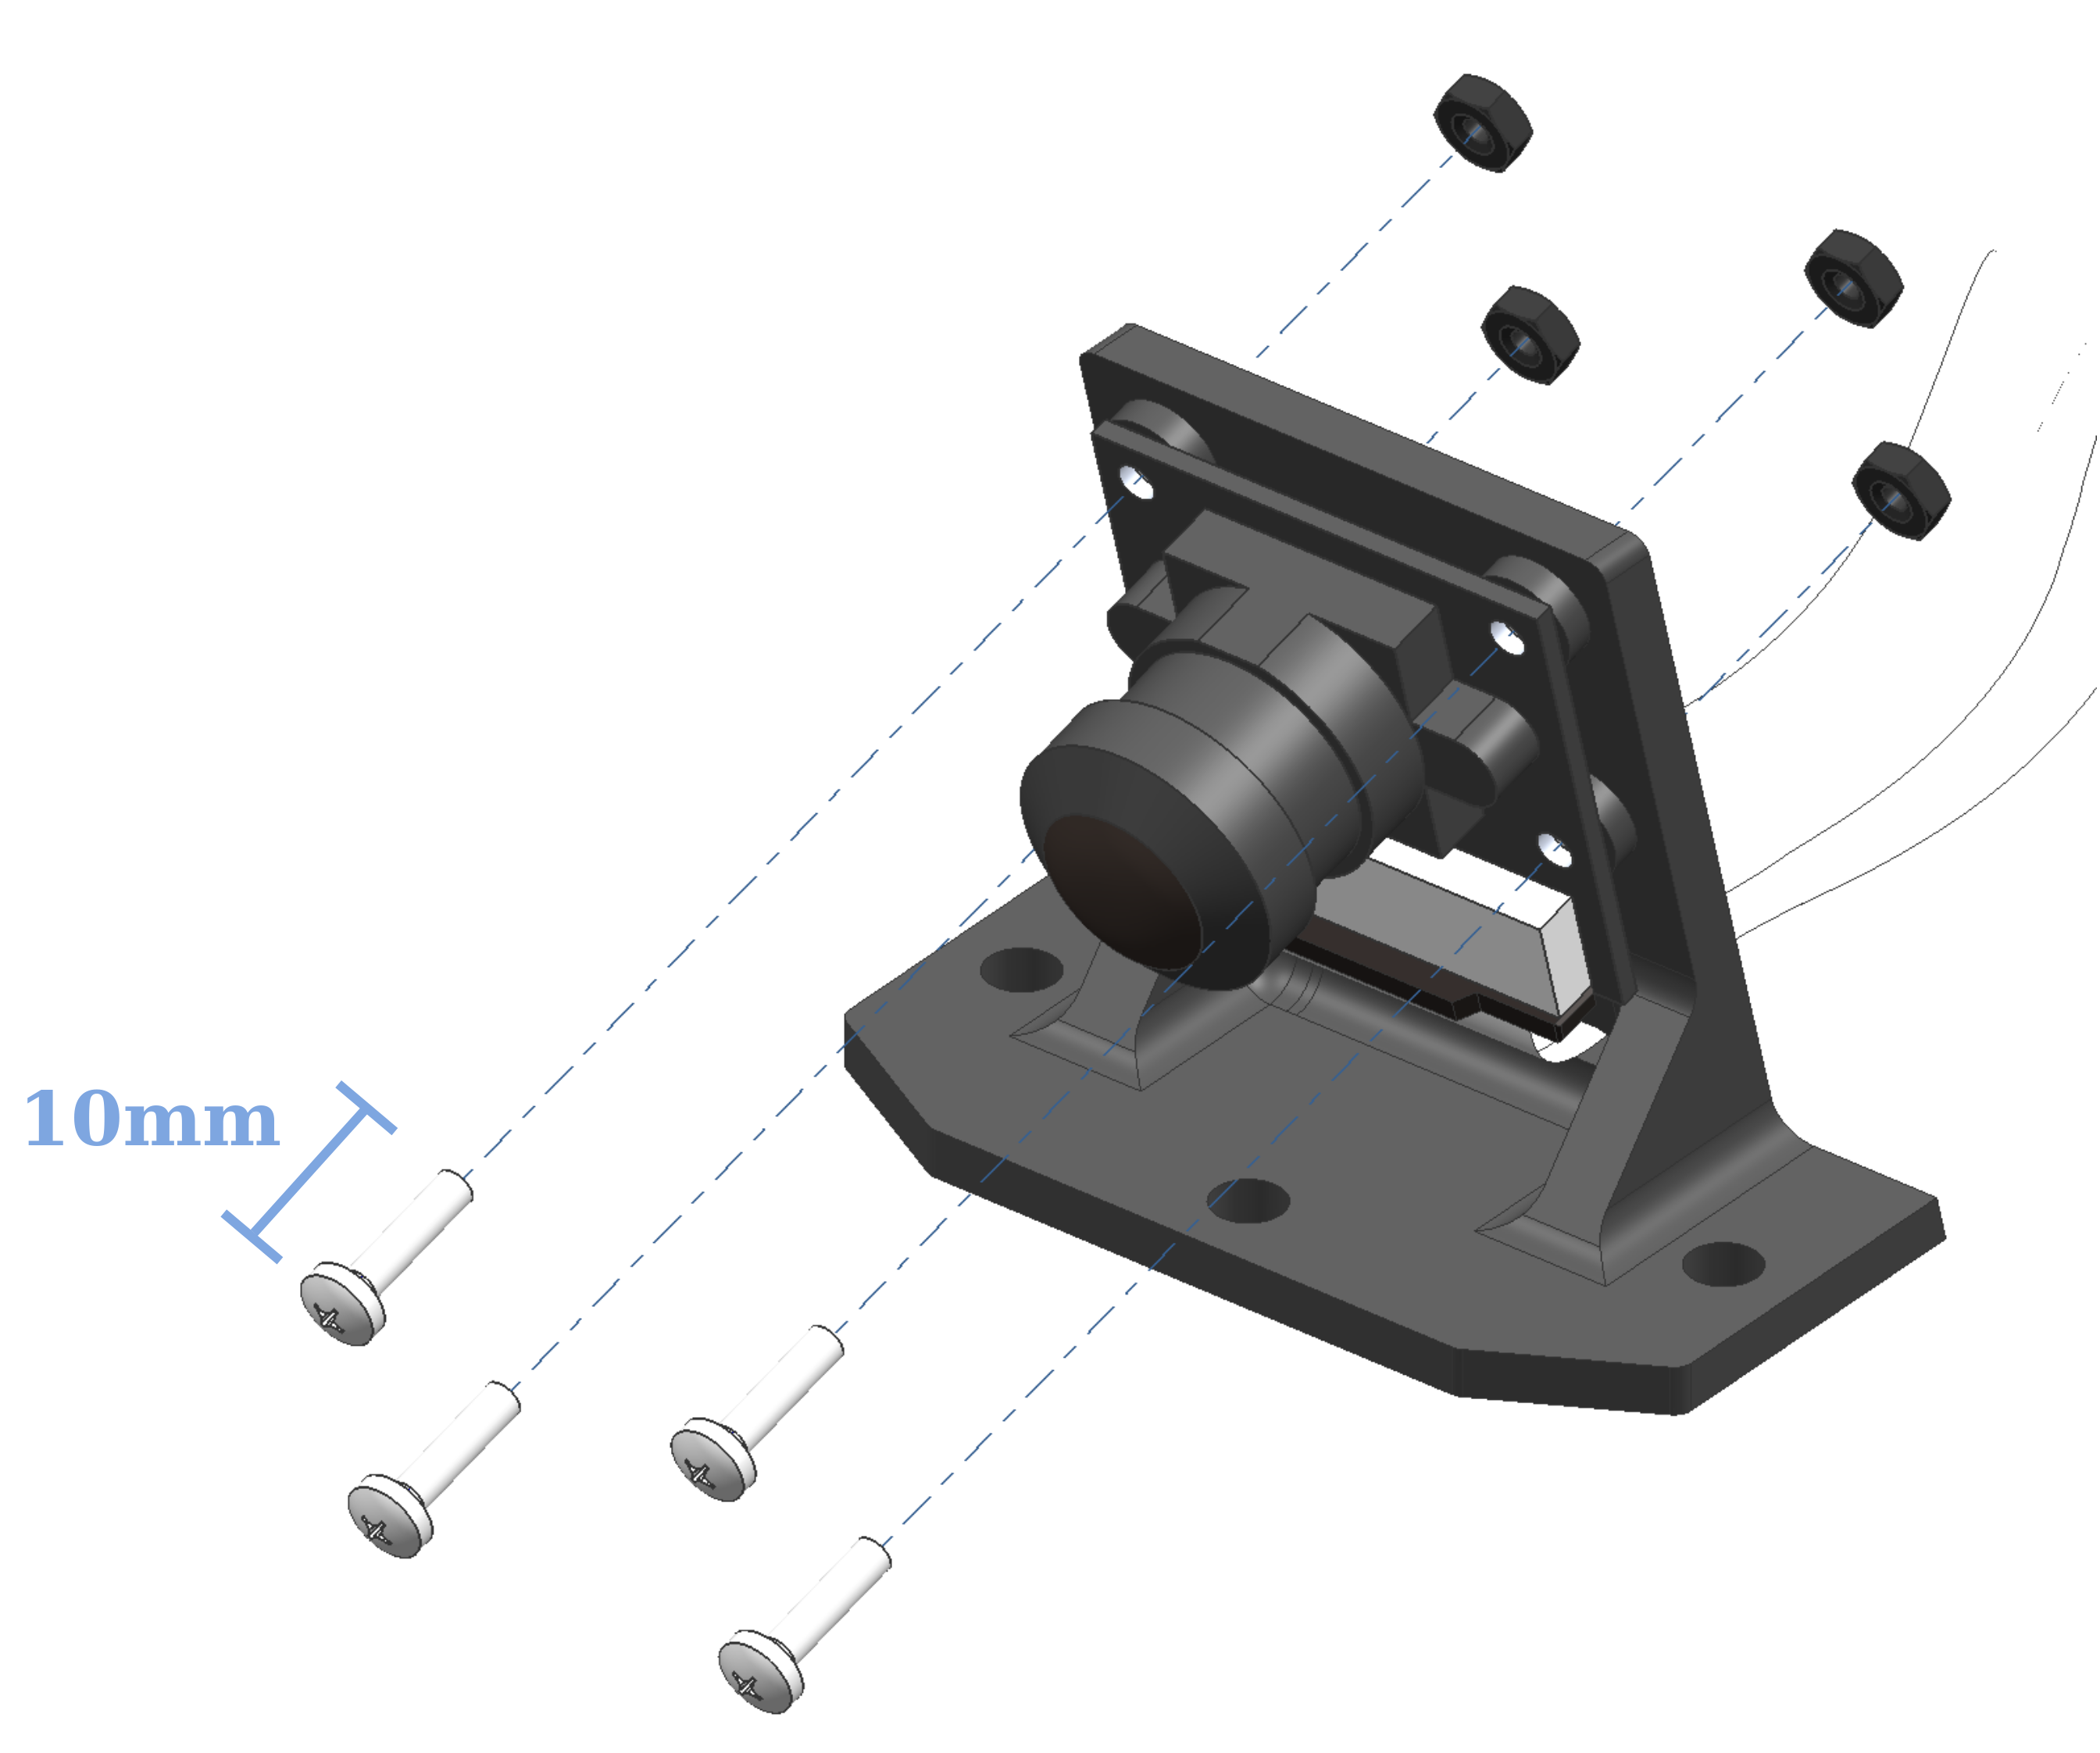
Insert the M3x10 nylong screws from the front to screw the camera to its mount, see Figure 16.26
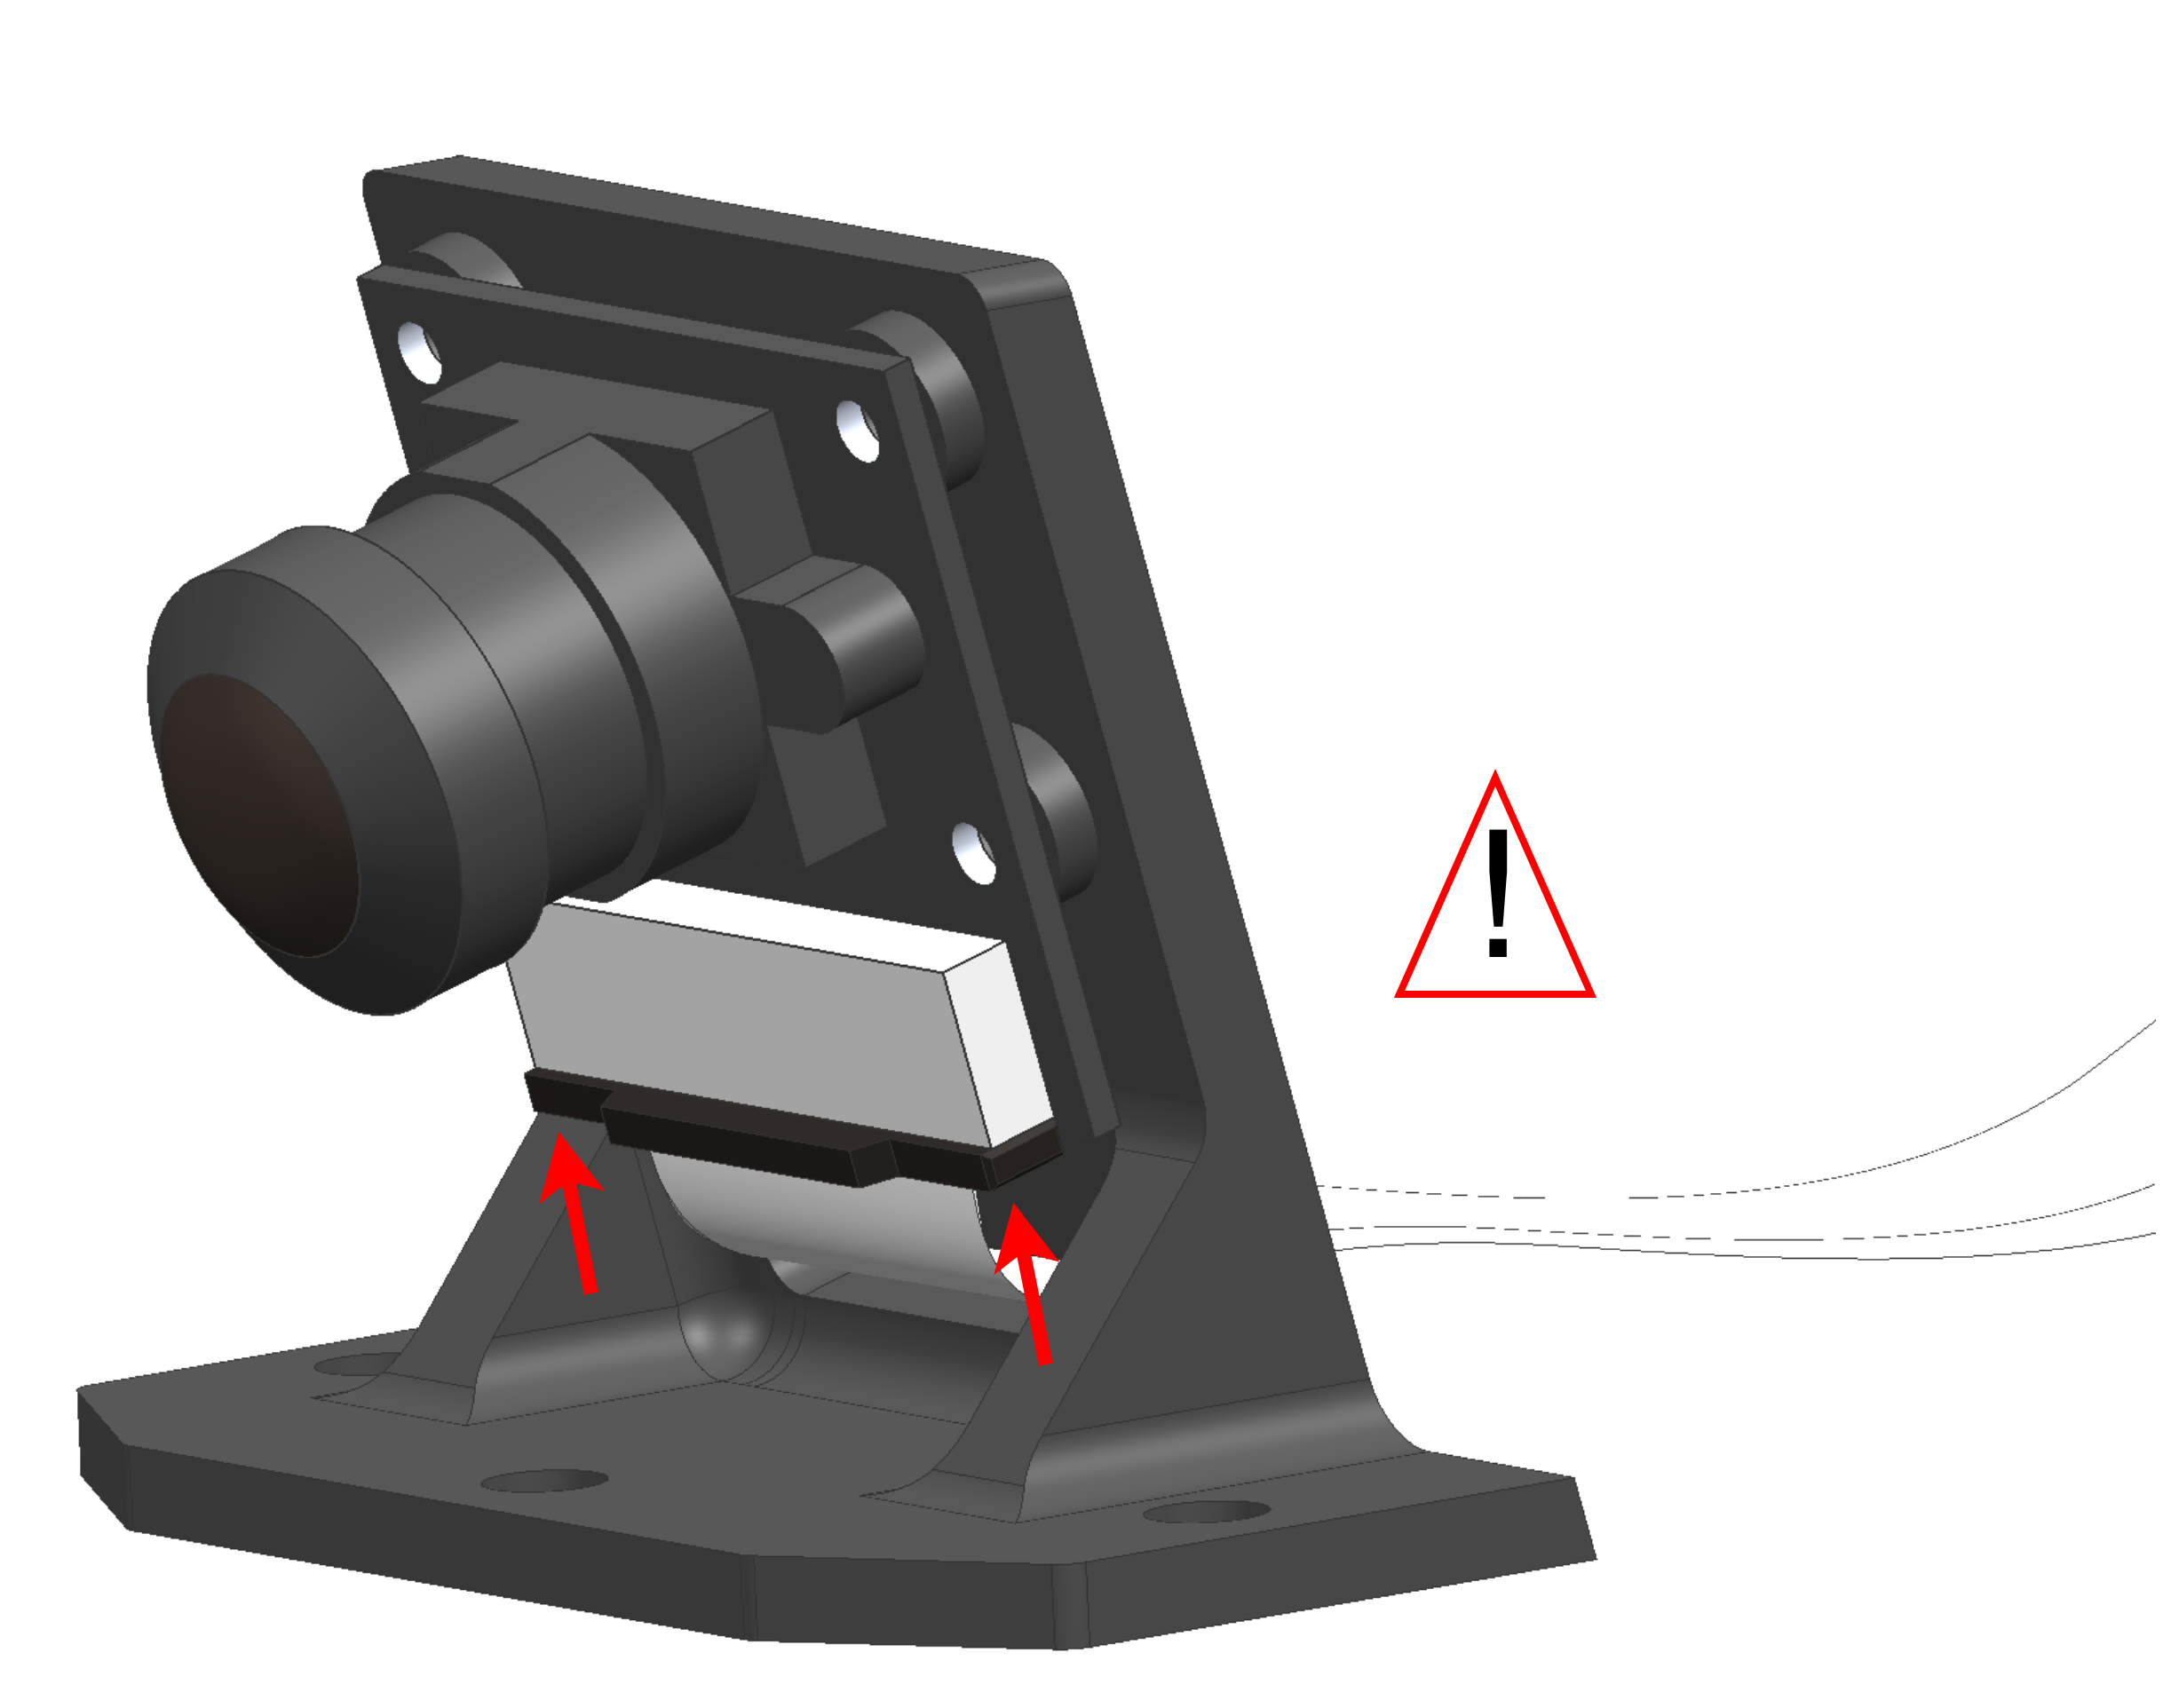
Make sure the camera is as parallel to its mount as possible, i.e. facing downwards at this very angle.
Step 17
✎Modified 2020-03-07 by rafaelfroehlich
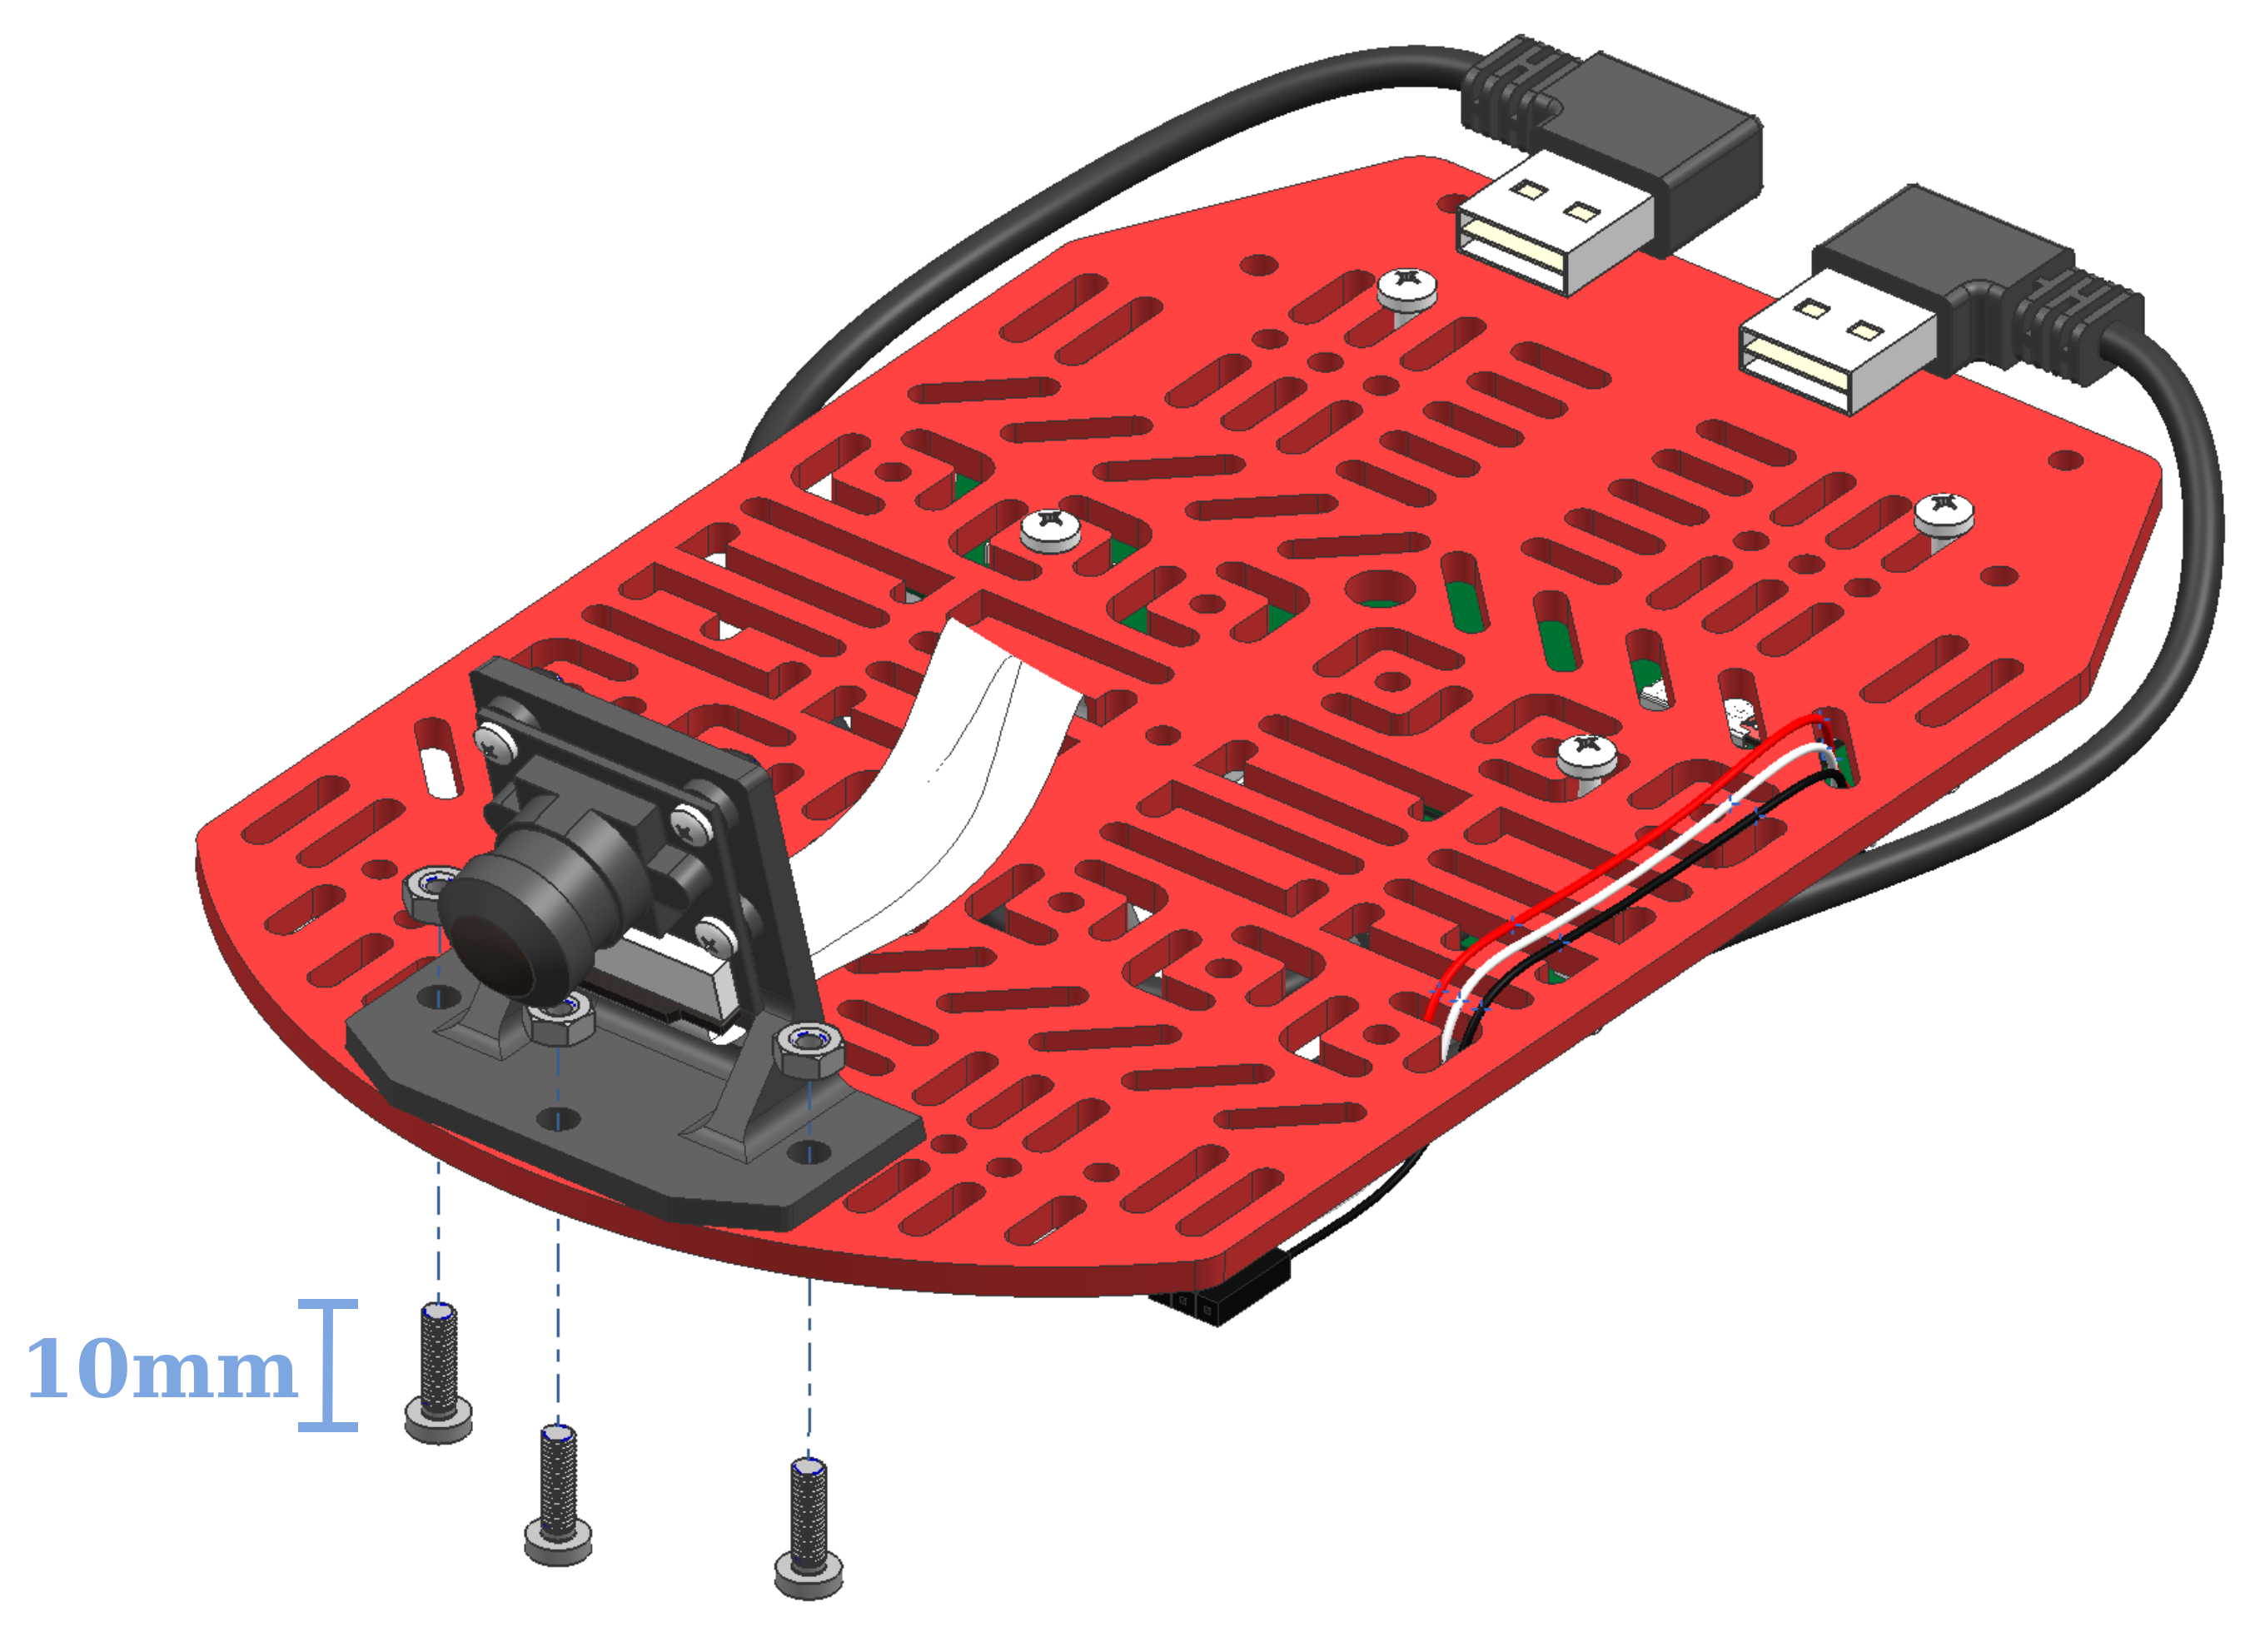
Screw the camera mount to the top plate with three M3x10 screws and metal M3 nuts, see Figure 16.27.
Top chassis
✎Modified 2020-03-07 by rafaelfroehlich
From the Duckiebox package take the following components: - Metal screws M3x10 (4x) - Back bumper bracer (1x)
Step 18
✎Modified 2020-03-07 by rafaelfroehlich
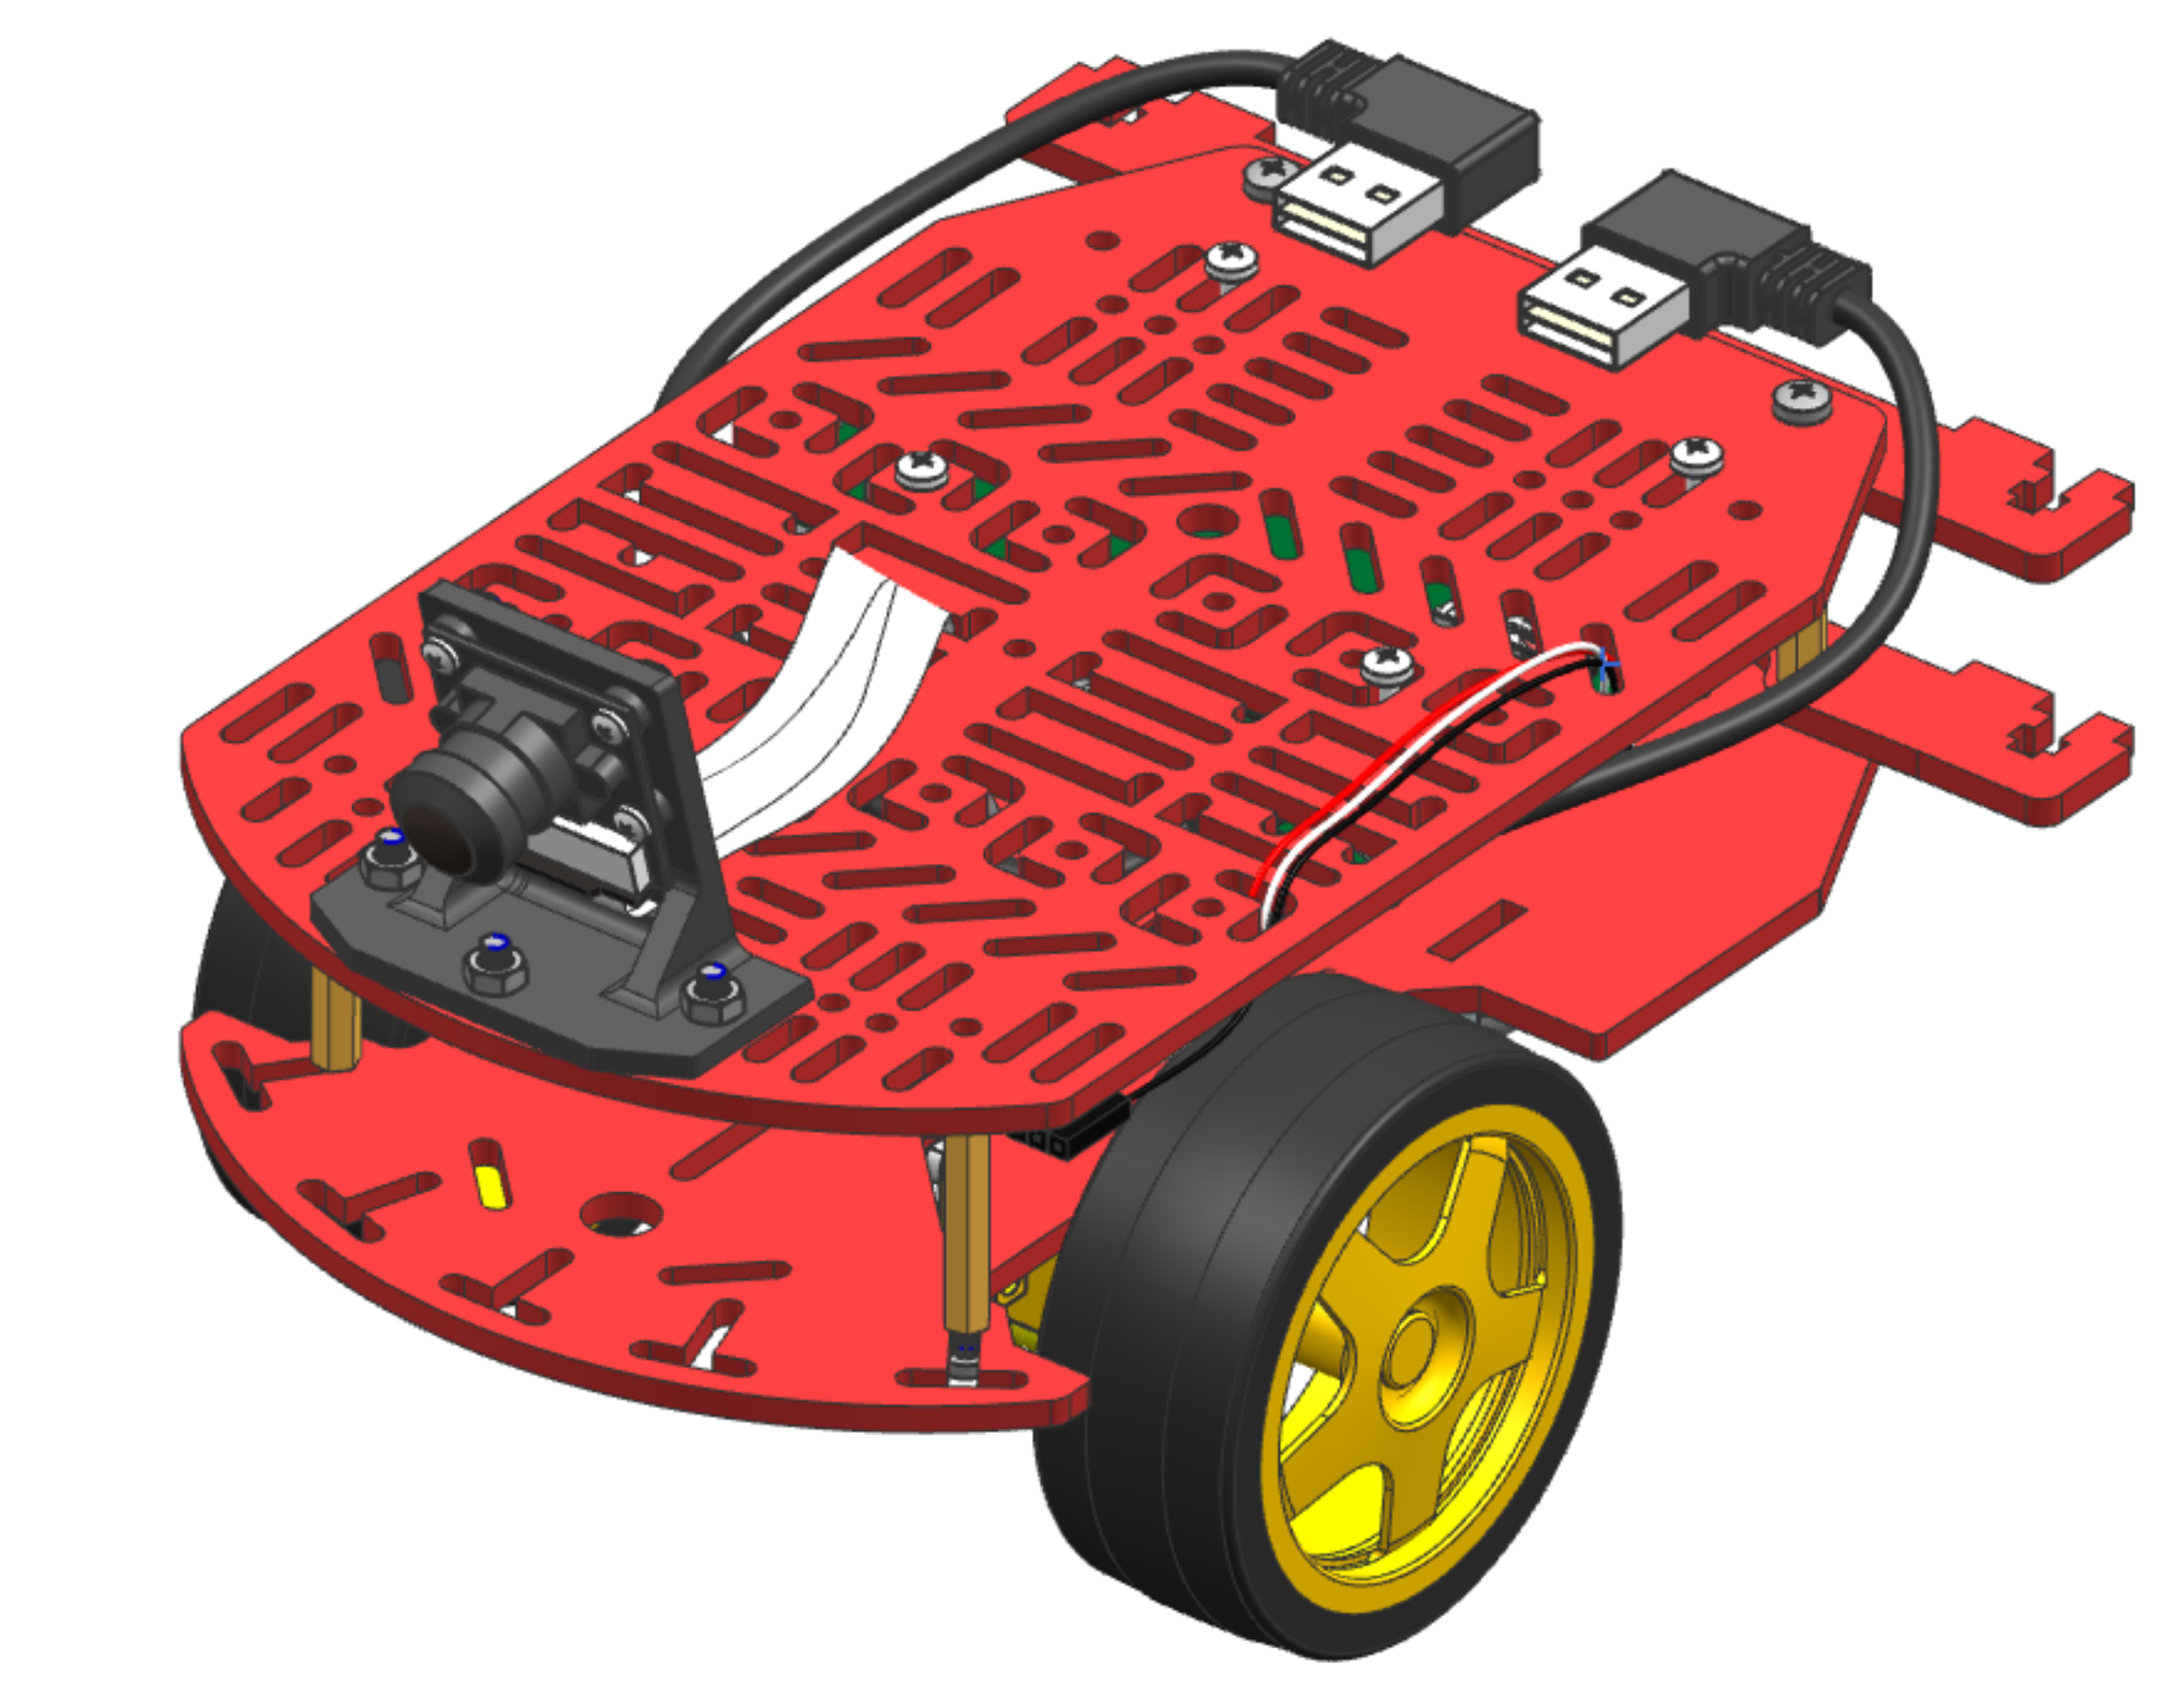
Put the top plate on the bottom part of the chassis as shown in figure Figure 16.28 but do not screw it in yet. This is how it should look like in the end.
Step 19
✎Modified 2020-03-07 by rafaelfroehlich
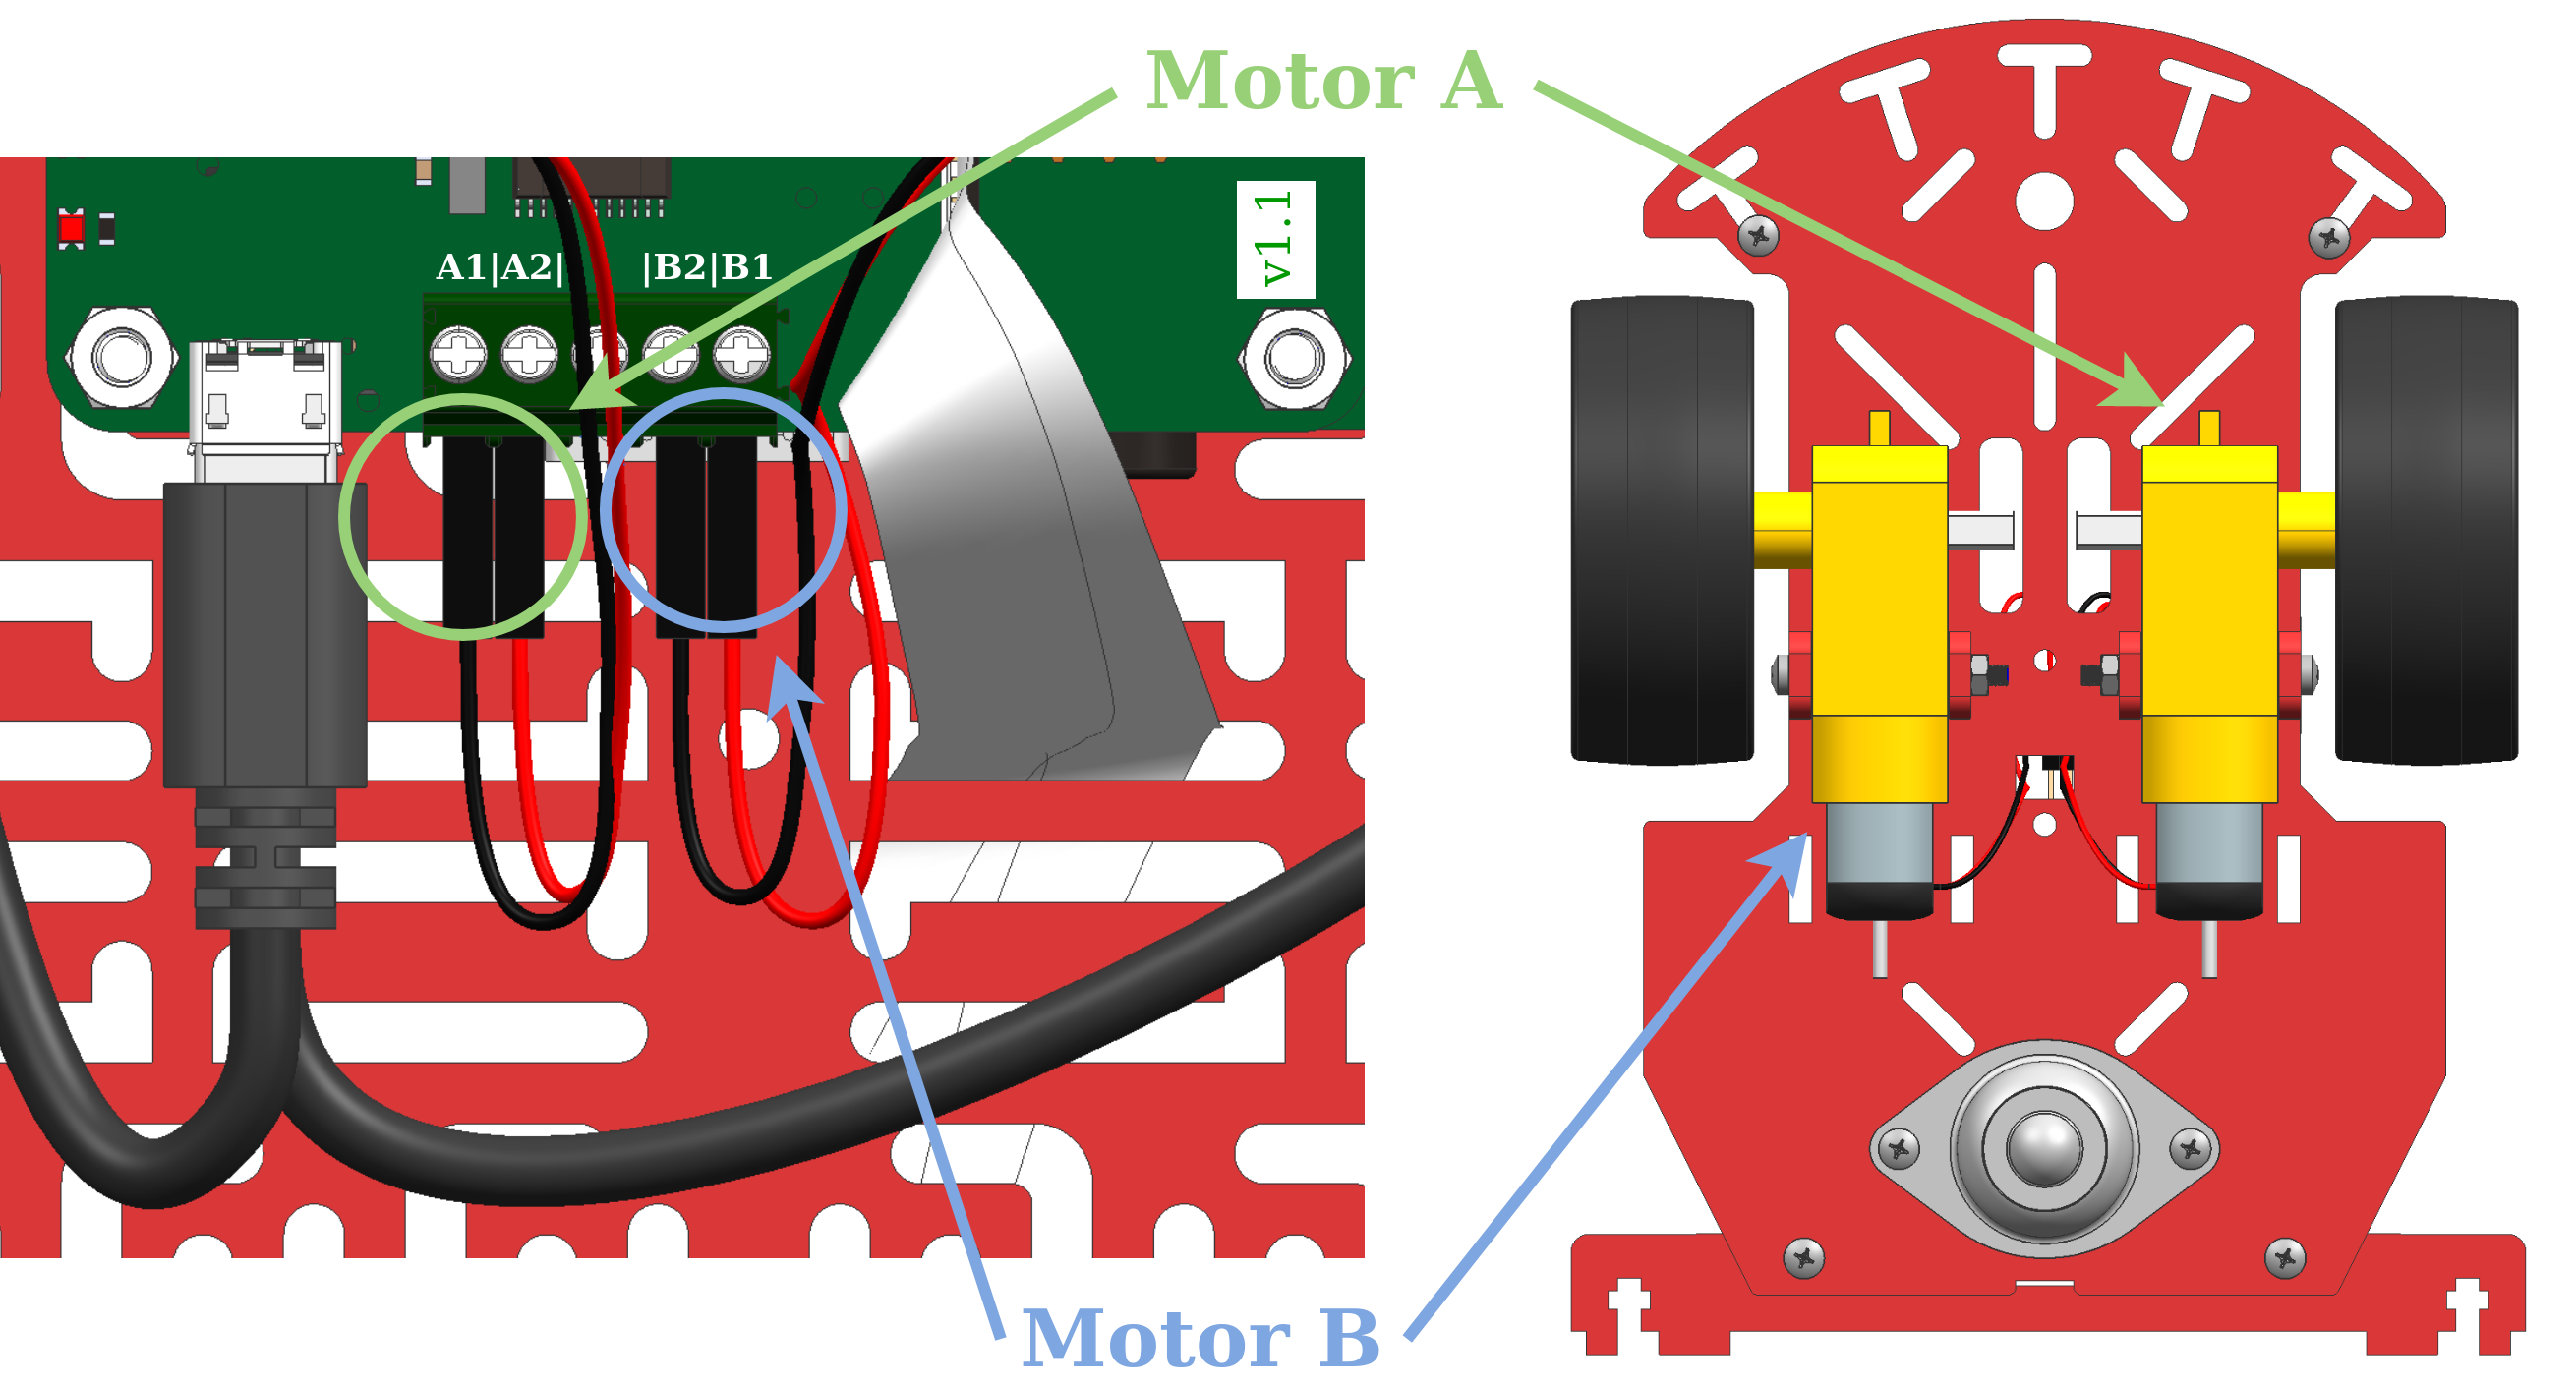
Now open the slots for the cables of the DC motors on the Hut with a small screw driver and make sure you mount the cables in correctly, see figure Figure 16.29. Probably you have to take the top and bottom part of the chassis apart again
Step 20
✎Modified 2020-03-07 by rafaelfroehlich
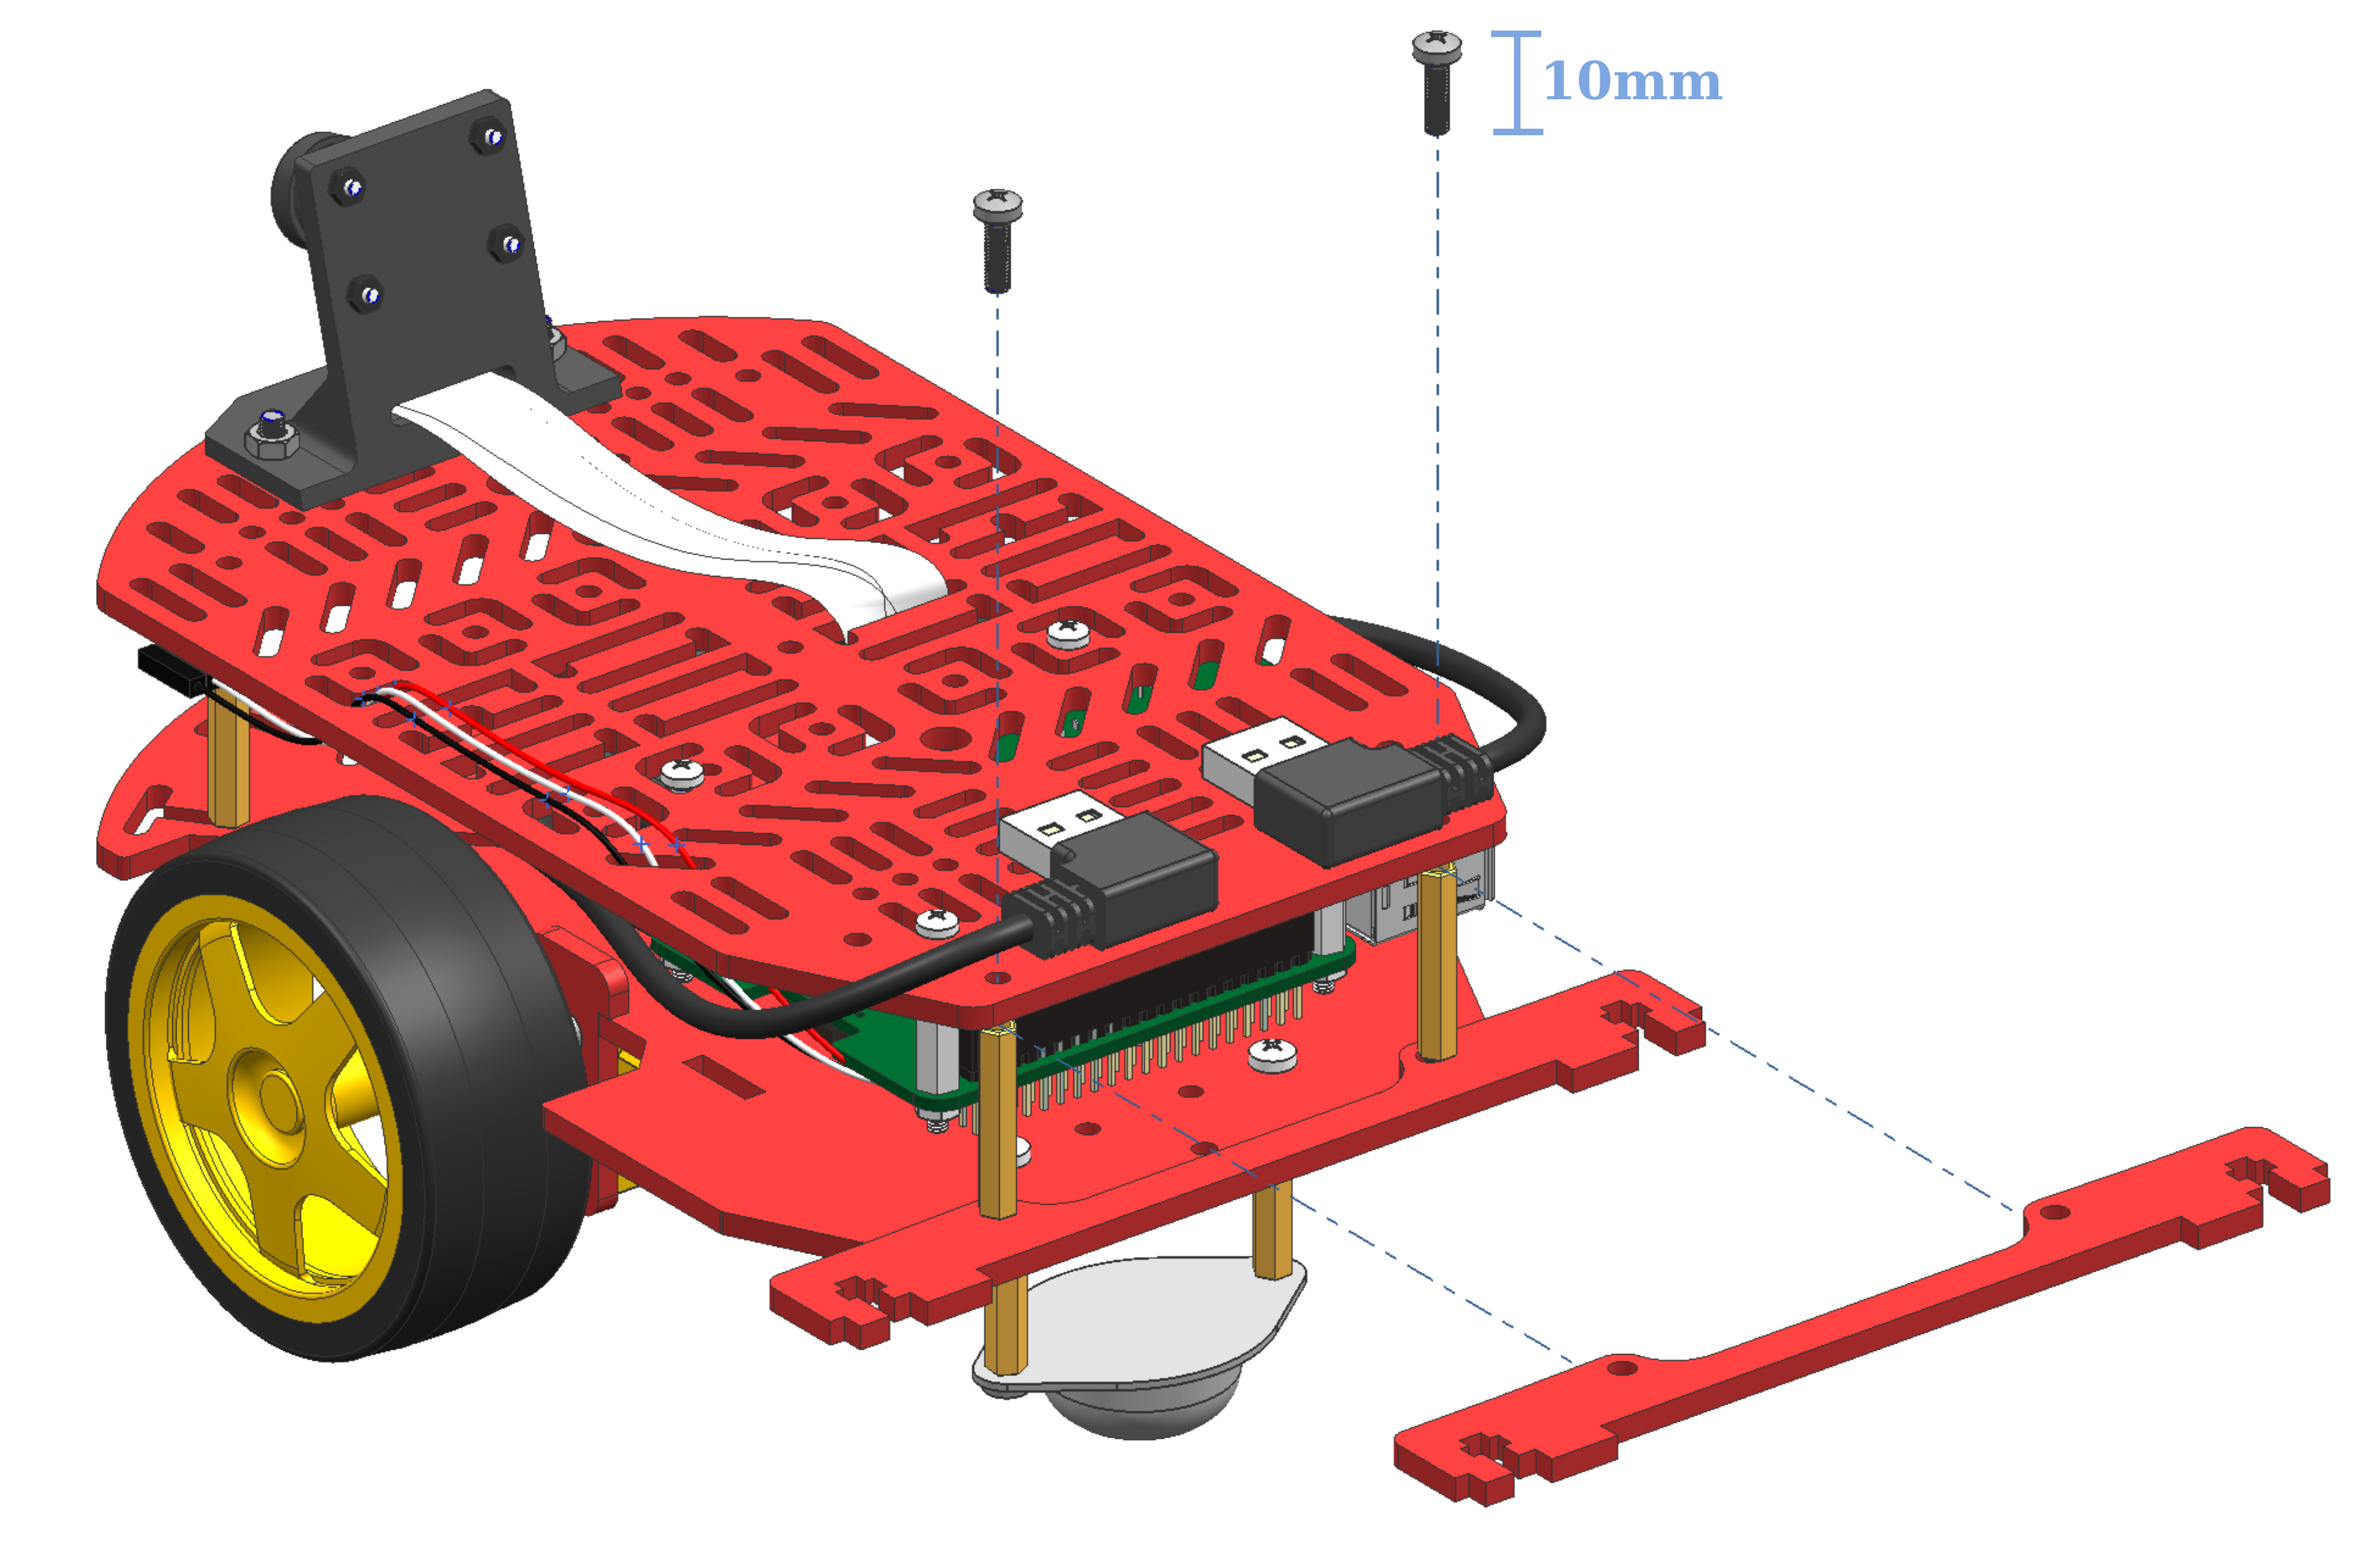
Place the second rear bumper bracer on top of the chassis spacers in the back of the chassis. Again, the holes should align (Figure 16.30). If you experience a slight misalignment, carefully pass an M3 screw through the top plate and the top bumper bracer first, then move the standoff until you can plug the screw in. At the end, put in the second M3 screw as well.
Step 21
✎Modified 2020-03-07 by rafaelfroehlich
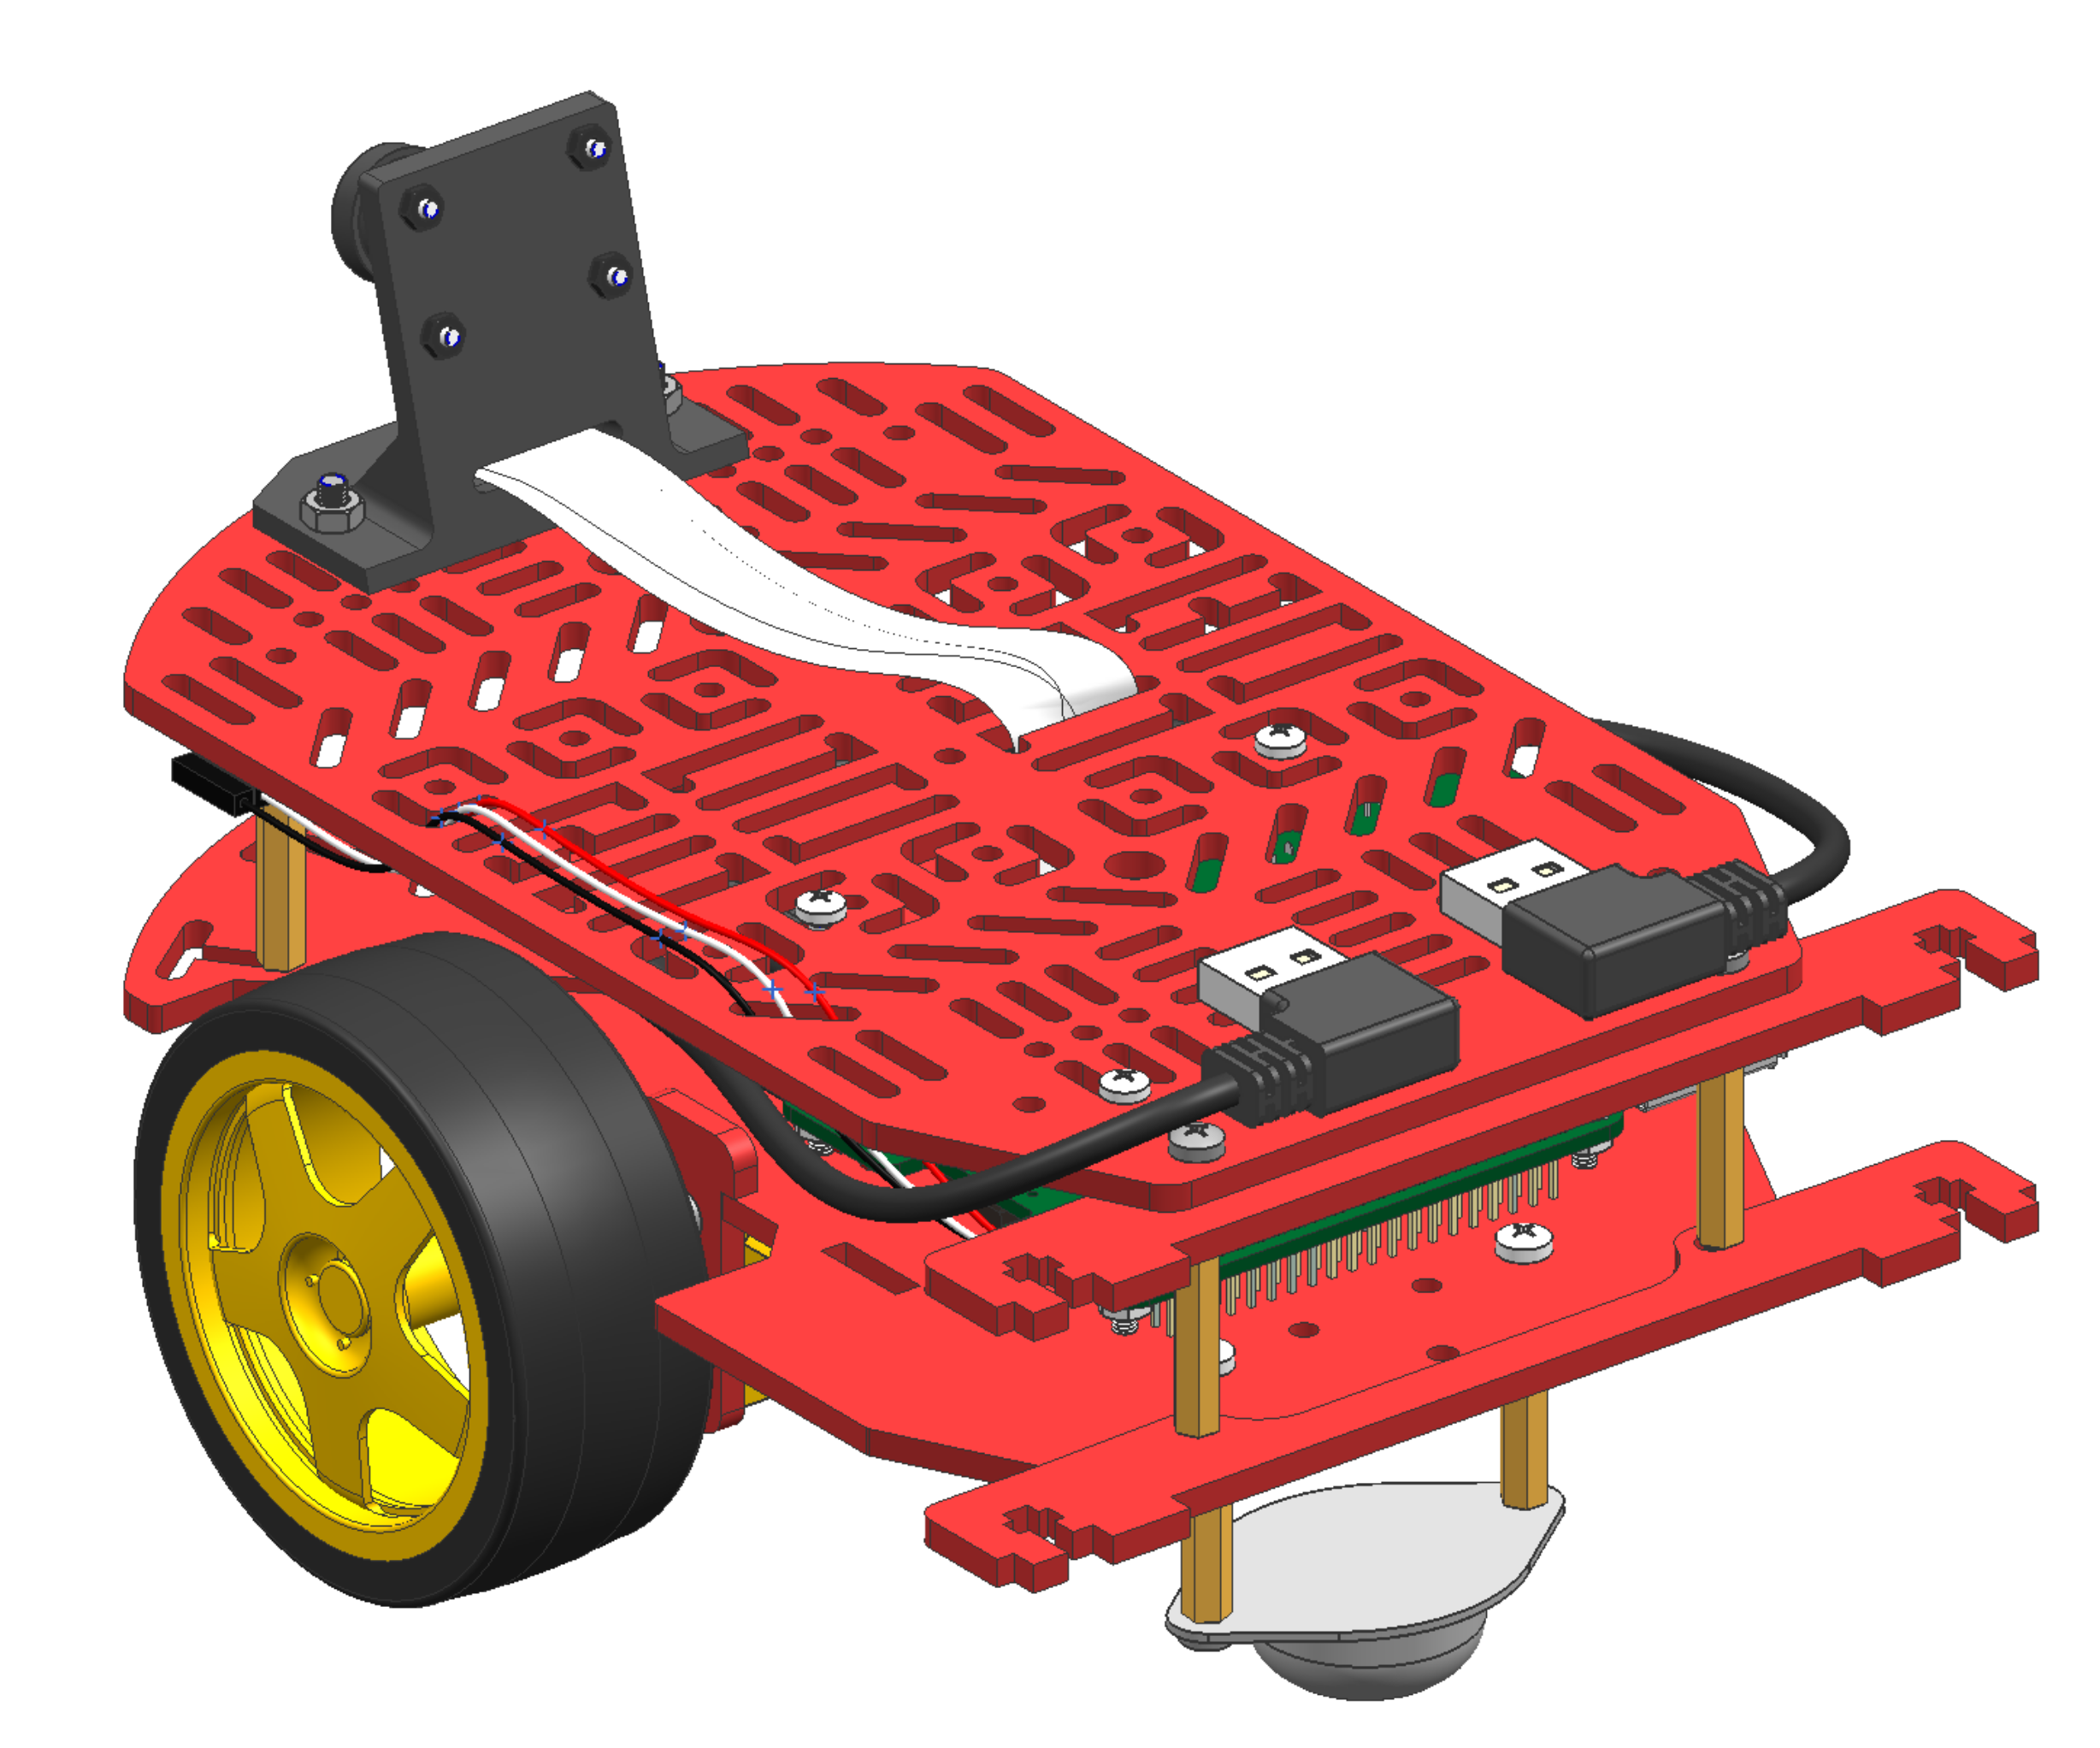
Fasten the top plate in the front using the other two M3x10 screws, as in(Figure 16.31.
Step 22
✎Modified 2020-03-07 by rafaelfroehlich
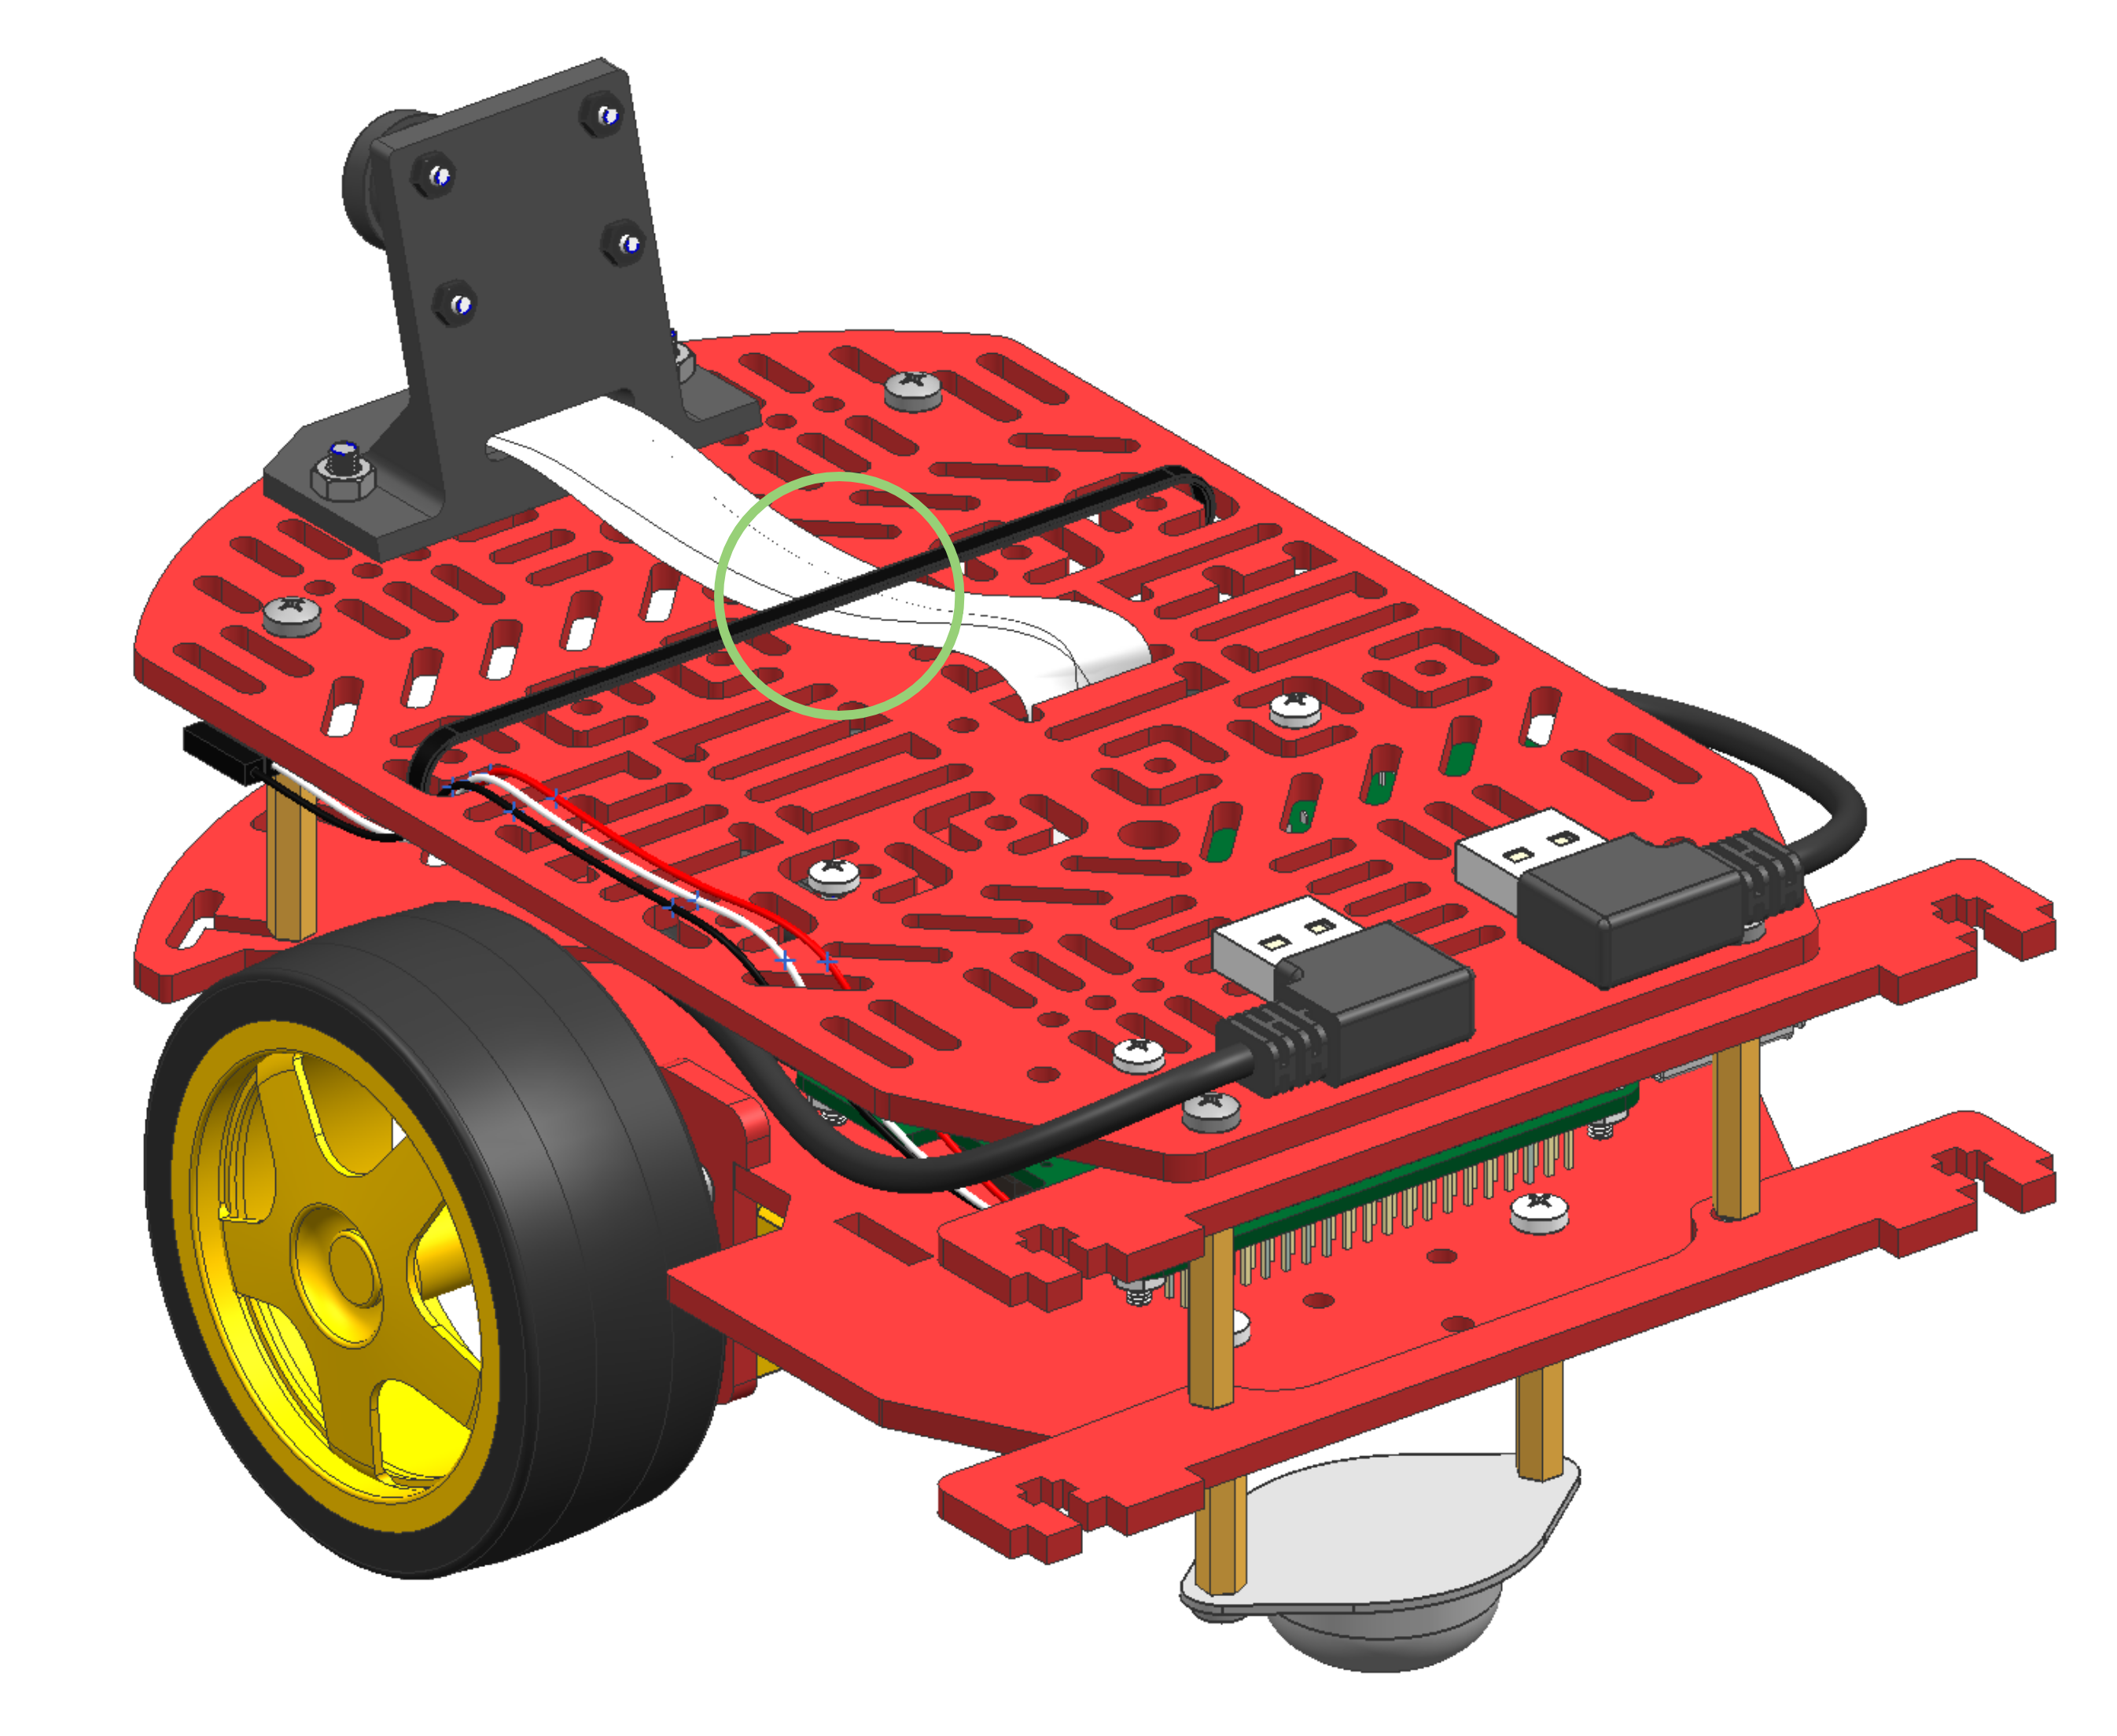
You can use a zip tie to help with cable management (Figure 16.32). Tip: you can use the same zip tie to keep the camera cable down and the USB cables below from touching the wheels.
Back bumper
✎Modified 2020-04-03 by Rafael Froehlich
From the Duckiebot kit take the following components:
- Back bumper (1x)
- M3x10 nylon screws (2x)
- M3x10 metal screws (4x)
- M3x10 countersunk screws (2x)
- M3 metal nut (4x)
- M3x25 spacers (2x)
- Back pattern plate (1x)
- Circle pattern sticker (1x)
In the picture, nylon screws are used. However you probably used them to assemble the omni-directional wheel, then use the metal screws.
Figure 16.33 shows the components needed to complete this upgrade.
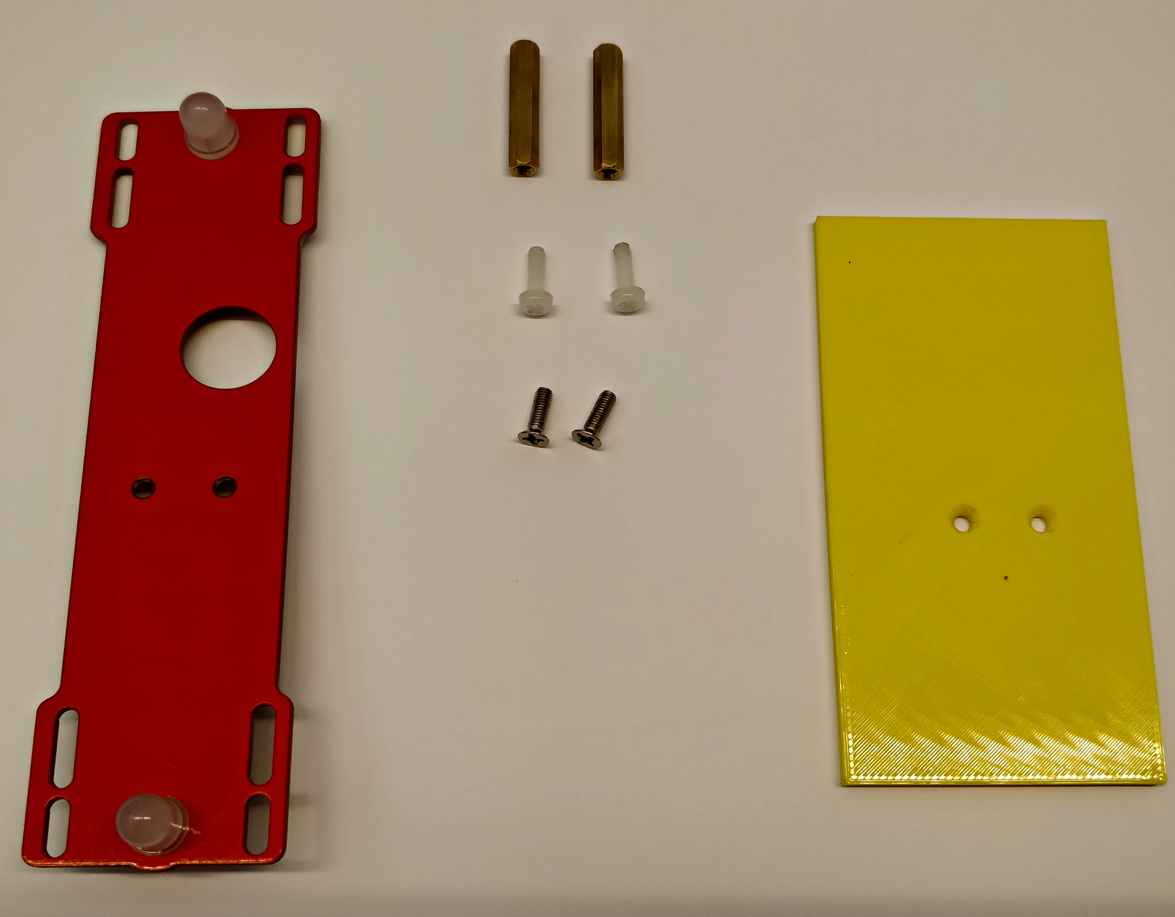
You could have a back plate of a different color with respect to the picture, e.g., black or white. They are all functionally equivalent.
Step 23
✎Modified 2020-03-07 by rafaelfroehlich
Mount the spacers using the metal screws, as in Figure 16.34.
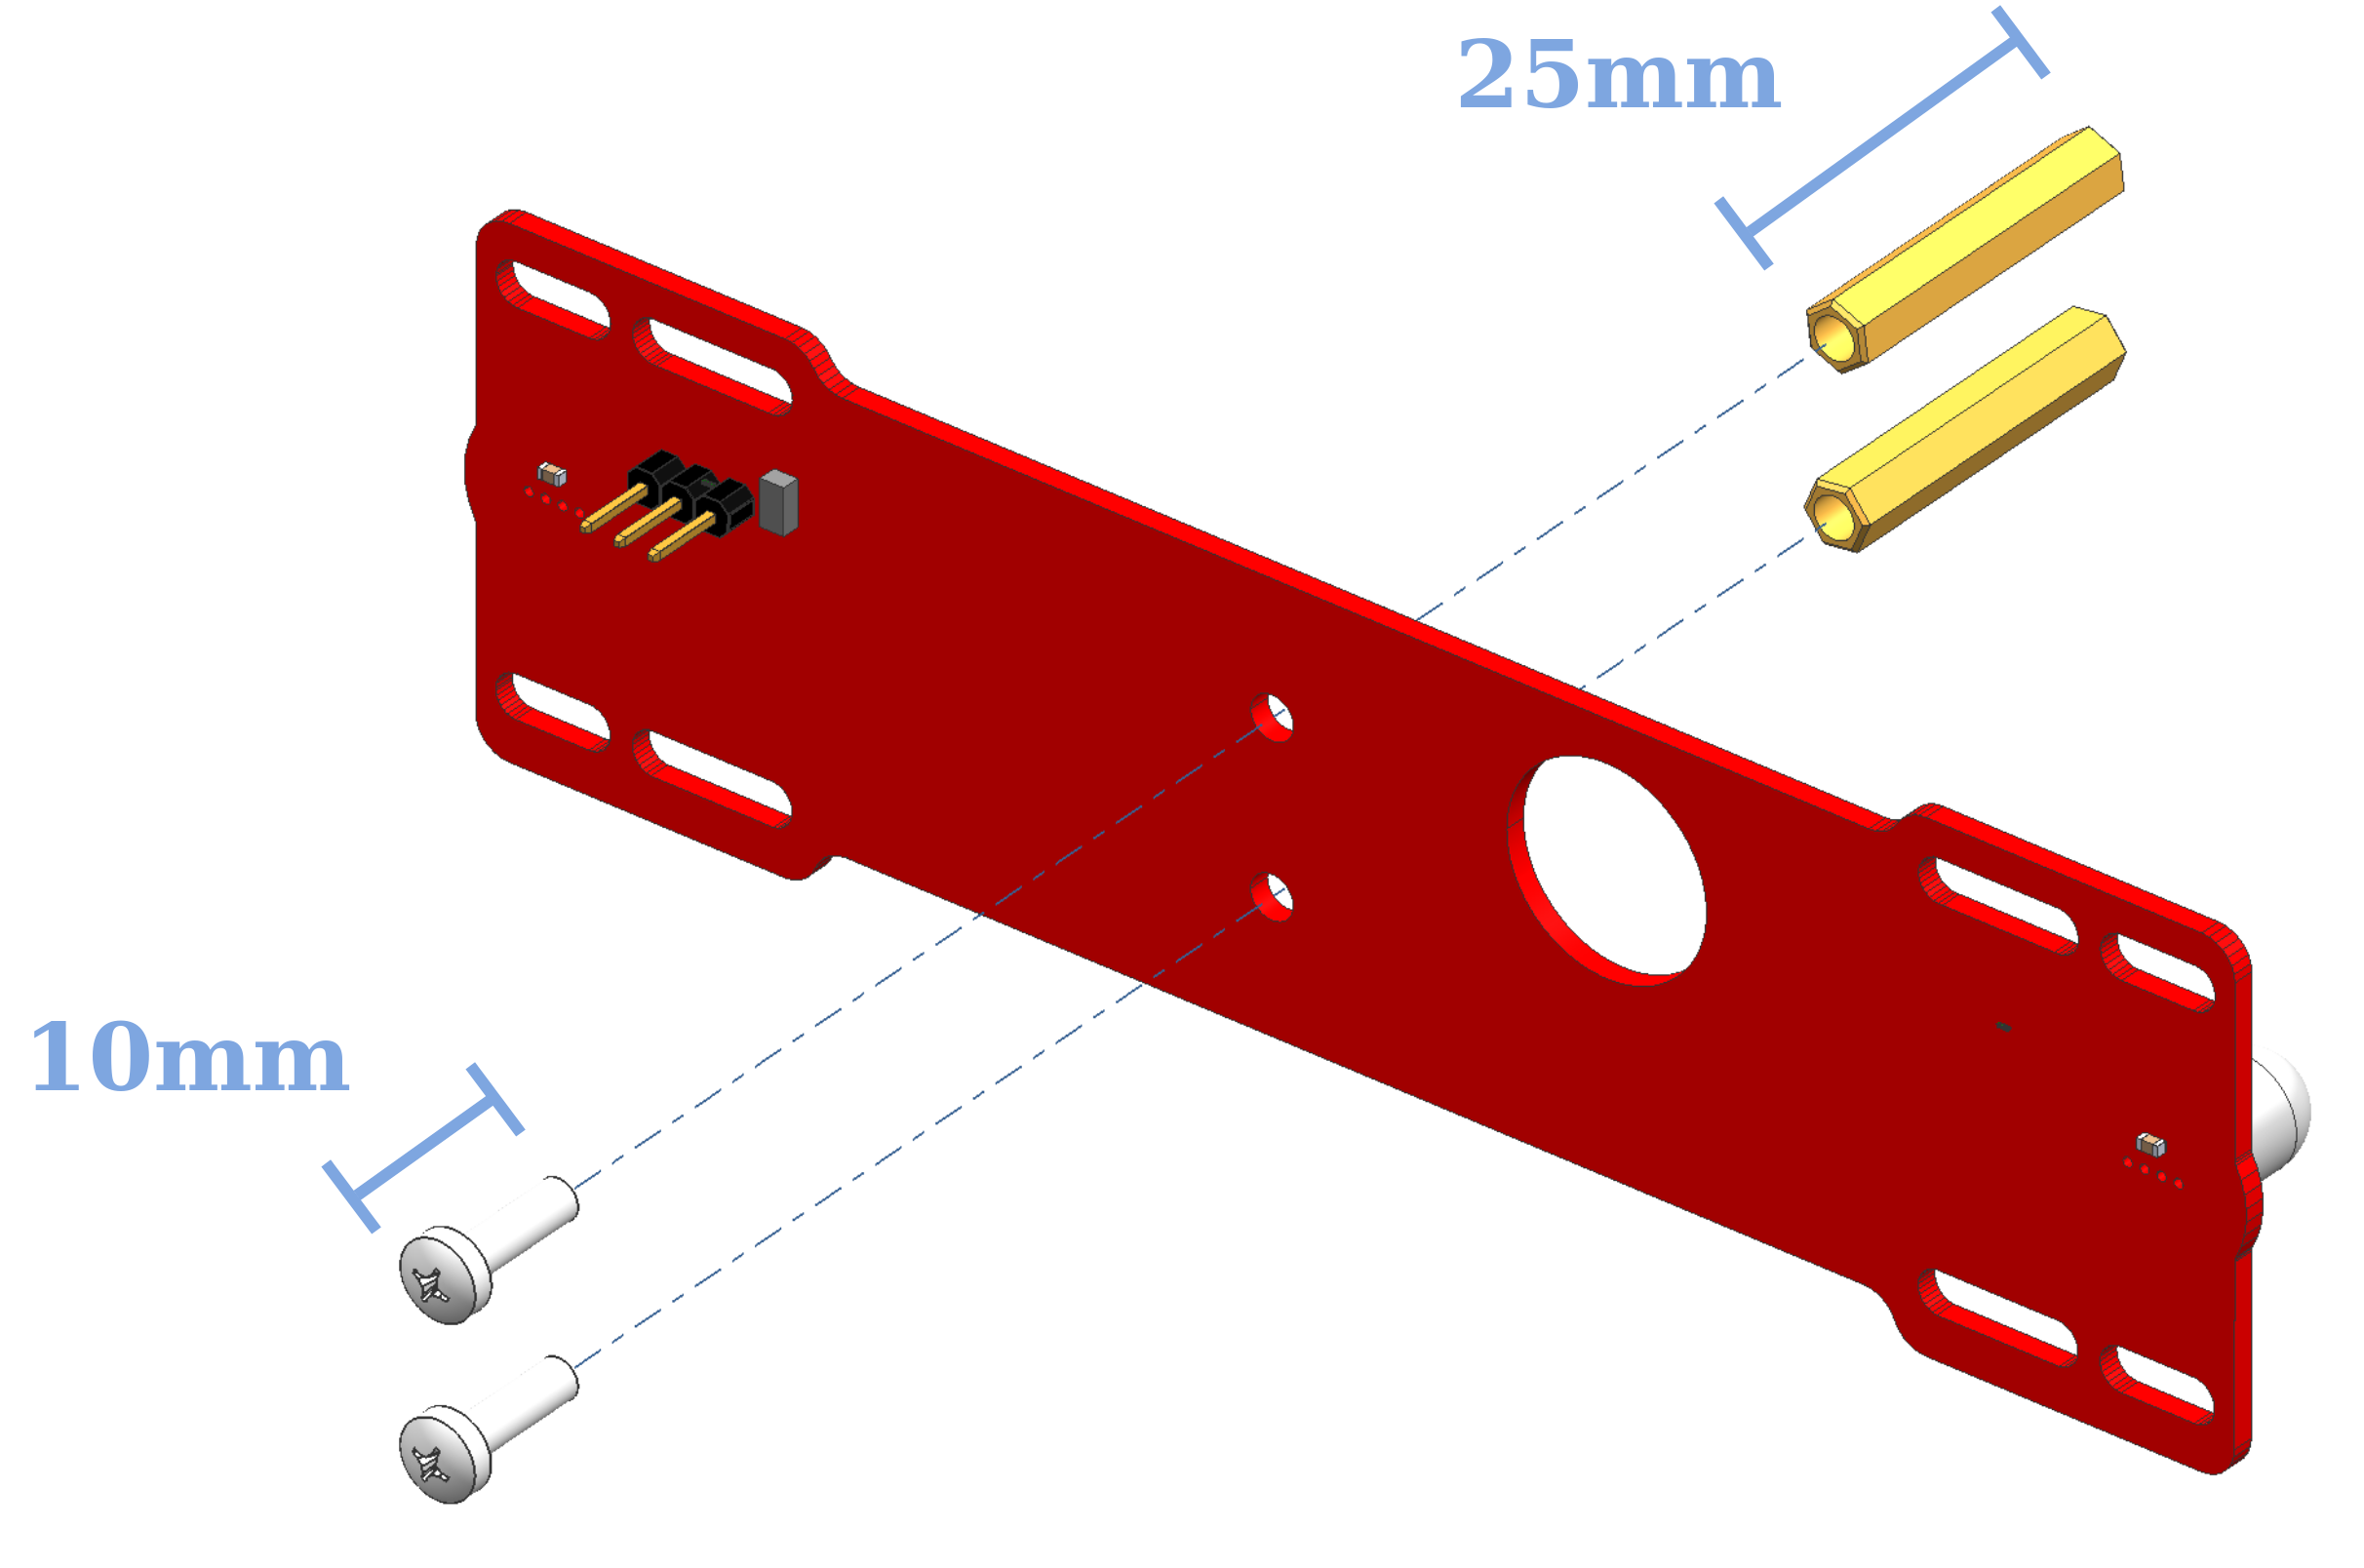
Pay attention that the spacers should be in the same direction as the LEDs.
Step 24
✎Modified 2020-03-07 by rafaelfroehlich
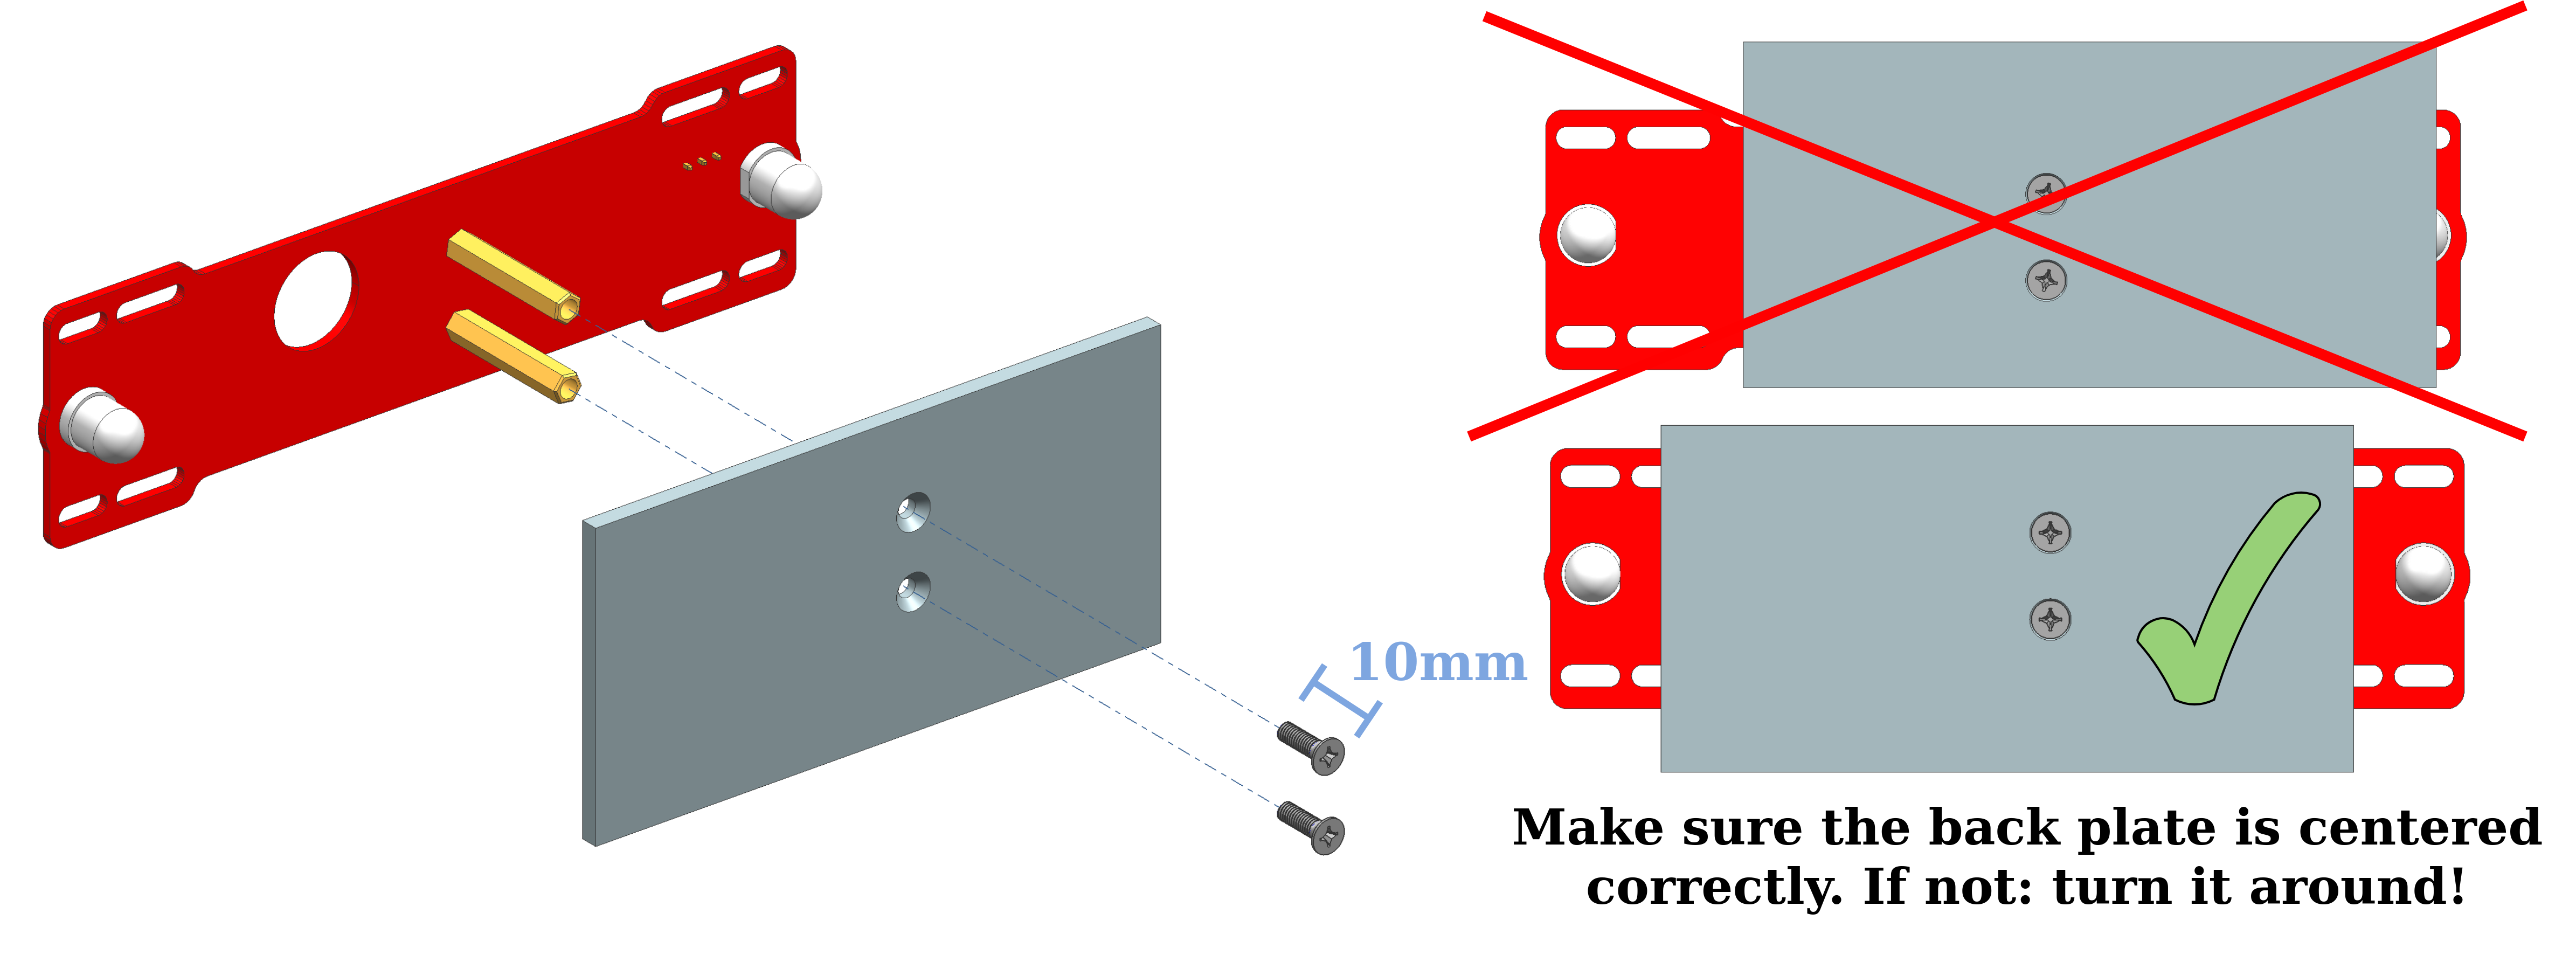
Fasten the back plate to the back bumper standoffs using the countersunk screws. The back plate is not symmetric, place it such that it is centered with respect to the back bumper as shown in picture Figure 16.35.
Step 25
✎Modified 2020-03-07 by rafaelfroehlich
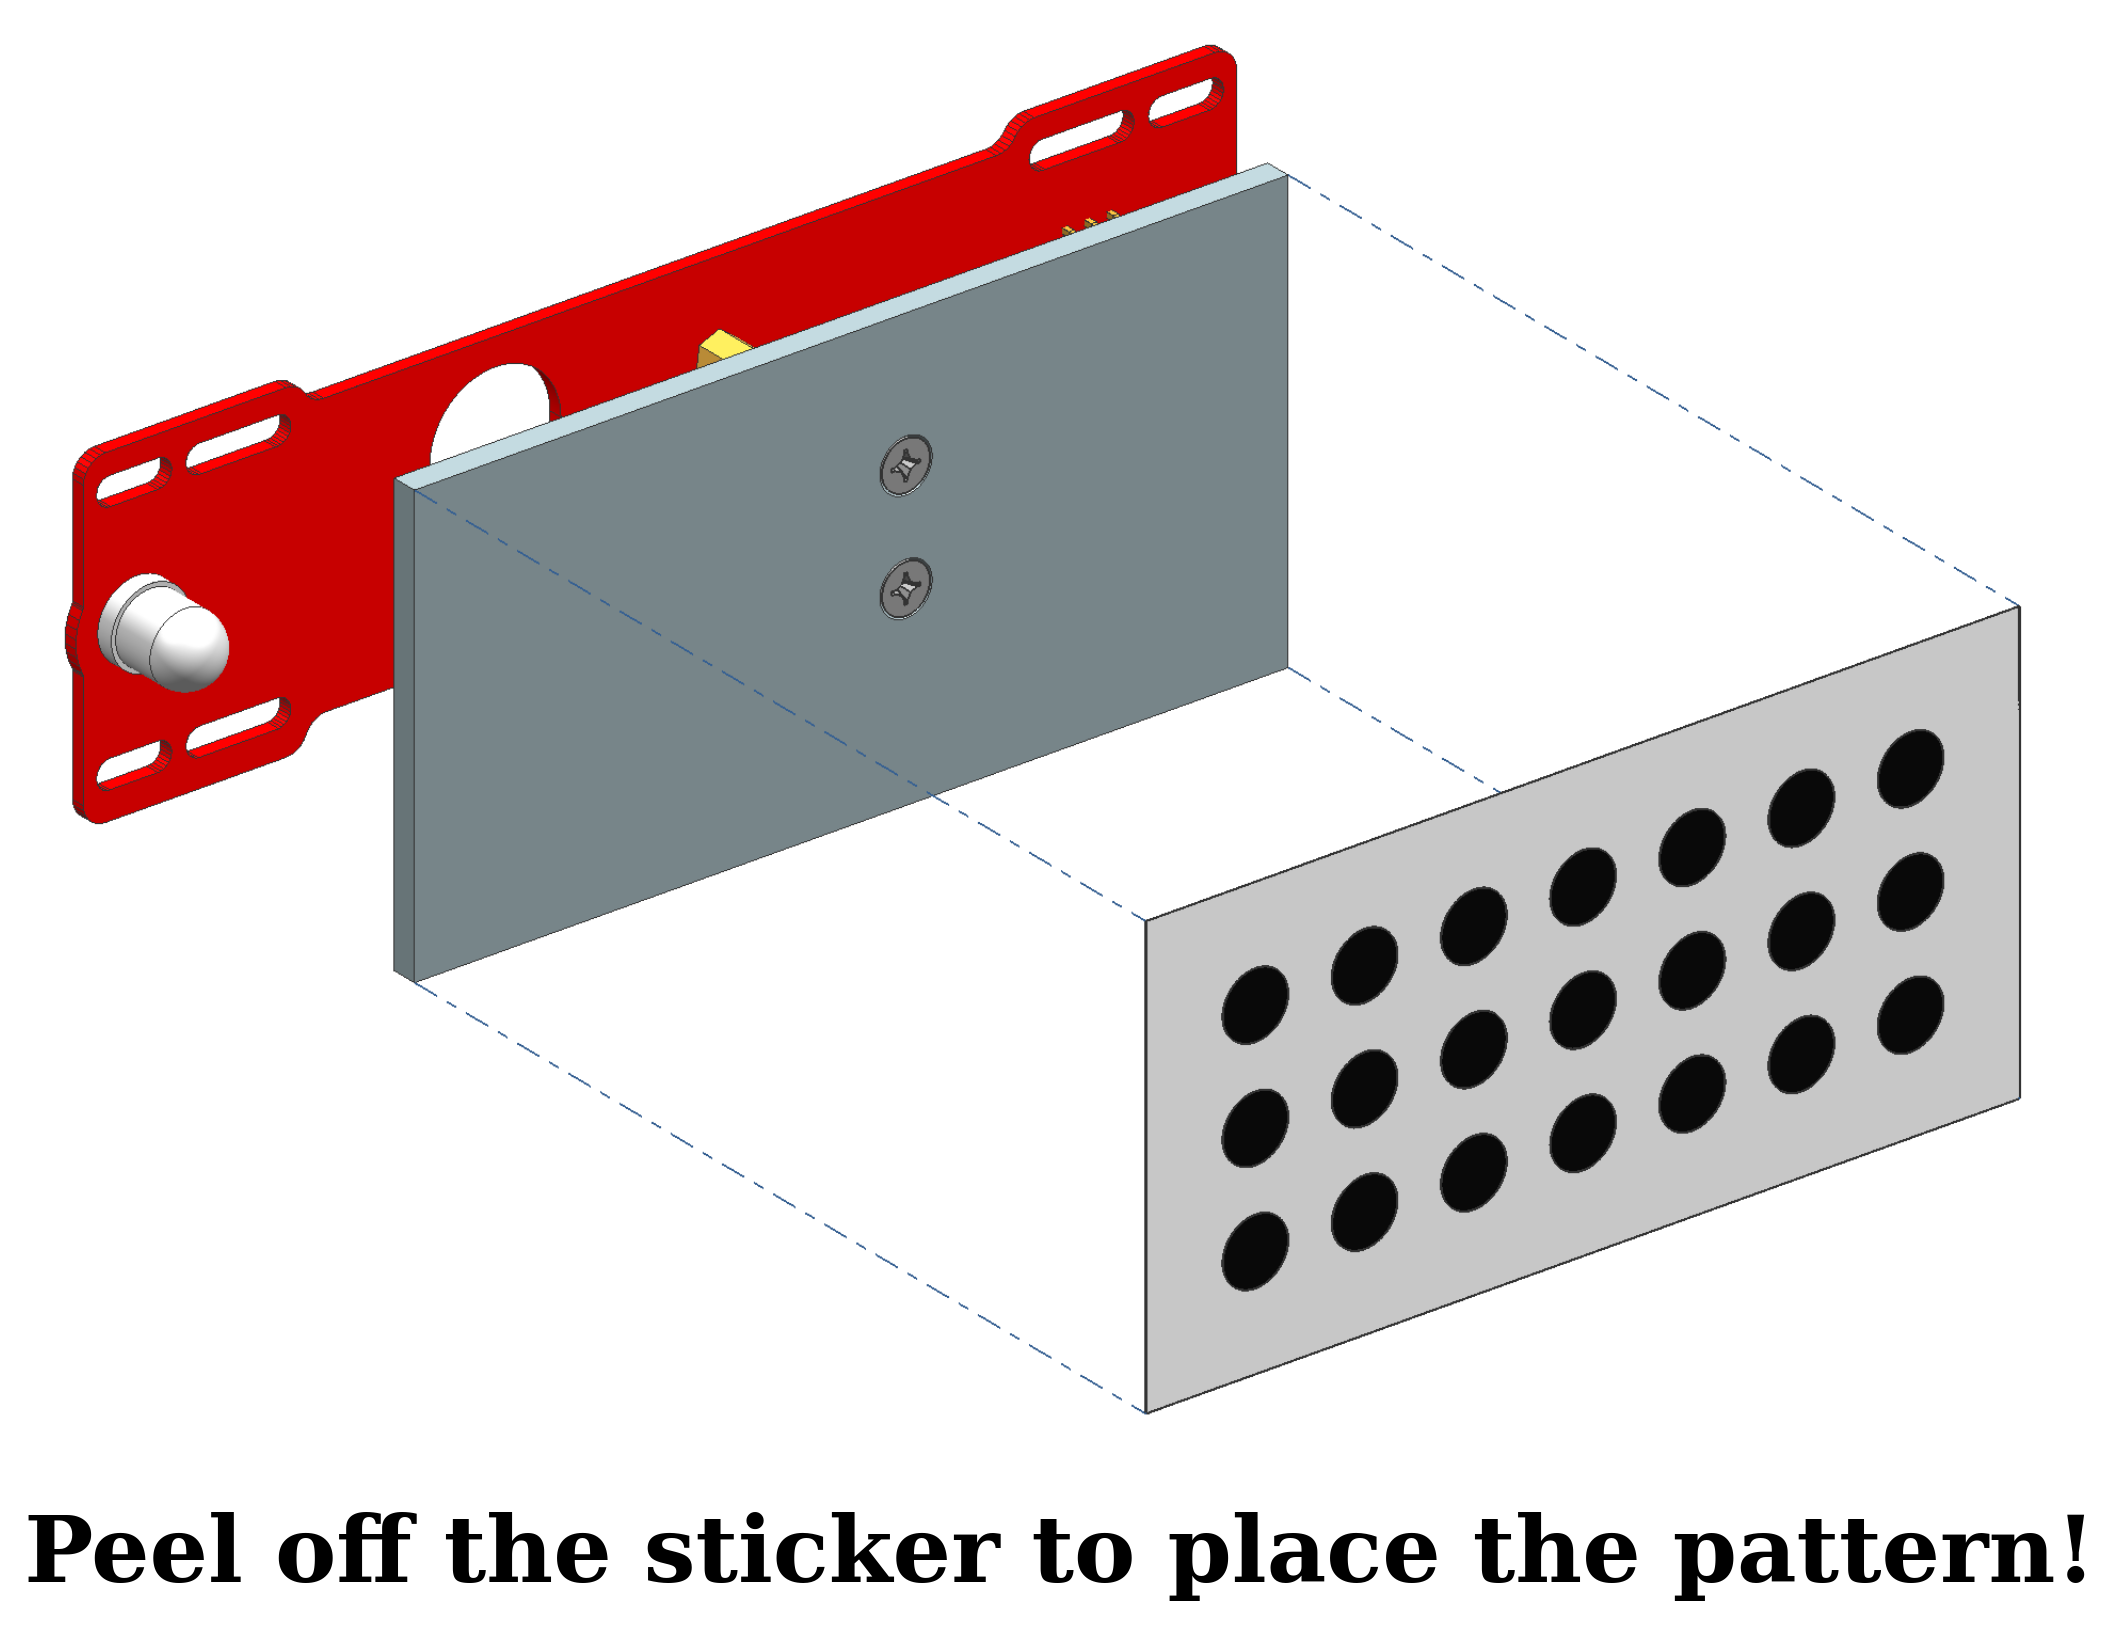
Peel off the sticker with the circle pattern and put it on the pattern plate mounted before, see picture Figure 16.36.
Step 26
✎Modified 2020-04-03 by Rafael Froehlich
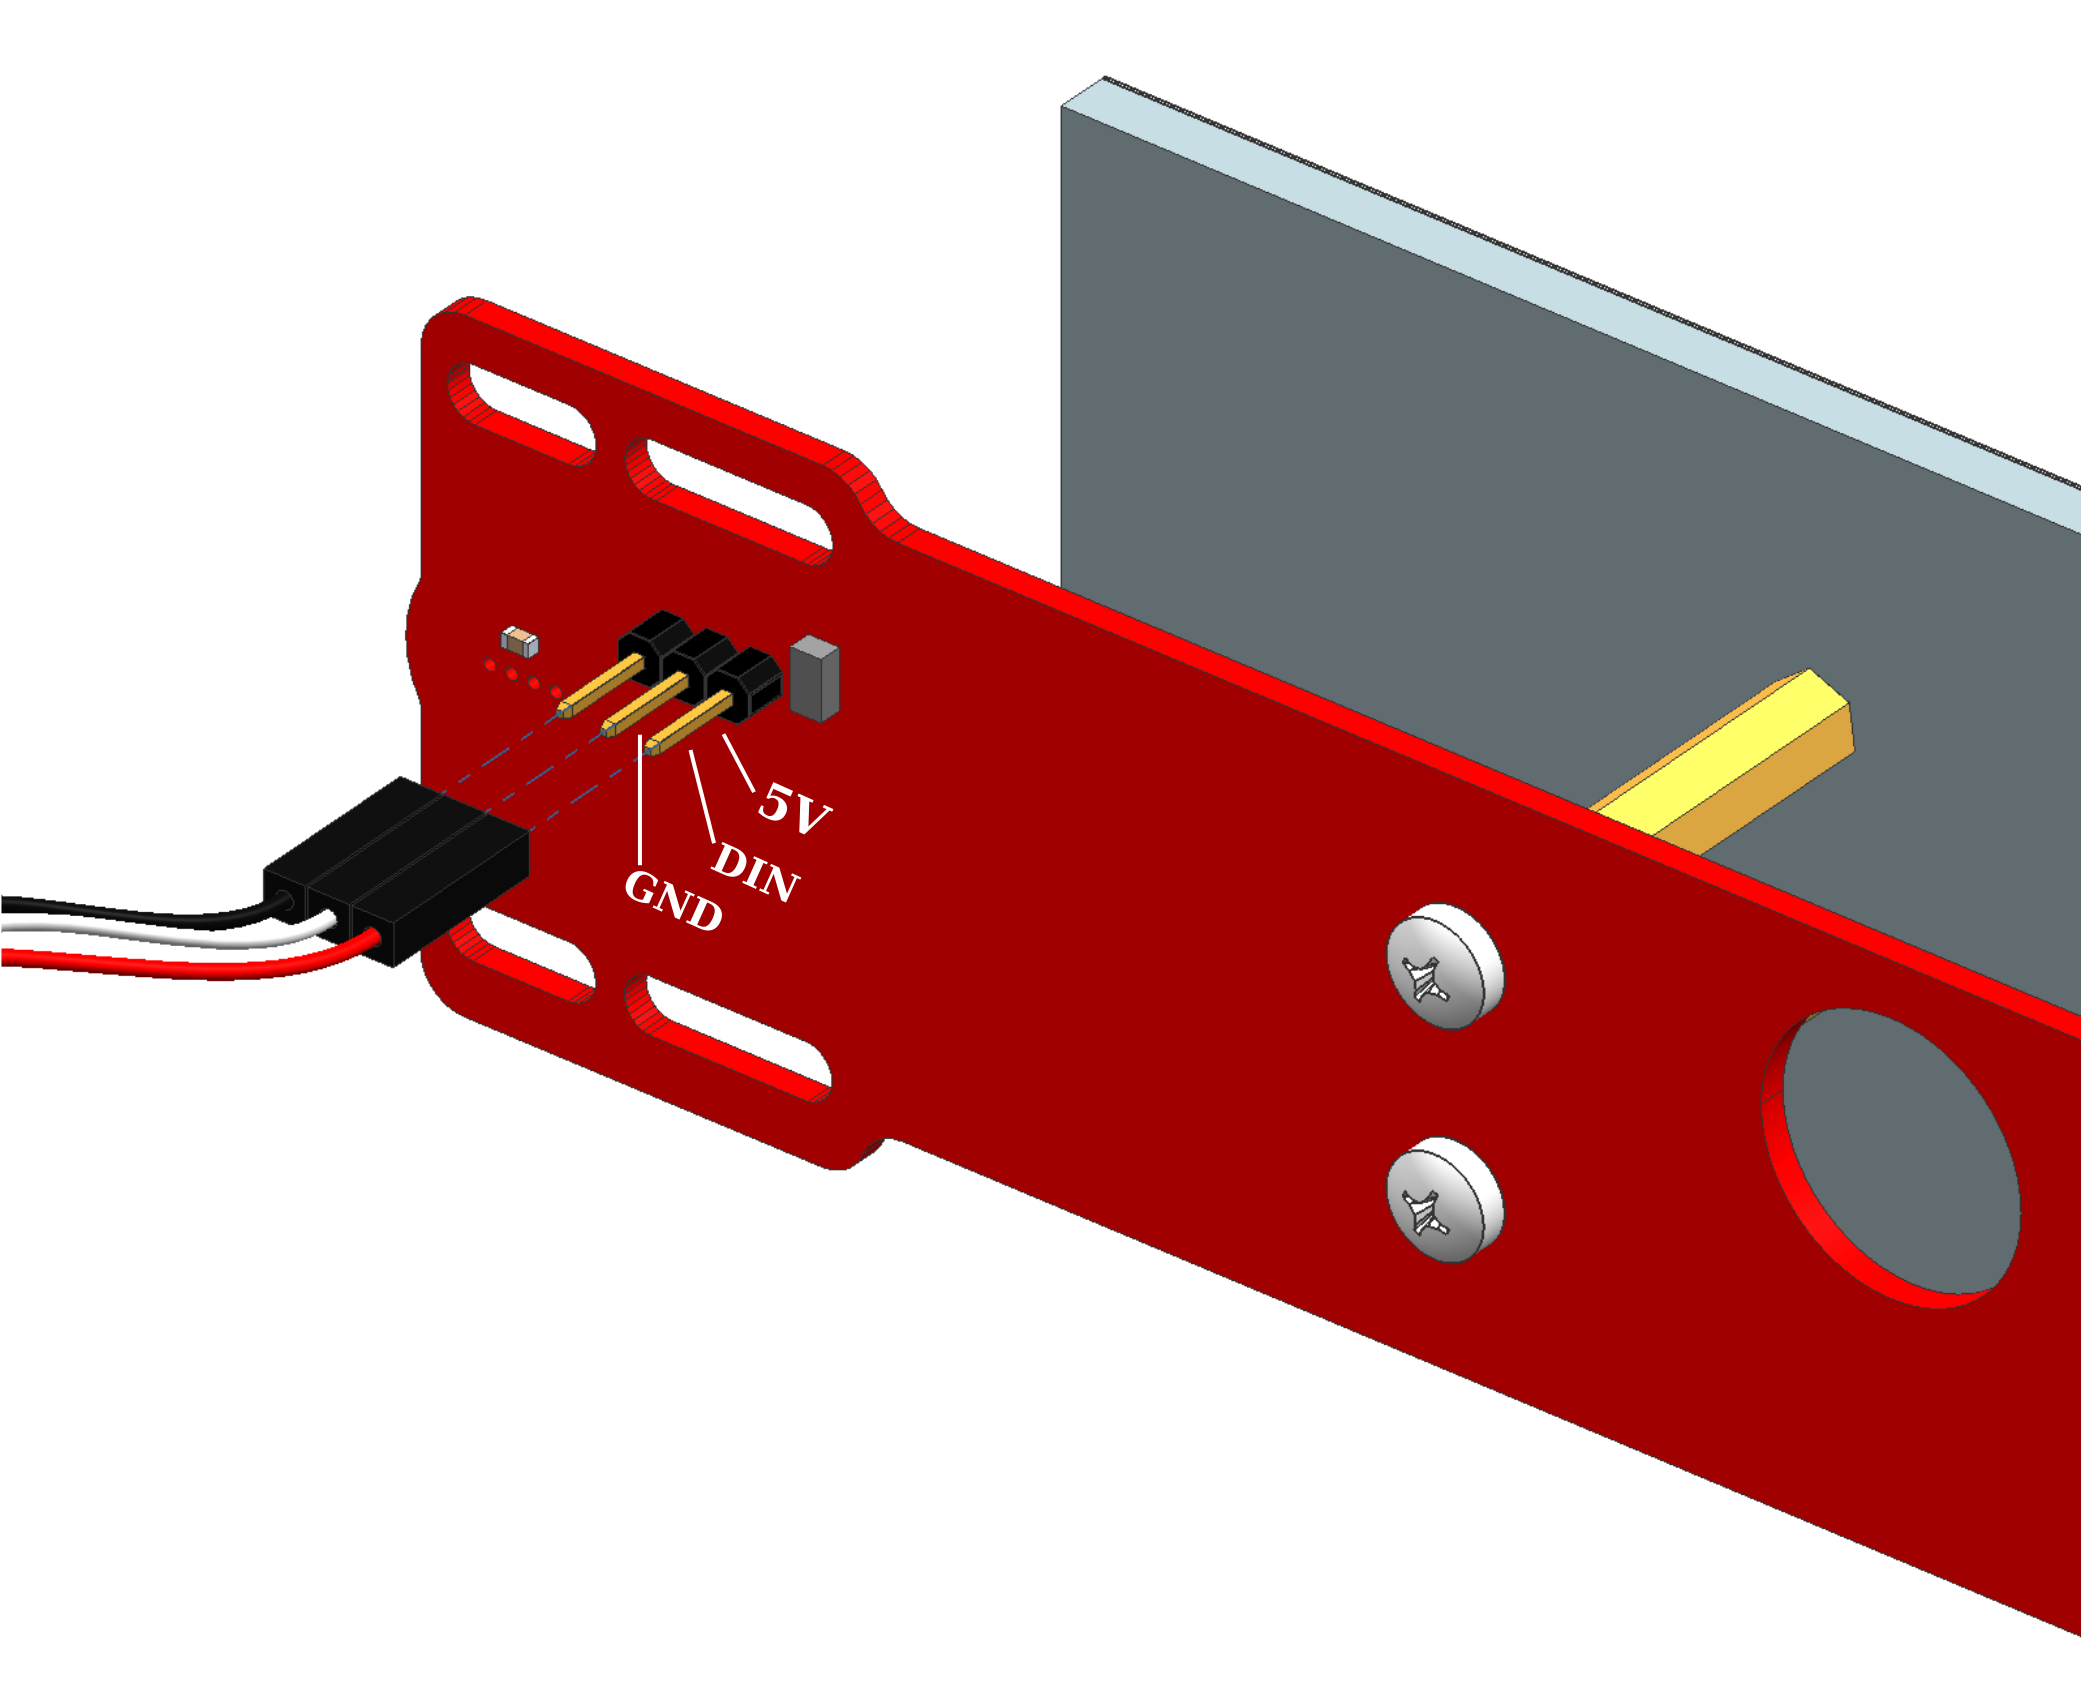
Connect a new jumper wire (F/F) to the connector on the back bumper, see picture Figure 16.37.
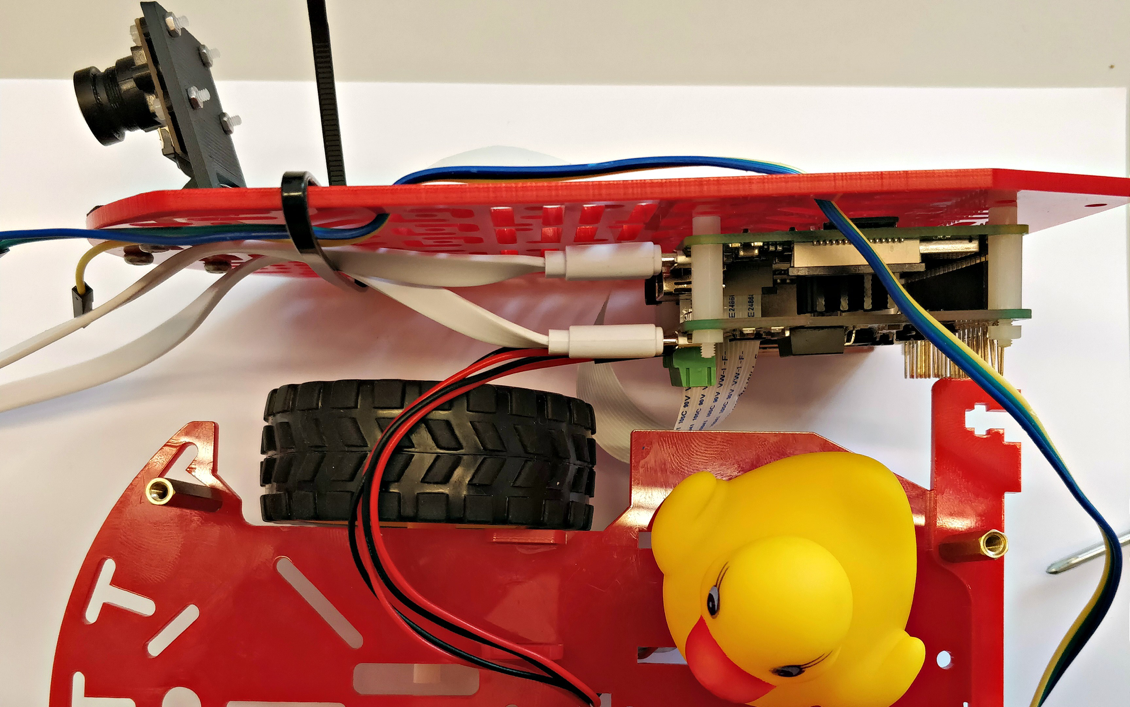
No matter what exact solution you choose concerning the cable management, the objective is to avoid any cables from touching the wheels in the end. One solution could be something like it is shown in figure Figure 16.38.
Step 27
✎Modified 2020-03-07 by rafaelfroehlich
Screw the back bumper to the rest of the chassis with four metal screws and nuts, see picture Figure 16.39.
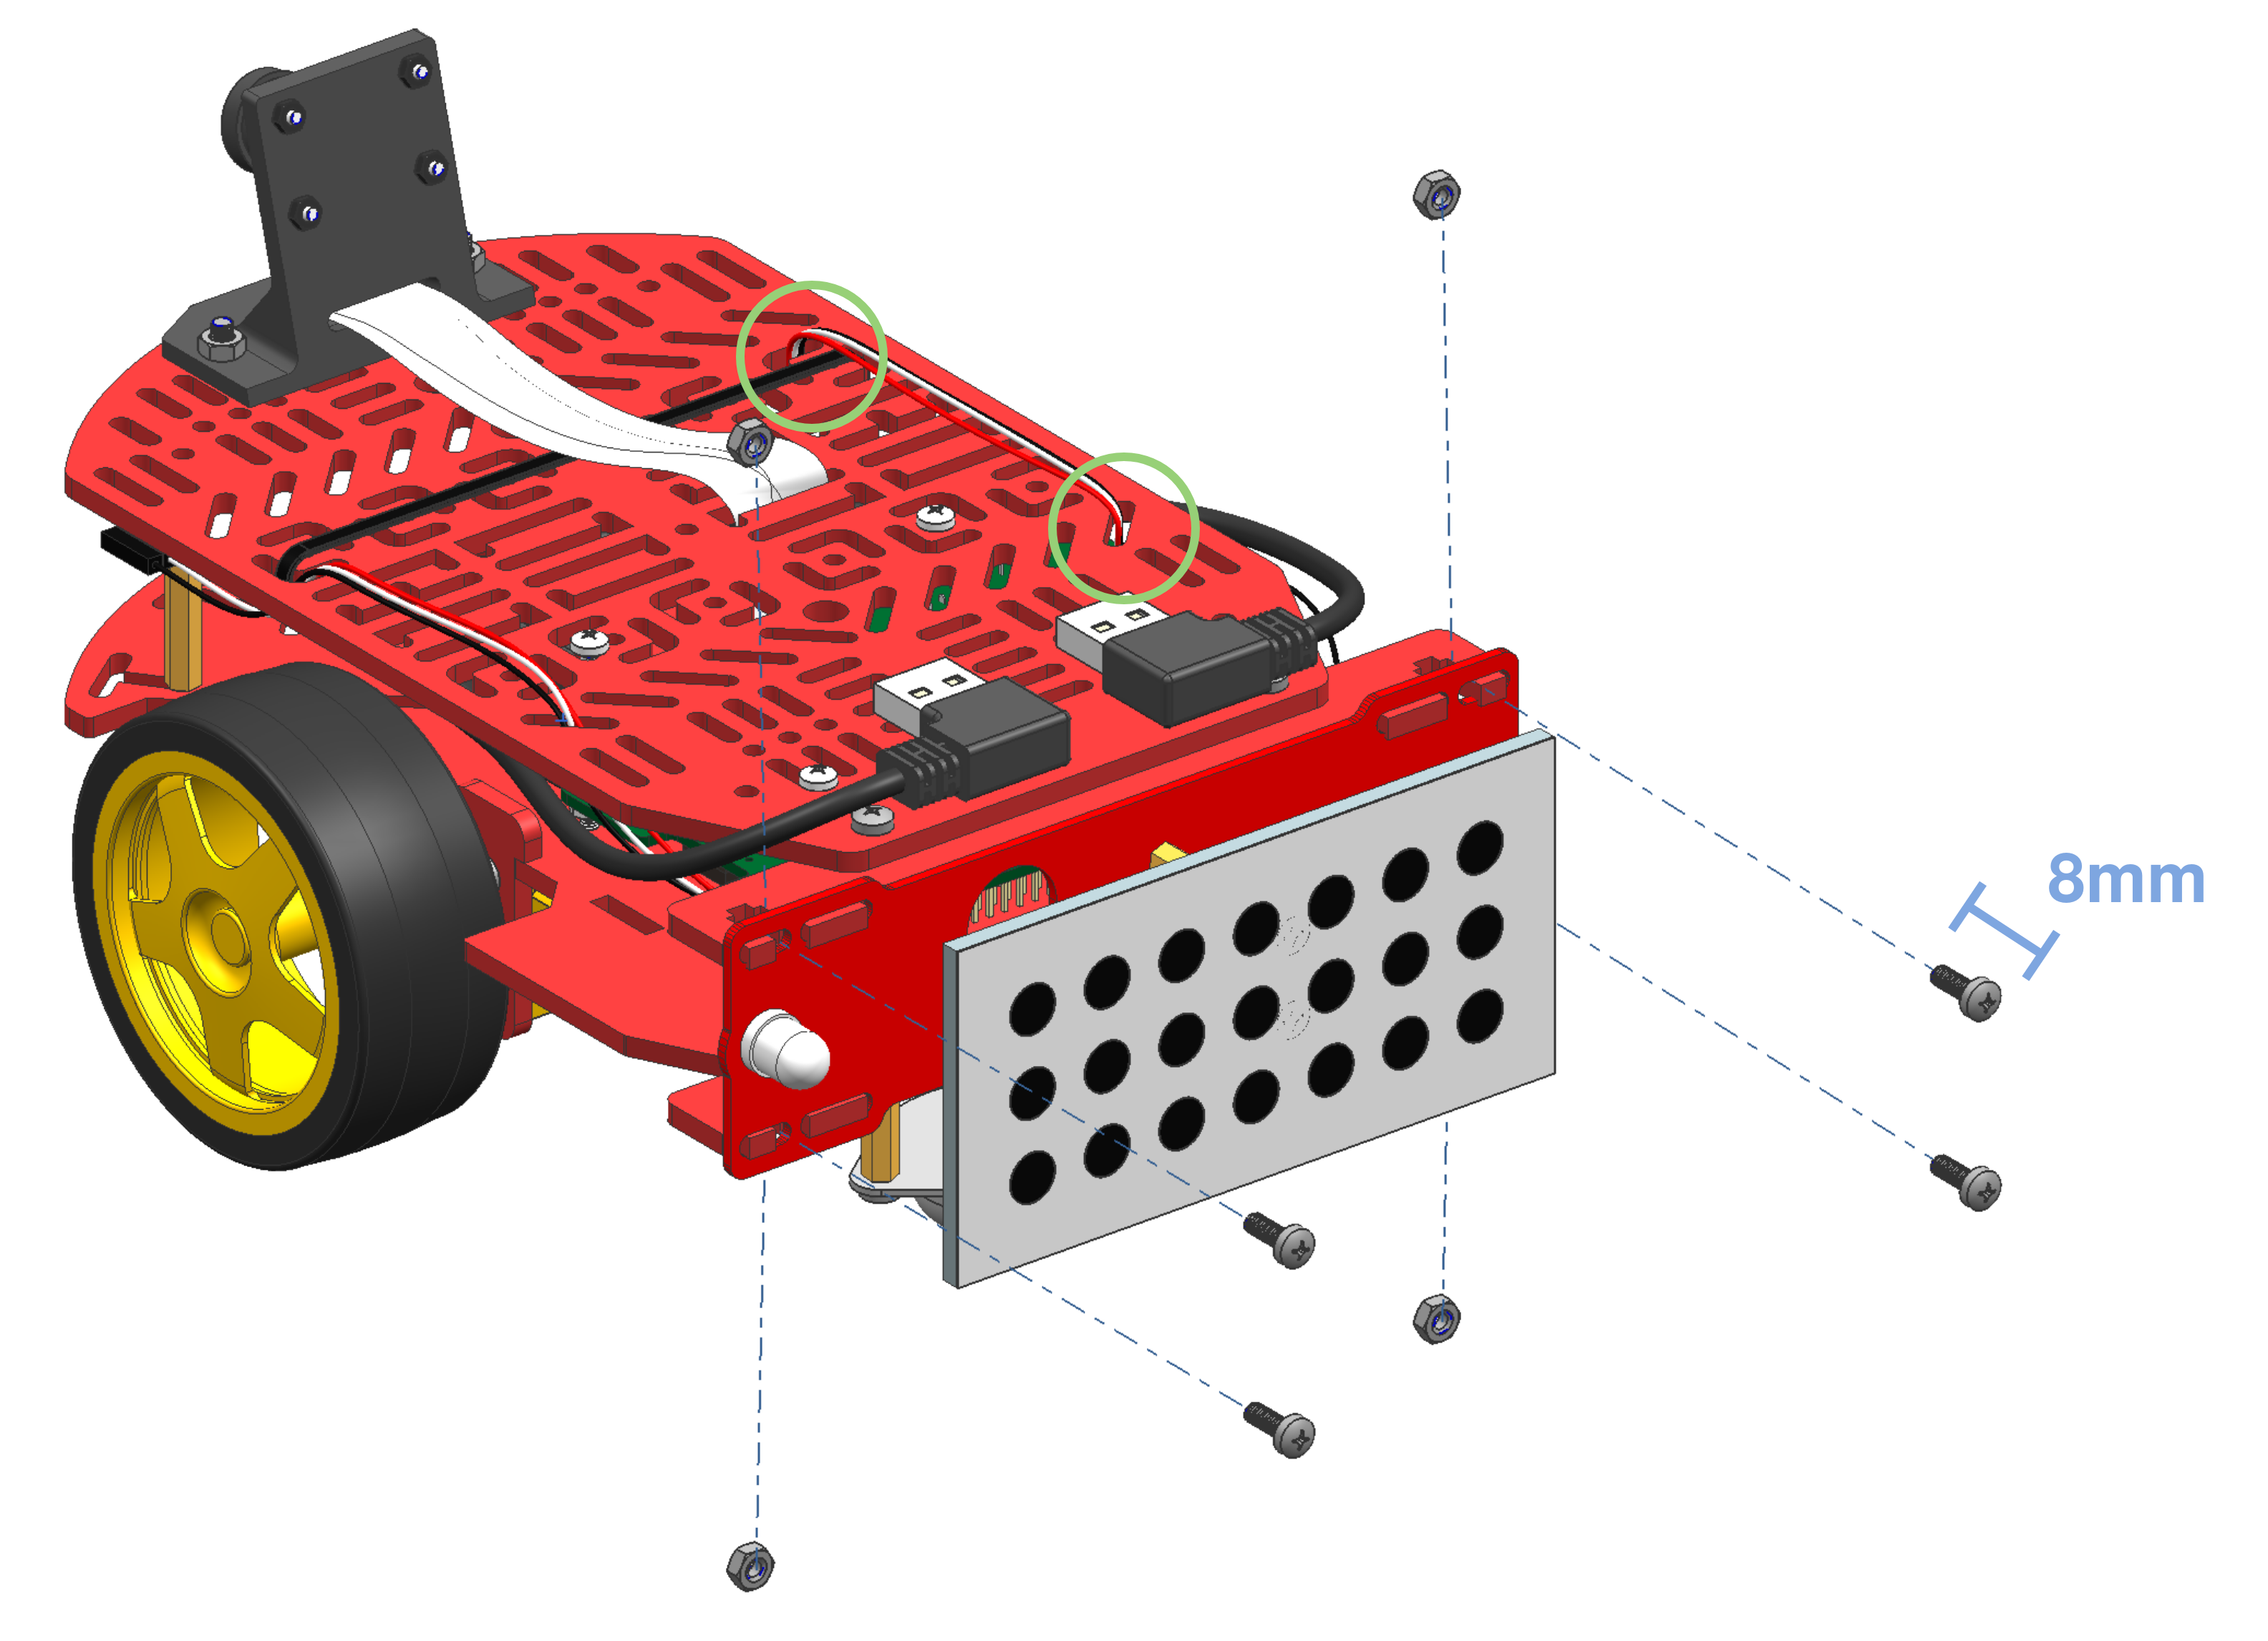
Pay attention that the pins of the bumper bracers are properly put in the holes of the back bumper. It might be a little bit difficult to place it properly.
Wire the cable mounted in step 26 through the top plate of the chassis as shown in the picture as well.
Front bumper
✎Modified 2020-03-07 by rafaelfroehlich
From the Duckiebot kit take the following components:
- Front bumper (1x)
- M3x10 metal screws (2x)
Step 28
✎Modified 2020-04-03 by Rafael Froehlich
At that point you should have arrived with two loose cables in the front. Make sure to connect both of them to the front bumper. The one from step 26 on the right hand side and the other on the left hand side, see picture Figure 16.40.

Step 29
✎Modified 2020-03-07 by rafaelfroehlich
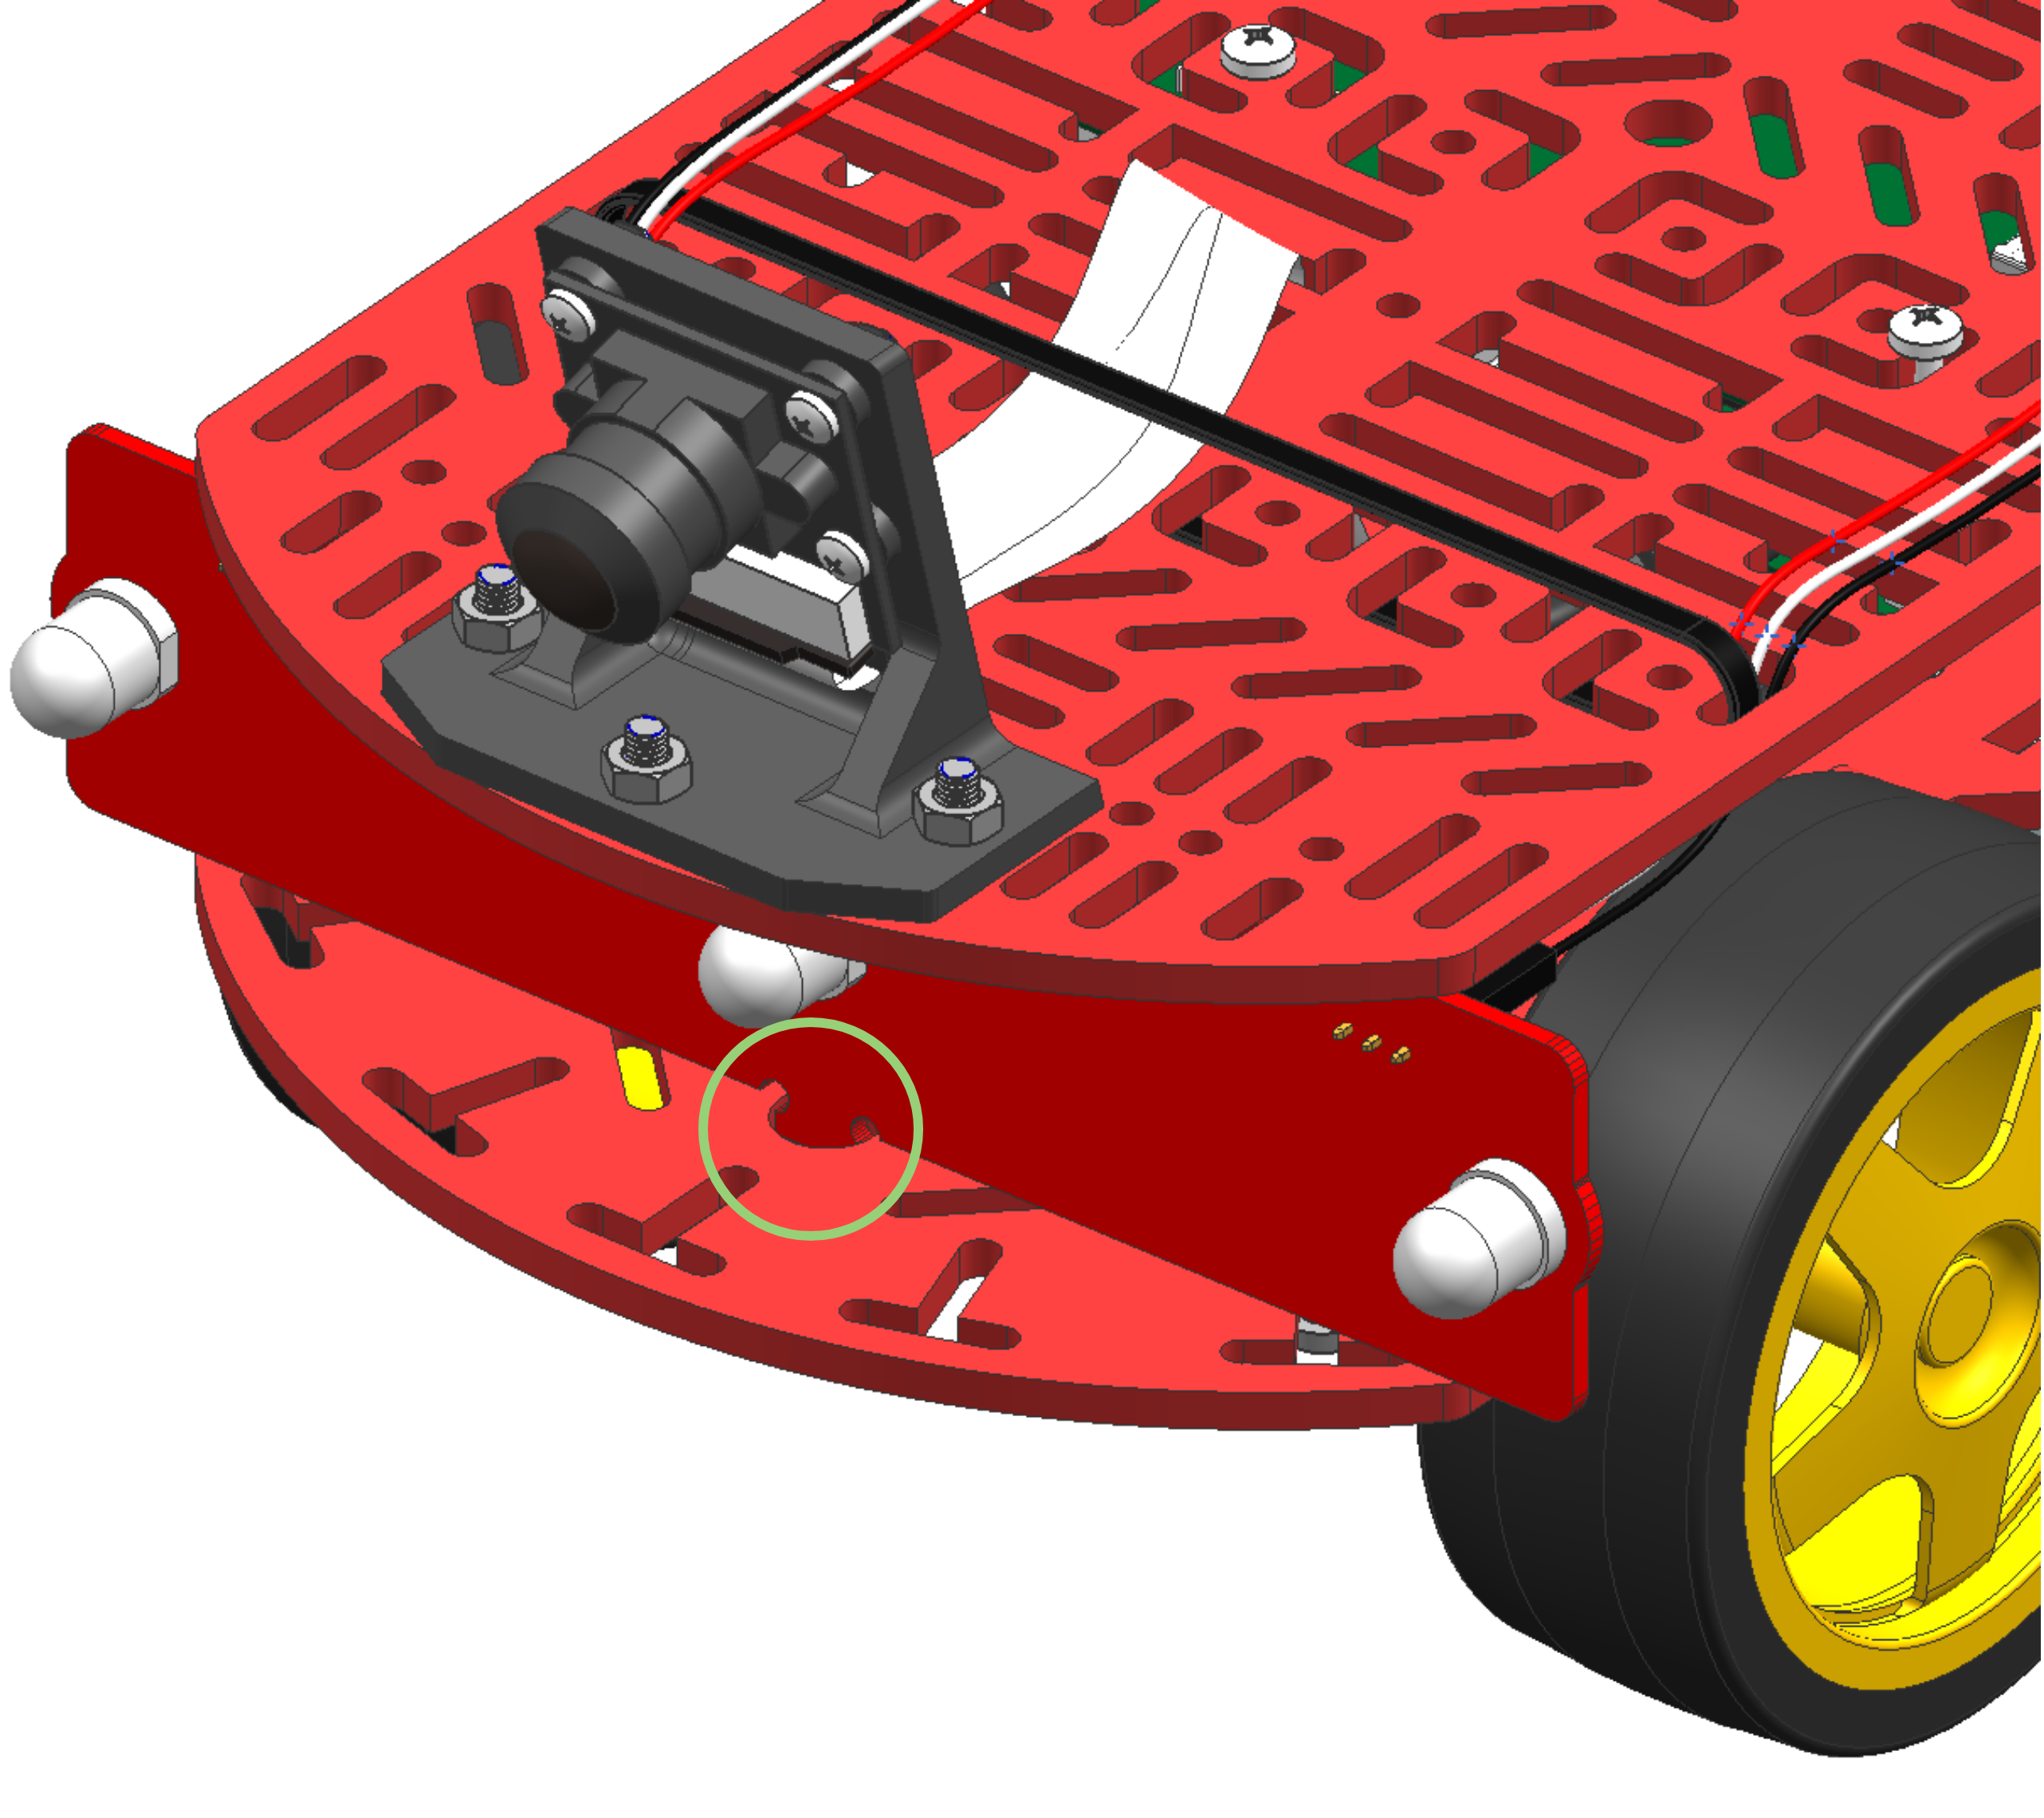
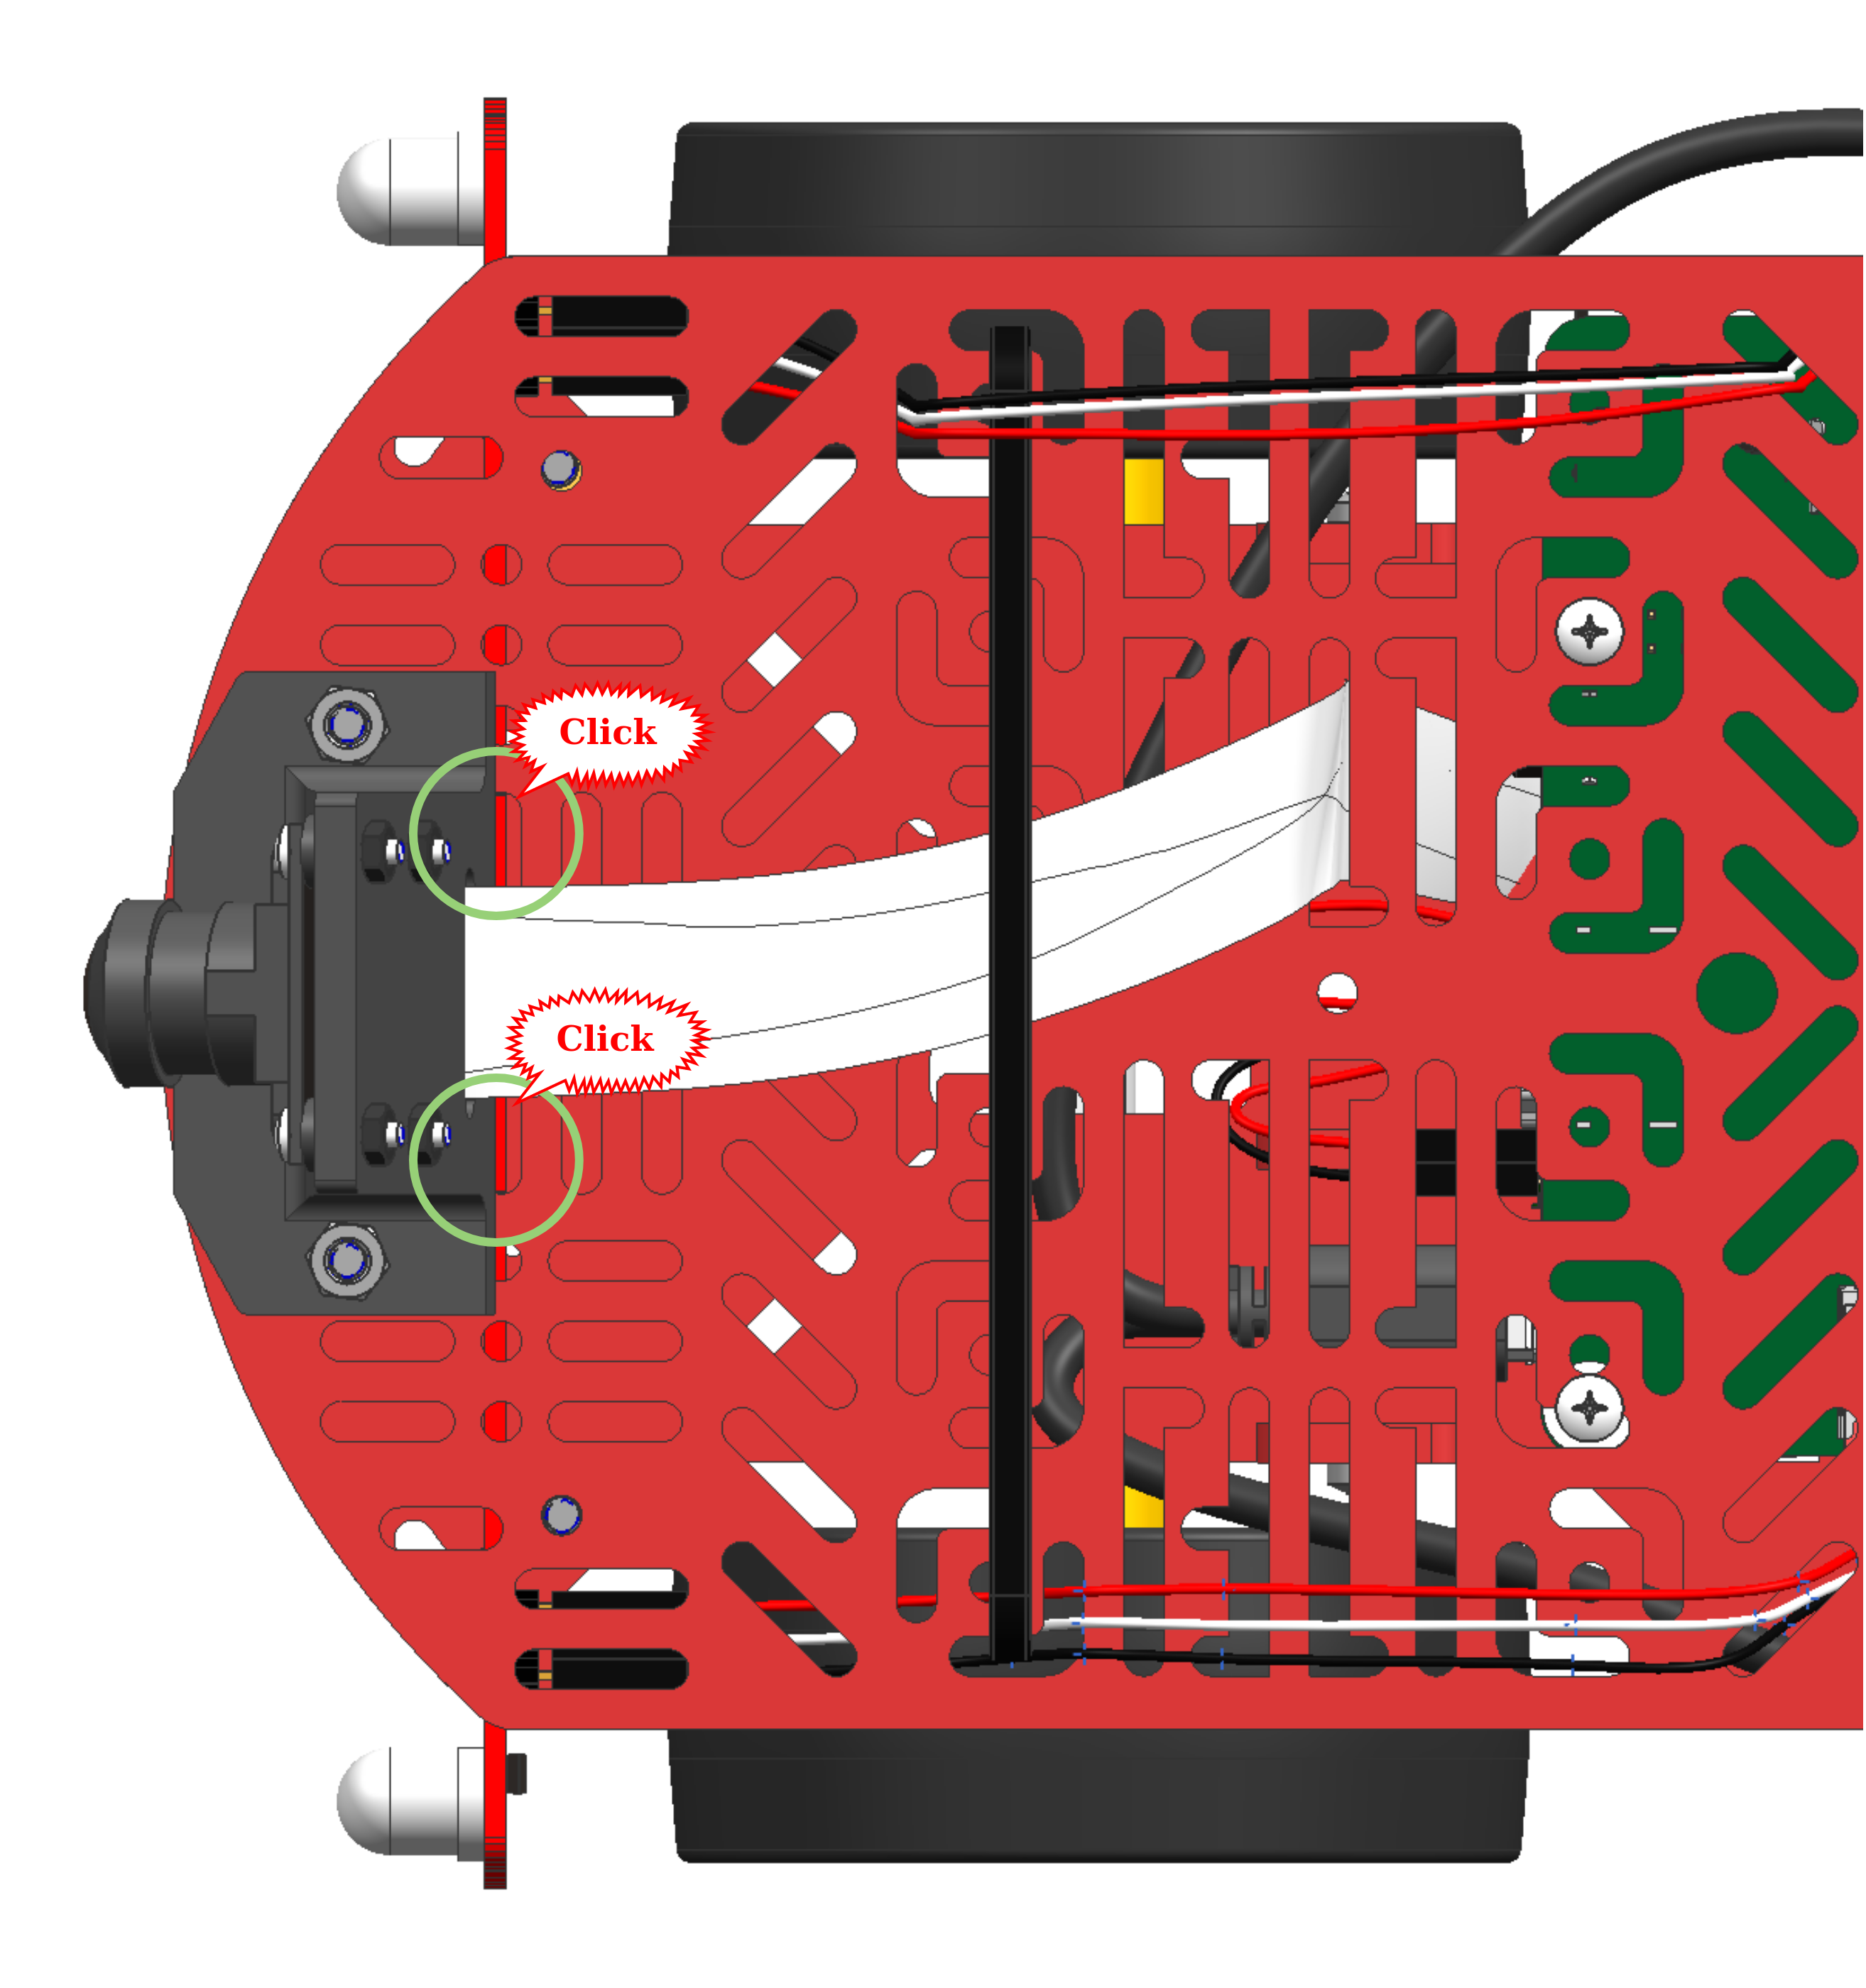
First, click in the front bumper without any screws. Maybe you have to bend the top and bottom plate of the chassis a little bit in order to make it fit, see pictures Figure 16.41 and Figure 16.42
Step 30
✎Modified 2020-03-07 by rafaelfroehlich
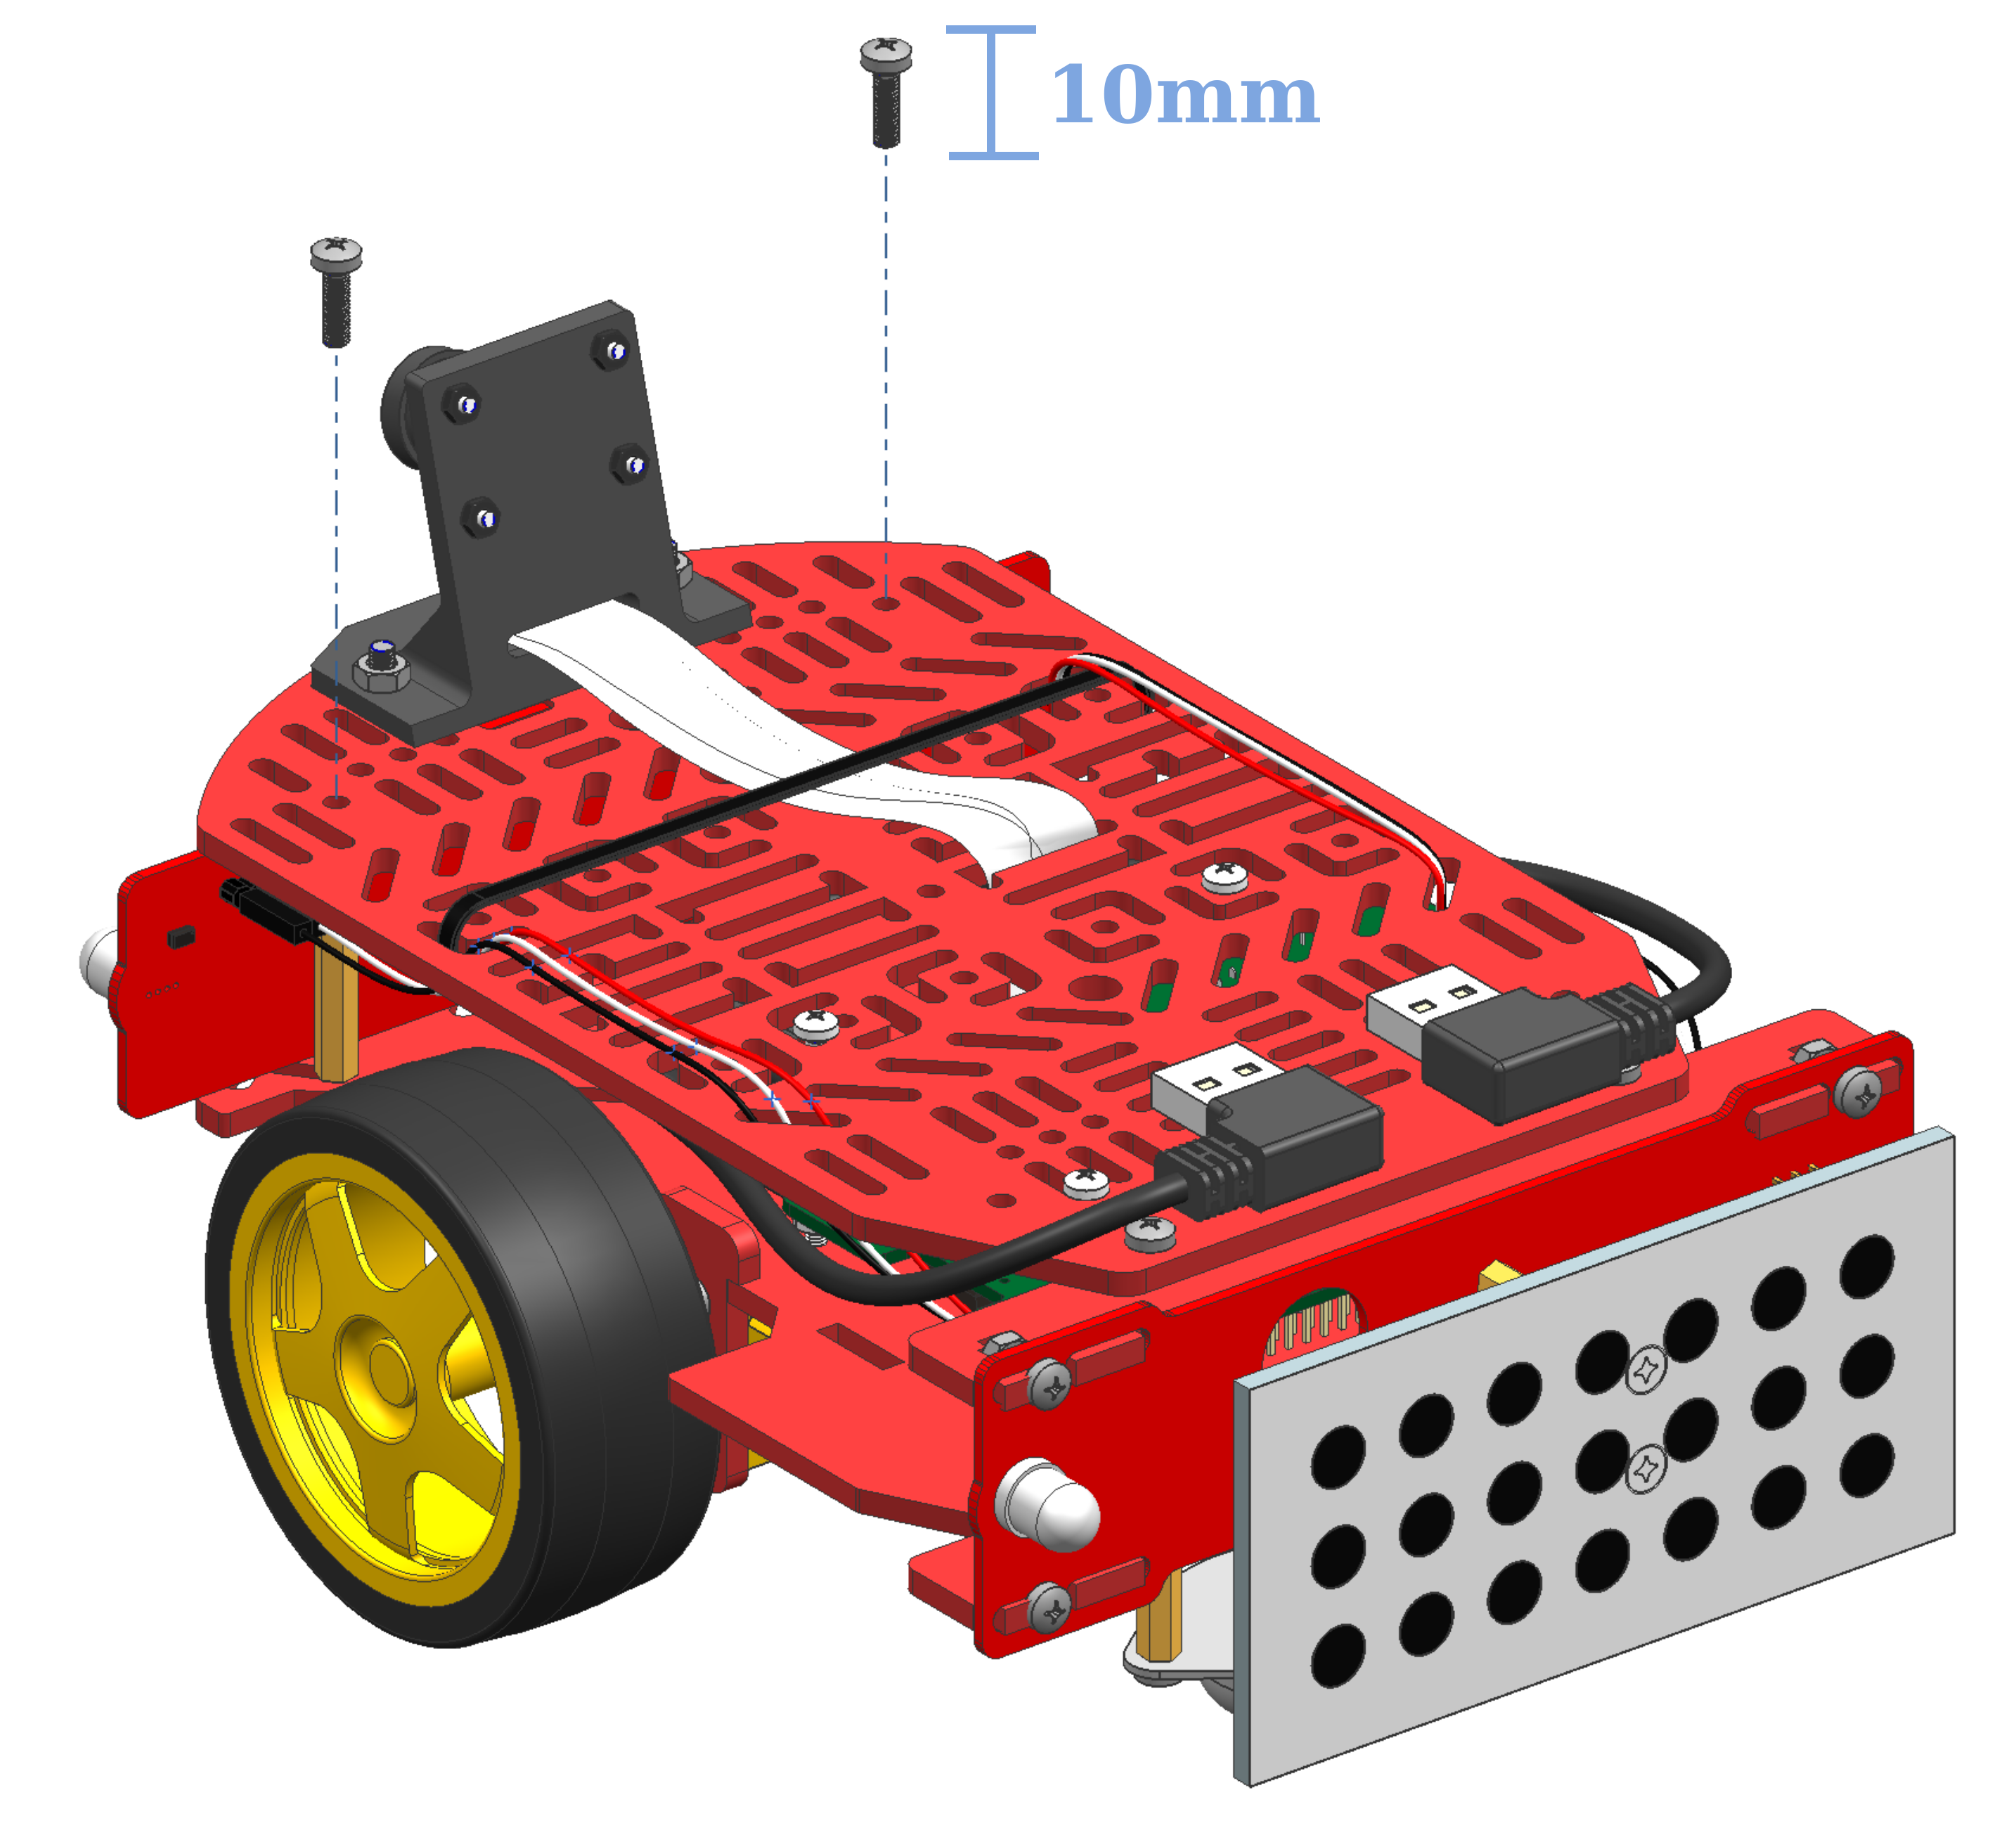
Now use the two M3x10 metal screws to finally fix the top plate of the chassis properly. This will now prevent the front bumper from falling out again. Probably you will have to move the standoffs a little bit in order to make the holes flush, see figure Figure 16.43.
Battery and Duckie
✎Modified 2020-03-07 by rafaelfroehlich
From the Duckiebot kit take the following components:
- Battery (1x)
- Zip tie (1x)
- Duckie (N+1x)
Visual inspection
✎Modified 2020-03-07 by rafaelfroehlich
Before plugging in the battery, make sure the Hut’s GPIO pins are (a) not touching each other, (b) not touching any metal screws (in case you did not follow these instructions exactly) and (c) are free from any external object that might have gotten stuck there during the assembly process.
If the GPIOs of the Hut get shorted (there is an electrically conductive connection between them) when you plug in the battery, you might damage the Raspberry Pi beyond repair!
Step 31
✎Modified 2020-04-03 by Rafael Froehlich
Place the battery and fix it using a zip tie (Figure 16.44), then connect the USB cables.
Do not unplug/replug the bumper wires when the power is on. You could break the bumpers!
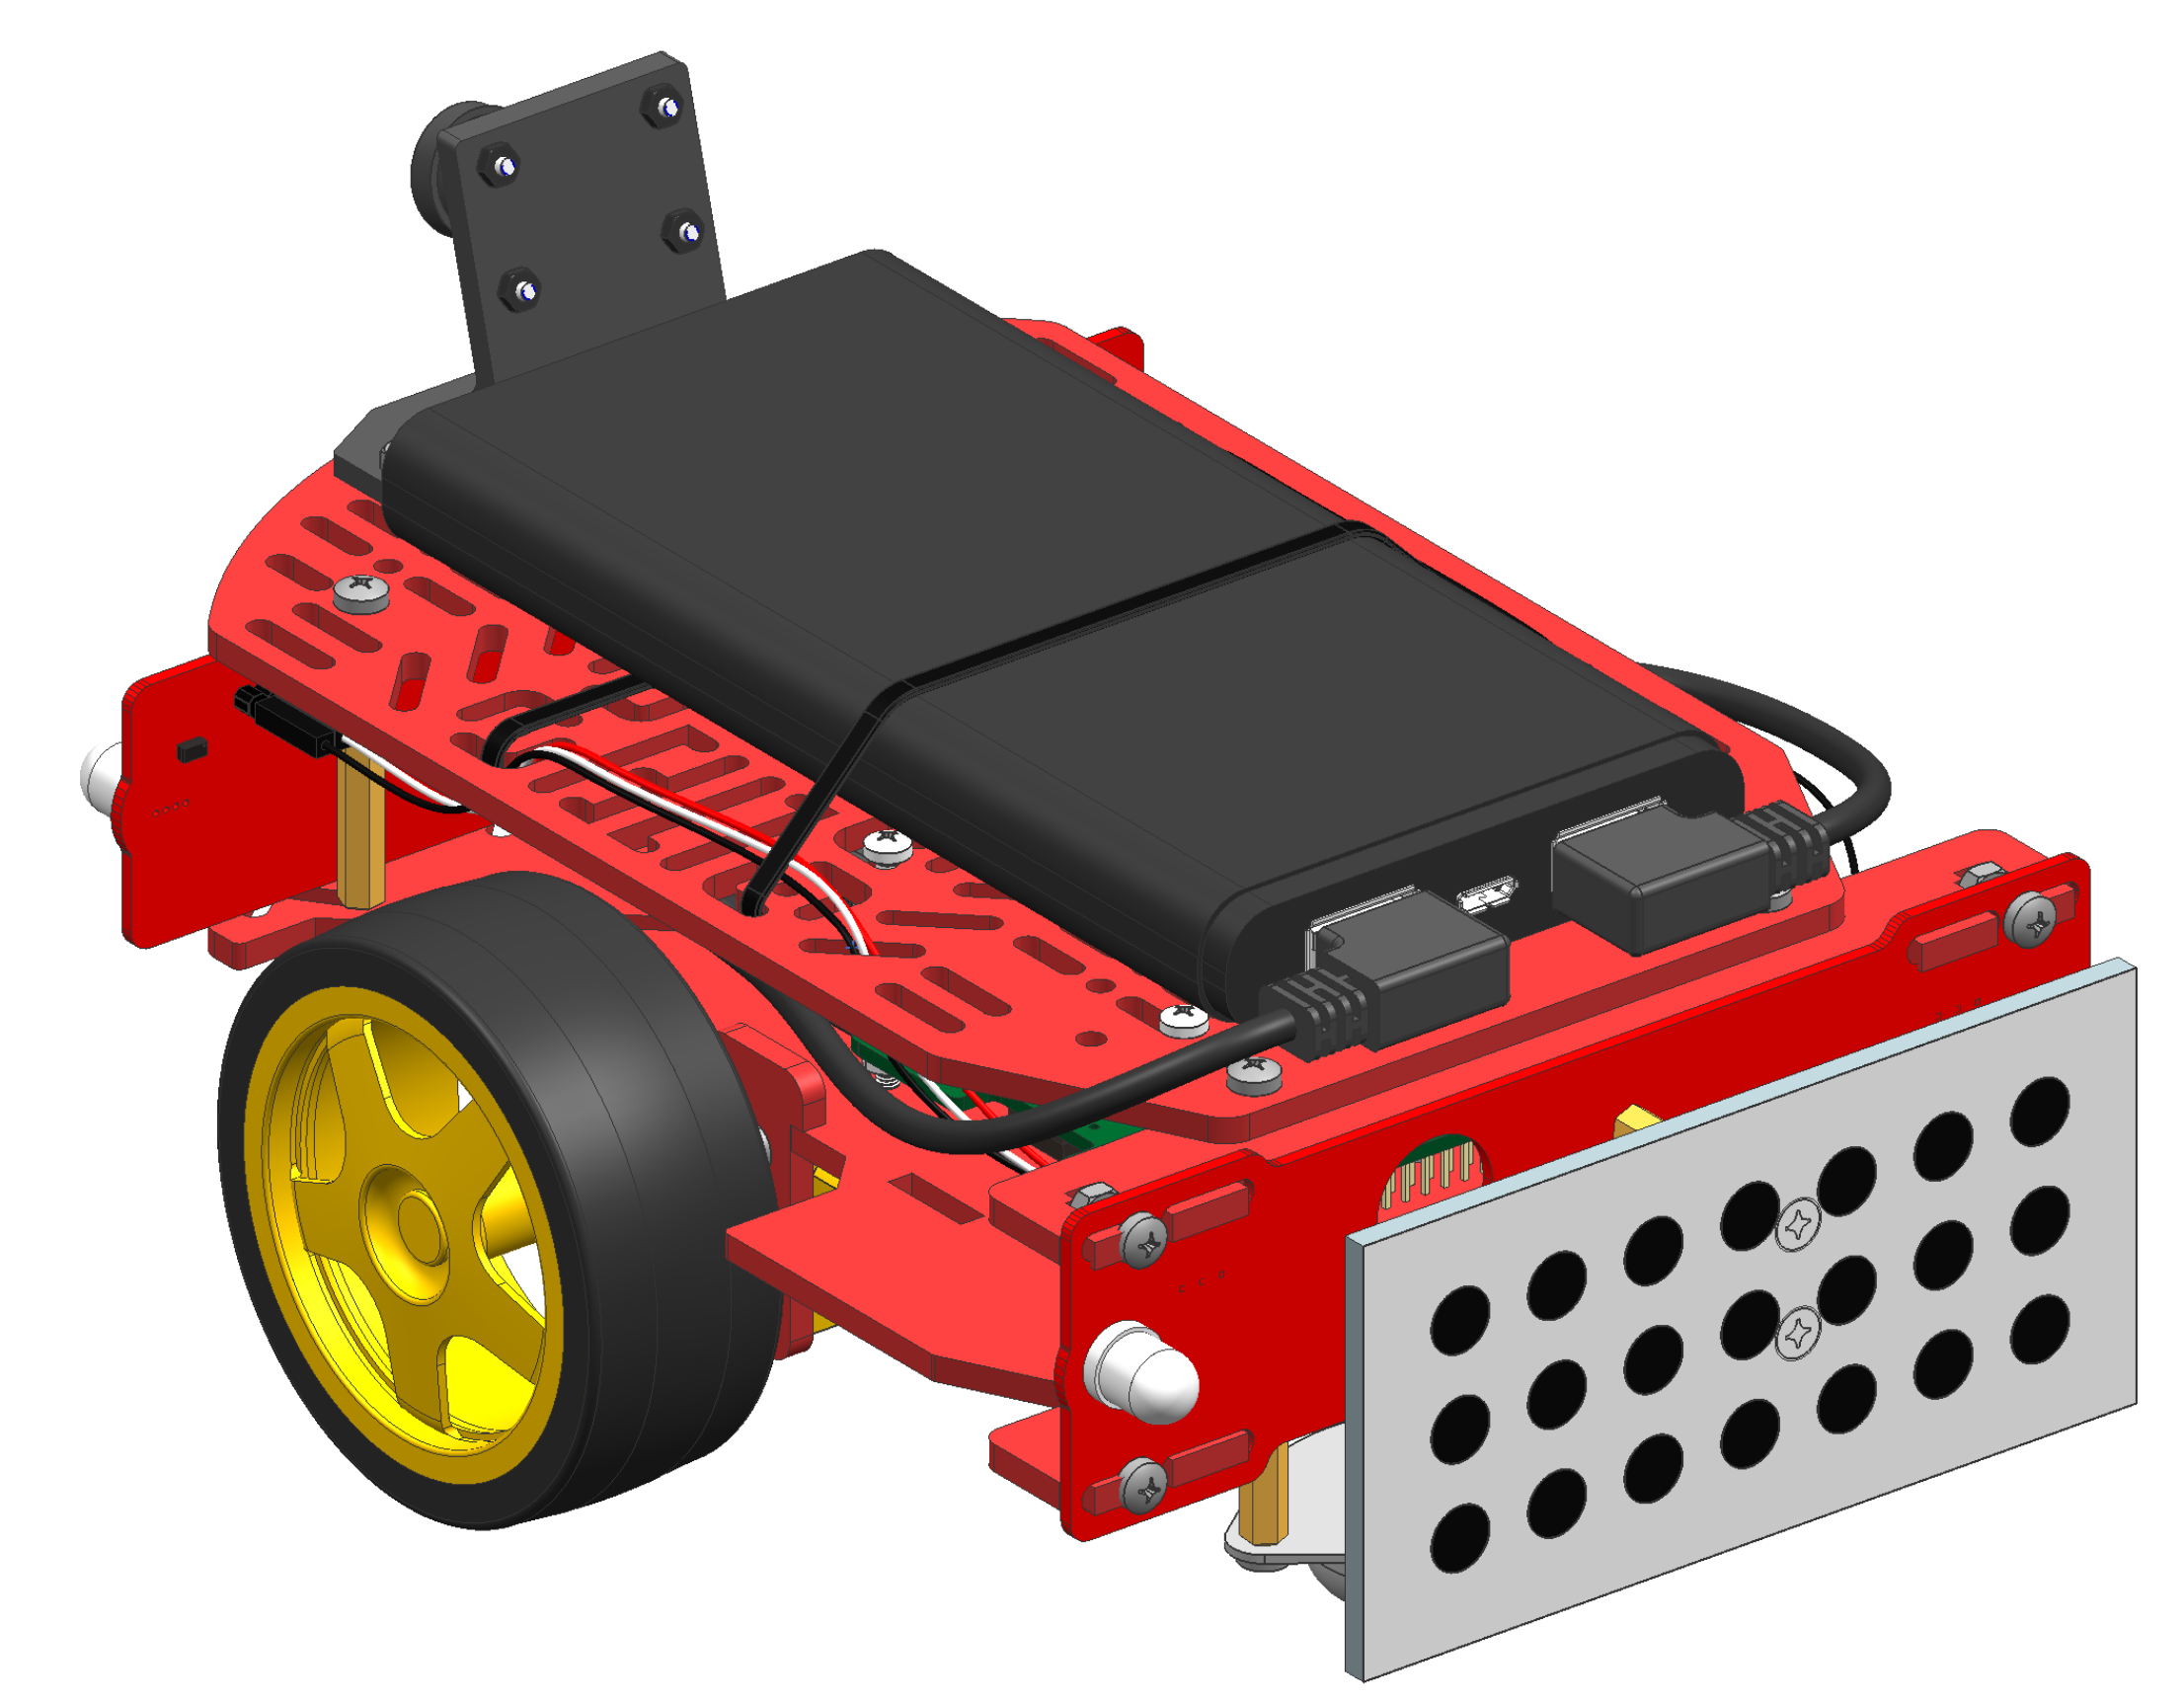
There are different batteries concerning the outer dimensions, so the result could look like either of the following pictures Figure 16.45 or Figure 16.46:
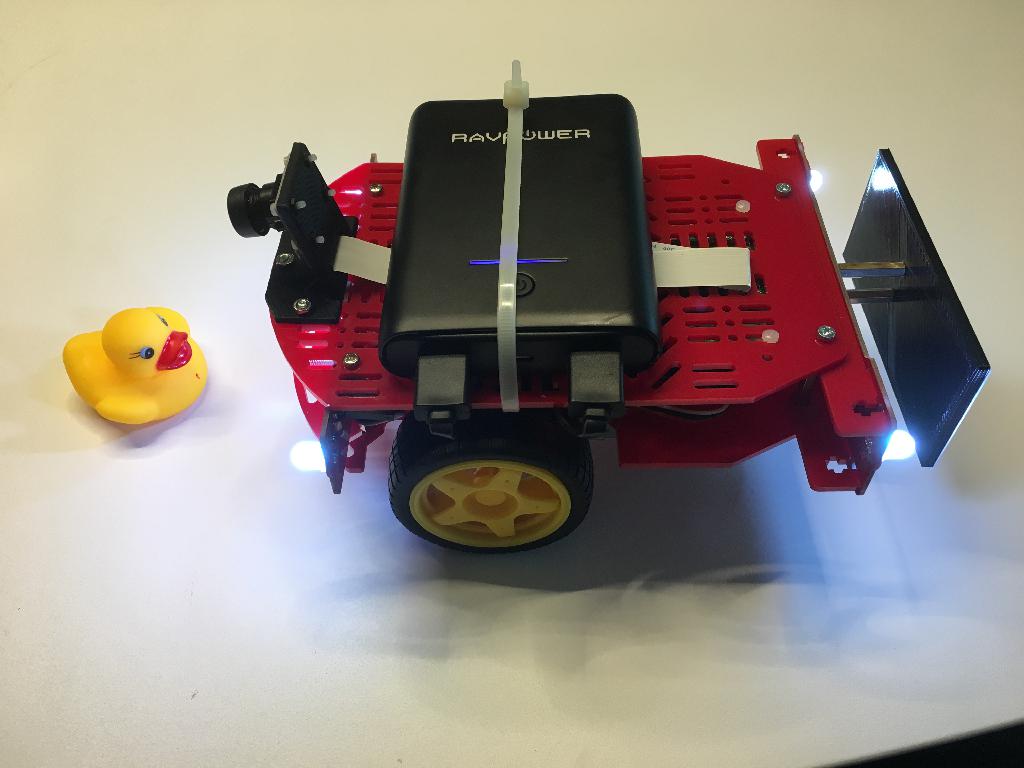
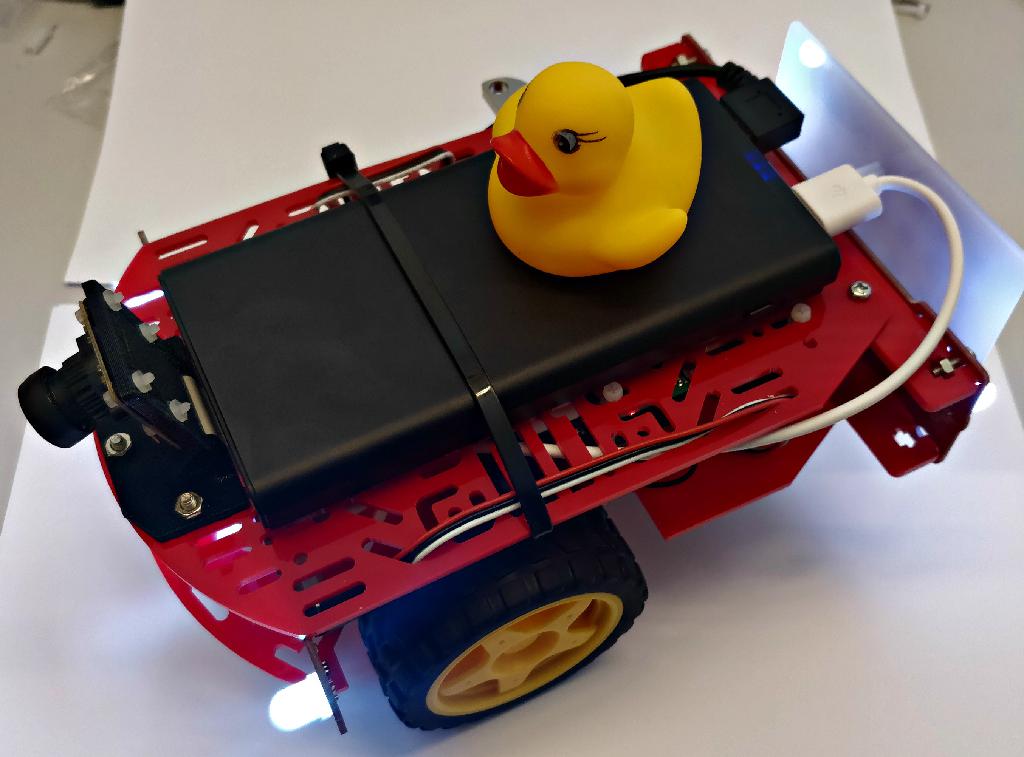
Now place a Duckie on top of your brand new Duckiebot, but be careful not to hurt the Duckie!
Check the outcome
✎Modified 2020-03-07 by rafaelfroehlich
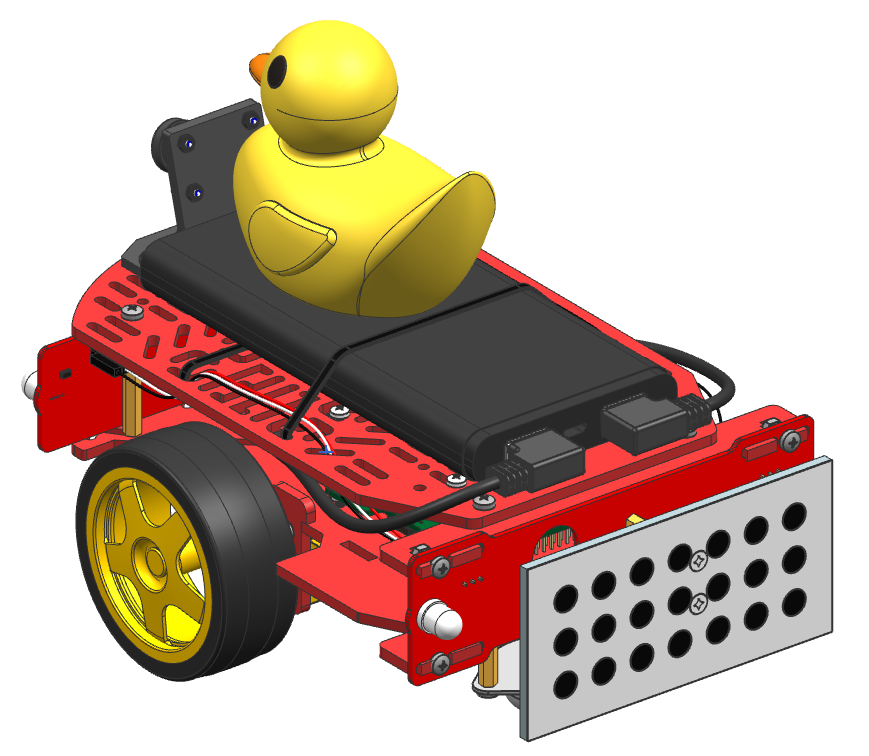
As a final check, verify that no cable is touching the wheels. You can use the provided zip ties to ensure that cables stay out of the way.
Hardware verification
✎Modified 2021-03-12 by duckietown
If you have assembled your Duckiebot DB18 but you are not sure if you did it correctly, you can use this tool test that. These steps are not mandatory but do serve as a good troubleshooting tool. It takes about 20 minutes.
The procedure consists of downloading and flashing a test image on an SD card. If you have only one SD card, you might want to do that before you do the steps in Unit C-3 - Setup - Duckiebot SD Card.
-
Download this SD card image
-
Extract the
.imgimage from the archive. -
Flash the image on an SD card. If you use Ubuntu, you can use the USB Image Writer tool that it comes with.
Make sure you write it to the right device! You can damage your system if you select a different device!
-
Now put the SD card in the assembled robot and power it up.
-
Put the robot on the ground.
If everything is successful within 30 to 60 seconds you should your robot’s lights start to change. If your robot is assembled correctly you should observe the following behavior:
-
All LEDs are green for 2 seconds.
-
All LEDs are red for 2 seconds.
-
The LEDs on the right side of the robot will be red, the rest are white, and the robot is turning right (i.e into the direction of the red LEDs).
-
The LEDs on the left side of the robot will be red, the rest are white, and the robot is turning left (i.e into the direction of the red LEDs).
-
The robot stops.
-
After a few seconds all LEDs are green.
-
End of the test. Everything appears to be assembled correct.
This is a video of what you should observe if your robot is assembled correctly:
Troubleshooting
✎Modified 2021-03-12 by duckietown
The omni-directional wheel, the back bumper or the Raspberry Pi are challenging to mount.
Sometimes in life you have to push a little to make things happen. (But don’t push too much or things will break!)
I have a different color of the back patter plate. Do I get the wrong one?
The color of this part can be of any and all are functionally equivalent.
My battery is different from the one shown in the pictures! Did I get the wrong box?
If there is a duckie in or on your box, you most probably got the right one. We support different battery models. All supported models are functionally equivalent, although the form factor varies.
The robot doesn’t move in the right direction or moves backwards instead of forward.
You have attached the motor wires in the wrong sockets. You will have to open the robot, fix that and test again.
At the end of the procedure the LEDs don’t turn green and the LED under the camera is red.
This means that the test procedure could not obtain an image from the camera. Check that your camera cable is attached correctly at both ends and that your camera is not broken.