Residual Policy Learning
✎Modified 2021-10-30 by liampaull
This section describes the basic procedure for making a submission with a model trained in simulation using residual policy learning with PyTorch and ROS. In this approach, we use the basic Duckietown lane following stack as the base policy, and we use reinforcement learning to improve it.
That you have made a submission with the ROS template.
You have a submission that leverages both our ROS stack and reinforcement learning.
 - Fourth Webinar")
The video is at https://vimeo.com/480202594.
Before getting started, you should be aware that this baseline is a combination of the RL baseline and of the ROS template. It is recommended that you are familar for each of those templates and baselines, as the workflow of this one is similar to those. Here are some links:
You should also make sure you have access to good hardware. A recent graphics card (probably GTX1060+) is a must, and more than 8GB of RAM is required.
Quickstart
✎Modified 2020-11-15 by Liam Paull
To train a policy, you should first make sure that Docker on your machine can access the GPU/CUDA. You should also install CUDA10.2+ locally.
Here’s a few pointers:
Clone this repo:
$ git clone https://github.com/duckietown/challenge-aido_LF-baseline-RPL-ros.git
Change into the directory:
$ cd challenge-aido_LF-baseline-RPL-ros
Test the submission, either locally with:
$ dts challenges evaluate --challenge CHALLENGE_NAME
or make an official submission when you are ready with
$ dts challenges submit --challenge CHALLENGE_NAME
You can find the list of challenges here. Make sure that it is marked as “Open”.
Baseline Overview
✎Modified 2020-11-15 by Liam Paull
Since, this baseline uses both ROS and ML, we need to train inside an environment where both ROS and PyTorch are installed. We will use Docker for this purpose.
The ROS template already provides us with a submission docker image. Our strategy here is to directly use that agent docker image during training, but we’ll the addition of the simulator and the training architecture on top.
This could have been done using a second running docker container to provide a network interface to the simulator, but this adds unnecessary overhead since we don’t actually need the added security that comes with running things separately.
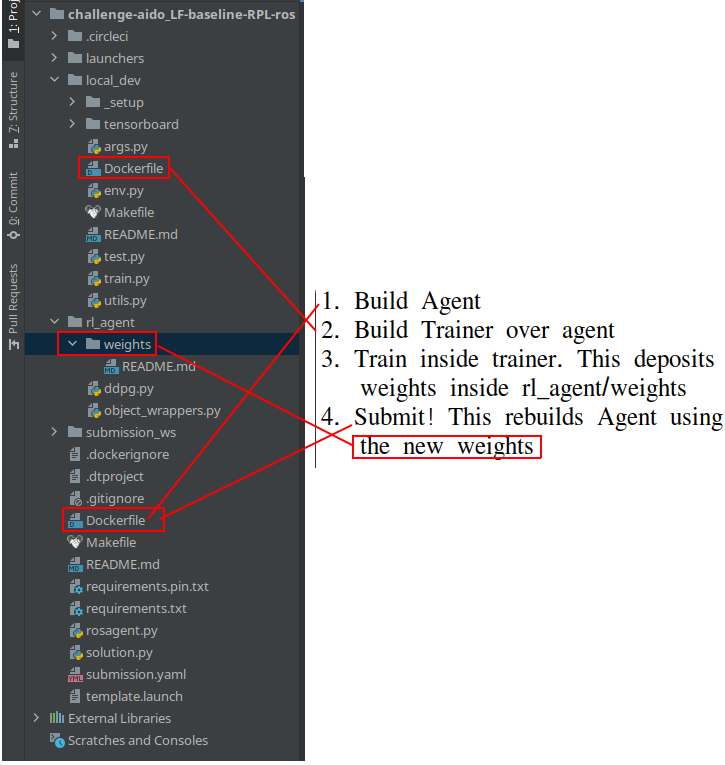
So, every time we train, we build the agent docker image, and then the “trainer docker” image builds directly FROM the agent image, adding the simulator on top.
The final docker container then runs the simulator and the agent in parallel, allowing the agent to directly interface with the simulator, just like we do in the other machine learning baselines.
How to train your policy
✎Modified 2020-11-15 by Liam Paull
From the challenge-aido_LF-baseline-RPL-ros directory, change into the local_dev directory:
$ cd local_dev
and open the args.py file.
This is how you will control the training and testing in this repo. For now, just change the --test argument to default=False. Then, we can train with:
$ make run
As mentioned Section 5.2 - Baseline Overview, this will first build two subsequent docker images. This might take a while. Then, it will train an RL policy over the ROS stack inside Docker.
When it finishes, see how it works. Simply change the --test flag back to default=True in args.py and test with:
$ make run
This will launch a simulator window on your host machine for you to view how your agent performs. You should see something like this:

You can use this gif to gauge how long it takes for the testing docker to start (do note that this assumes that the two required docker images have already been built!)
How to submit the rained policy
✎Modified 2020-11-15 by Liam Paull
Make sure that rosagent.py uses the right weights for your RL agent. This is controlled by the MODEL_NAME global variable. Then follow the procedure in Section 5.1 - Quickstart to evaluate and submit.
How to improve your policy
✎Modified 2020-11-15 by Liam Paull
First, you should probably improve the base ROS policy. By default, this baseline uses the basic lane_following demo that is provided in Duckietown (unknown ref opmanual_duckiebot/demo-lane-following).
You could build a Pure Pursuit controller, change the lane filter, etc. See the classical Duckietown baseline for more ideas.
To do this, you would add your new ROS packages inside of submission_ws.
You could also limit RL’s influence over the final policy. Perhaps the current approach of giving it full control in [-1,1] action values isn’t restrictive enough. Perhaps it could be better if it could only change the base policy by smaller action values.
Or perhaps it’s the opposite: maybe the base policy needs to be changed by more than 1: since the min/max value that
the base policy can output is 1/-1, the RL policy would need to be able to output from -2 to 2 to fully correct it.
Here are some ideas for improving your policy:
- Check out the
dtRewardWrapperinrl_agentand modify the rewards (set them higher or lower and see what happens). By default, this wrapper is not used: you will have to add it totrain.py. - Try resizing the images. Make them smaller to have faster training, or bigger for making sure that RL can extract everything it can from them. You will need to also edit the layers in
ddpg.pyaccordingly. - Try making the observation image grayscale instead of color.
- Try stacking multiple images, like 4 monochrome images instead of 1 color image. You will need to also edit the layers in
ddpg.pyaccordingly. - You can also try increasing the contrast in the input to make the difference between road and road-signs clearer. You can do so by adding another observation wrapper.
- Cut off the horizon from the image (and correspondingly change the convnet parameters).
- Check out the default hyperparameters in
local_dev/args.pyand tune them. For example increase theexpl_noiseor increase thestart_timestepsto get better exploration. - (more sophisticated) Use a different map in the simulator, or - even better - use randomized maps. But be mindful that some maps include obstacles on the road, which might be counter-productive to a
LFsubmission. - (more advanced) Use a different/bigger convnet for your actor/critic. And add better initialization.
- (very advanced) Use the ground truth from the simulator to construct a better reward
- (extremely advanced) Use an entirely different training algorithm - like PPO, A2C, or DQN. Go nuts. But this might take significant time, even if you’re familiar with the matter.
Sim2Real Transfer (Optional)
✎Modified 2020-11-15 by Liam Paull
You should try your agent on the real Duckiebot.
It is possible, even likely, that your agent will not generalize well to the real environment. One approach to mitigate this problem is to randomize the simulator environment during training, in the hope that this improves generalization. This approach is referred to as “Domain Randomization”.
To implement this, you will need to modify the local_dev/env.py file. You’ll notice that we launch the Simulator class from gym-duckietown. When we take a look at the constructor, you’ll notice that we aren’t using all of the parameters listed. In particular, the three you should focus on are:
map_name: What map to use; hint, take a look at gym_duckietown/maps for more choicesdomain_rand: Applies domain randomization, a popular, black-box, sim2real techniquerandomized_maps_on_reset: Slows training time, but increases training variety.
Mixing and matching different values for these will help you improve your training diversity, and thereby improving your evaluation robustness!