Docker basics
✎Modified 2019-09-27 by Aleksandar Petrov
The very fundamental Docker knowledge needed for Duckiebot operations.
If you are frequent user of Python, you have probably experienced that making your projects portable can sometimes be quite difficult. Your code might work only on a specific version of Python and requires specific versions of some particular libraries. But how can you make sure that the users of your code have the same installed? Thankfully, the Python community has develped wonderful tools to manage that, such as virtual environments and PyPI. Unfortunately, these tools stop short of extending their convenice outside the Python world. What about your parameters, libraries, packages written in different languages, binary executables, system configurations, and anything else that your code might need to run correctly? How do you make sure your user has all of this setup correctly? And what if you want this to work accross different hardware and operating systems? How difficult can achieving true portability be? In fact, it turns out, this is an engineering task that has taken thousands of the world’s brightest developers many decades to implement!
Thanks to the magic of container technology we can now run any Linux program on almost any networked device on the planet. All of the environment preparation, installation and configuration steps can be automated from start to finish. Depending on how much network bandwidth you have, it might take a while, but that’s all right. All you need to do is type a single command string correctly.
Docker is a tool for portable, reproducible, and self-contained computing. It is used to perform operating-system-level virtualization, something often referred to as containerization. While Docker is not the only software that does this, it is by far the most popular one.
The very basic knowledge of using Docker
What’s so special about containerization?
✎Modified 2019-10-01 by Jacopo Tani
A (Docker) container is a packaging around all the software (libraries, configuration files, services, binary executable, etc.) that a computer needs to run a program. And by all, we don’t simply mean the source code or the dependencies, we really mean all. Everything you need, from the lowest level OS components to the user interface. A container does not care what flavor or release of Linux you try to run it on, it has everything it needs to work everywhere inside it (it is a container, afterall). Not to mention that Linux Docker containers can generally be also executed on Mac OS and Windows as well!
Containerization is a process that allows partitioning the hardware and the core software (the kernel) of an operating systems in such a way that different containers can co-exist on the same system independently from one-another. Programs running in such a container have access only to the resources they are allow to and are completely independent of libraries and configurations of the other containers and the host machine. Because of this feature, Docker containers are extremely portable.
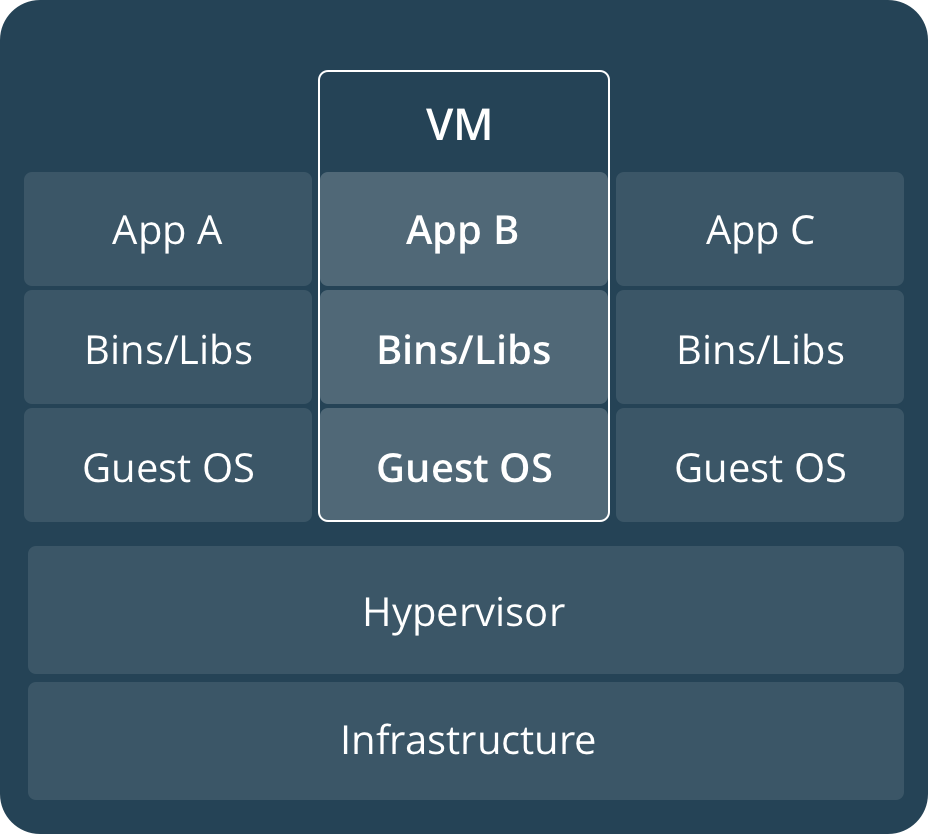
Containers are often compared to virtual machines (VMs). The main difference is that VMs require a host operating system (OS) with a hypervisor (another program) and a number of guest OS, each with their own libraries and application code. This can result in a significant overhead. Imagine running a simple Ubuntu server in a VM on Ubuntu: you will have most of the kernel libraries and binaries twice and a lot of the processes will be duplicated on the host and on the guest. Containerization, on the other hand, leverages the existing kernel and OS, keeps track of what you already have and adds only the additional binaries, libraries and code necessary to run a given application. See the illustration below.
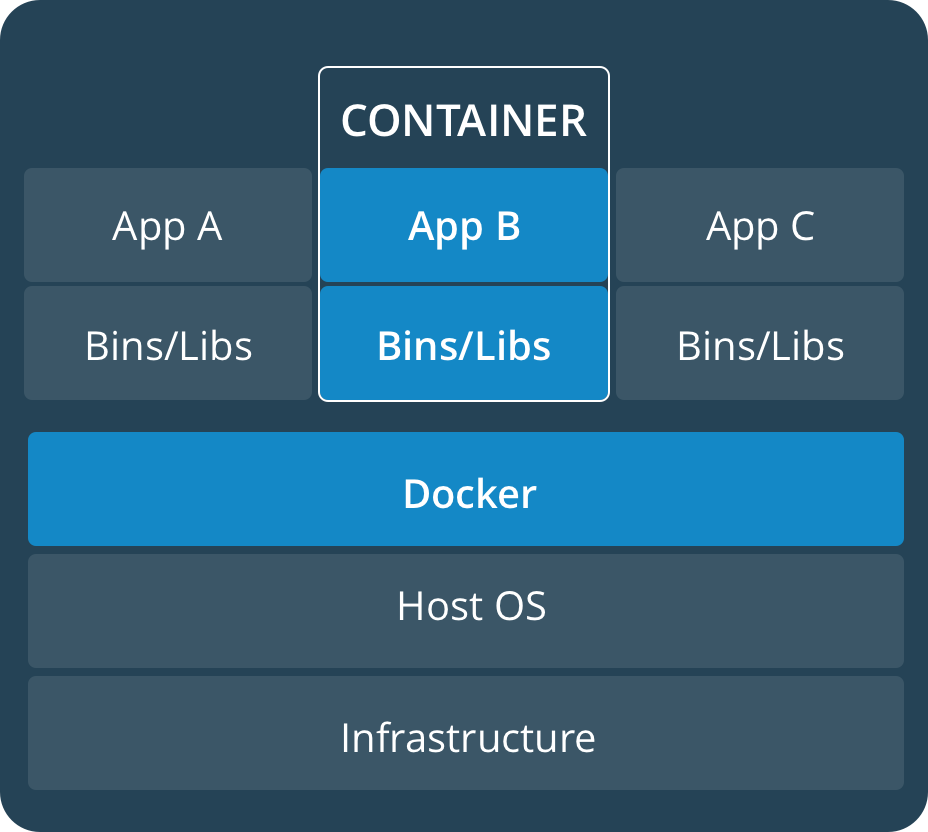
Because containers don’t need a separate OS to run they are much more lightweight than VMs. This makes them perfect to use in cases where one needs to deploy a lot of independent services on the same hardware or to deploy on not-that-powerful platforms, such as a Raspberry Pi - the platform Duckiebots use.
Containers allow for reuse of resources and code, but are also very easy to work with in the context of version control. If one uses a VM, they would need to get into the VM and update all the code they are using there. With a Docker container, the same process is as easy as pulling the container image again.
The same feature makes Docker containers great for development. If you mess up a configuration or a library in a container, all you need to do to fix it is, stop it, remove it, and try again. There is no trace left on your system and you cannot break down your OS by committing a simple stupid mistake in a container.
And the best part of it all, Docker containers are extremely portable. That means, that once you package your mindbogglingly-awesome Duckiebot code as a Docker container, you can very easily share it with your friends and anyone else in the world, who would be able to try it on their own robot with a single line in the terminal. Just as easily you can test it in simulation or even submitting for competing in the AI Driving Olympics!
What is it in a Docker container?
✎Modified 2019-09-26 by Jacopo Tani
You can think of Docker containers as objects built from Docker images which in turn are built up of Docker layers. So what are these?
Docker images are build-time constructs while Docker containers are run-time constructs. That means that a Docker image is static, like a .zip or .iso file. A container is like a running VM instance: it starts from a static image but as you use it, files and configurations might change.
Docker images are build up from layers. The initial layer is the base layer, typically an official stripped-down version of an OS. For example, a lot of the Docker images we run on the Duckiebots have rpi-ros-kinetic-base as a base.
Each layer on top of the base layer constitutes a change to the layers below. The Docker internal mechanisms translate this sequence of changes to a file system that the container can then use. If one makes a small change to a file, then typically only a single layer will be changed and when Docker attempts to pull the new version, it will need to download and store only the changed layer, saving space, time and bandwidth.
In the Docker world images get organized by their repository name, image name and tags. As with Git and GitHub, Docker images can be stored in image registers that reside on the Internet and allow easy worldwide access to your code. The most popular Docker register is called DockerHub and it is what we use in Duckietown.
A Duckietown image stored on DockerHub has a name of the form duckietown/rpi-ros-kinetic-base:daffy. Here the repository name is duckietown, the image name is rpi-ros-kinetic-base, and the tag is daffy.
All Duckietown-related images are in the duckietown repository. The images themselves can be very different and for various applications.
Sometimes a certain image might need to have several different versions. These can be designated with tags. For example, the daffy tag means that this is the image to be used with the daffy version of the Duckietown code base.
It is not necessary to specify a tag. If you don’t, Docker assumes you are interested in the image with latest tag, should such an image exist.
Working with Docker images
✎Modified 2019-09-26 by Jacopo Tani
We will now take a look at how you can use Docker in practice. For this, we assume you have already set up Docker on your computer as explained in the Laptop Setup page.
If you want to get a new image from a Docker register (e.g., DockerHub) on your local machine then you have to pull it. For example, you can get an Ubuntu 18.04 image by running the following command:
laptop $ docker pull library/ubuntu:18.04
You will now be able to see the new image you pulled if you run:
laptop $ docker image list
Just like that you got a whole new OS on your computer with a single line in the terminal!
If you don’t need this container, or if you’re running down on storage space, you can remove it by simply running:
laptop $ docker image rm ubuntu:18.04
You can also remove images by their IMAGE ID as printed by the list command.
If you want to look into the heart and soul of your images, you can use the commands docker image history and docker image inspect to get a detailed view.
Working with containers
✎Modified 2019-10-01 by hosnerm
Containers are the run-time equivalent of images. When you want to start a container, Docker picks up the image you specify, creates a file system from its layers, attaches all devices and directories you want, “boots” it up, sets up the environment, and starts a pre-determined process in this container. All that magic happens with you running a single command: docker run. You don’t even need to have pulled the image beforehand, if Docker can’t find it locally, it will look for it on DockerHub.
Here’s a simple example:
laptop $ docker run ubuntu
This will take the ubuntu image with latest tag and will start a container from it.
The above won’t do much. In fact, the container will immediately exit as it has nothing to execute. When all processes of a container exit, the container exits as well. By default this ubuntu image runs bash and as you don’t pass any commands to it, it exits immediately. This is no fun, though.
Let’s try to keep this container alive for some time by using the -it switch. This tells Docker to create an interactive terminal session.
laptop $ docker run -it ubuntu
Now you should see something like:
container $ root@73335ebd3355:/#
Keep in mind that the part after @ (the container’s hostname) will be different - that is your container ID.
In this manual, we will use the following icon to show that the command should be run in the container:
container $ command to be run in the container
You are now in your new ubuntu container! Try to play around, you can try to use some basic bash commands like ls, cd, cat to make sure that you are not in your host machine.
If you are sure about the difference between the host and the container, you might want to see what happens when you do rm -rf / IN THE CONTAINER. Do that extremely carefully because that wipes out all of the root of a system. You do not want to run this on your host. By running the above command in a Docker container you will destroy the OS inside the container - but you can just exit and start another one. If instead you have confused host and container, at this point you probably need to re-install your OS.
You can check which containers you are running using the docker ps command - analogous to the Linux ps command. Open a new terminal window (do not close the other one just yet) and type:
laptop $ docker ps
An alternative syntax is
laptop $ docker container list
These commands list all running containers.
Now you can go back to your ubuntu container and type exit. This will bring you back to your host shell and will stop the container. If you again run the docker ps command you will see nothing running. So does this mean that this container and all changes you might have made in it are gone? What about all these precious changes you made in it? Are they forever lost into the entropy abyss of electric noise in your computer’s memory? Not at all, docker ps and docker container list only list the currently running containers.
You can see all containers, including the stopped ones with:
laptop $ docker container list -a
Here -a stands for all. You will see you have two ubuntu containers here (remember the first one that exited immediately?). There are two containers because every time you use docker run, a new container is created. Note that their names seem strangely random. We could have added custom, more descriptive names, but more on this later.
We don’t really need both of these containers, so let’s get rid of one of them:
laptop $ docker container rm container name
You need to put your container name after rm. Using the container ID instead is also possible. Note that if the container you are trying to remove is still running you will have to first stop it.
You might need to do some other operations with containers. For example, sometimes you want to start or stop an existing container. You can simply do that with:
laptop $ docker container start container name
laptop $ docker container stop container name
laptop $ docker container restart container name
Imagine you are running a container in the background. The main process is running but you have no shell attached. How can you interact with the container? You can open a terminal in it with:
laptop $ docker attach container name
Let’s start again the container that we stopped before. You can check its container ID and name via docker container list -a. You can then start it again with command introduced above. You will see that the docker start command will only print the container ID and will return you back to the terminal. Rather uneventful, huh? Don’t worry, your container is actually running: check that with docker ps.
But even though it is running, it seems you cannot do anything with it. But fear not, use the docker attach command to get back in the container’s shell. Now you’re back in and ready for the next adventure.
Often, you will need to run multiple processes in a single container. But how could you do that if you have only a single terminal? Well, Docker has a neat command for that: docker exec. The full signature of it is docker exec CONTAINER_NAME/ID COMMAND. Let’s use that to create a file in our Ubuntu container that is already running. Open a new terminal and simply substitute the container name or ID in the signature above and use the command touch /quackworld which should create an empty file called quackworld in the container’s root. The full command should look like that:
laptop $ docker exec c73ee1f963a2 touch /quackworld
Verify that the file was indeed created by running it again, but this time with the command ls \ instead, which will show you the contents of the root folder. Finally, verify that the change was made in the same container as the one to which you attached before by finding the file there and that the change was not made on your host by checking that you don’t have a file called quackworld in your root folder.