Introduction to ROS
✎Modified 2019-10-02 by Rohit Suri
The official wiki describes ROS as:
... an open-source, meta-operating system for your robot. It provides the services you would expect from an operating system, including hardware abstraction, low-level device control, implementation of commonly-used functionality, message-passing between processes, and package management. It also provides tools and libraries for obtaining, building, writing, and running code across multiple computers.
You probably have some idea about what the above words mean. However, if this is your first encounter with ROS, you are already overestimating how complicated it is. Worry do not.
Putting it in very simple terms, as a roboticist, ROS is what will prevent you from reinventing the wheel at every step of building a robot. It is a framework which helps you manage the code you write, while providing you with a plethora of tools which will speed up the process.
Basic understanding of ROS
Why ROS?
✎Modified 2020-10-11 by arsimone
Your Duckiebot is a very simple robot which has very few sensors. In case of DB-18 only one sensor: the camera. However if you are working with newer configuration such as DB-19 or DB-Beta you will have the camera plus the wheel encoders. Every robot also has two actuators: the motors. You can probably write all the code for the basic funtionality of a Duckiebot yourself. You start by getting images from the camera, processing them to detect lanes, generating suitable motor commands, and finally executing them. You create a single program for all of this which looks like this:
img = get_image_from_camera()
pose = get_pose_from_image(img)
cmd = get_command_from_pose(pose)
run_motors(cmd)
The next day, your Duckiebot crashes into a duckie which was crossing the road, so you want to add duckie detection into your program to prevent such accidents. You modify your program and it now looks like this:
img = get_image_from_camera()
pose = get_pose_from_image(img)
cmd = get_command_from_pose(pose)

if duckie_detected(img):
    cmd = EMERGENCY_STOP

run_motors(cmd)
You realize, however, that your Duckiebot is not at level 5 autonomy yet and you want to add manual control for difficult to navigate regions in the city. Your code now looks like this:
img = get_image_from_camera()
pose = get_pose_from_image(img)
cmd = get_command_from_pose(pose)

if mode == AUTONOMOUS:
    if duckie_detected(img):
        cmd = EMERGENCY_STOP
else:
    cmd = get_command_from_joystick()

run_motors(cmd)
It is easy to see that when you start thinking about having even more advanced modes of operation such as intersection navigation, Duckiebot detection, traffic sign detection, and auto-charging, your program will end up being a massive stack of if-else statements. What if you could split your program into different independent building blocks, one which only gets images from cameras, one which only detects duckie pedestrians, one which controlls the motors and so on. Would that help you with organizing your code in a better way? How would those blocks communicate with each other? Moreover, how do you switch from autonomous mode to manual mode while your Duckiebot is still running? And what will happen once you try to do this for advanced robots with a lot of sensors and a large number of possible behaviors?
Basics of ROS
✎Modified 2020-10-11 by arsimone
Look at the following system
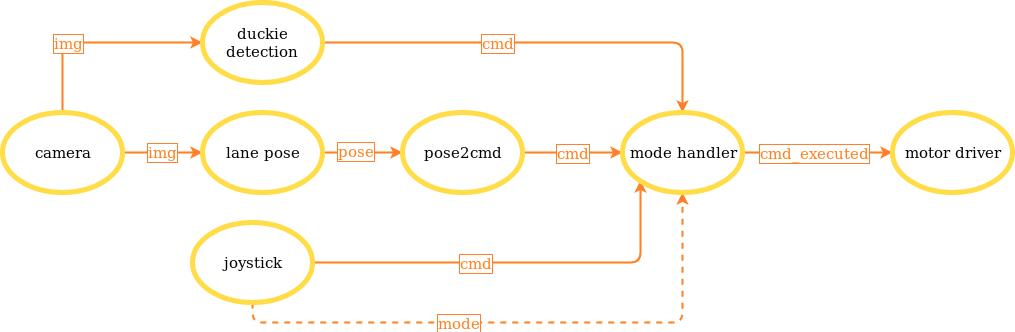
It performs exactly the same task as before. Unlike before, each of the building blocks is independent from the rest of the blocks, which means that you can swap out certain parts of the code with those written by others. You can write the lane pose extraction algorithm, while your friend works on converting that pose to a motor command. During runtime, the lane pose extractor and duckie detection algorithm run in parallel, just helping you utilize your resources better. The only missing piece to get a working system is making these blocks communicate with each other. This is where ROS comes in.
In ROS terminology, each box is a node, and each solid arrow connection is a topic. It is intuitive that each topic carries a different type of a message. The img topic has images which are matrices of numbers, whereas the pose topic may have rotation and translation components. ROS provides a lot of standard message types ranging from Int, Bool, String to images, poses, IMU measurements. You can also define your own custom messages combining different message types in one.
The nodes which send out data on a topic are called publishers of that topic and the ones which receive the data and use it are called subscribers of that topic. As you can seem from the diagram above, a node can be a publisher for one topic and subscriber for another at the same time.
You may have noticed a dashed arrow from the joystick node to the mode_handler. This represents that you can switch from manual to autonomous mode and vice versa using a button on your (virtual) joystick. Unlike sending images, which is a continuous flow of information, you will not keep switching modes all the time. ROS has a framework designed specifically for such case. This is called a service. Just like with messages, you can also define your own services. Here, the mode_handler node offers a service and the joystick node is the client of that service.
What manages the connections between nodes is the Location not known more precisely.rosmaster. The rosmaster is responsible for helping individual nodes find one another and setting up connections between them. This can also be done over a network. Remember that you are able to see what your Duckiebot sees (unknown ref opmanual_duckiebot/read-camera-data)previous warning
next (36 of 45)
index
I will ignore this because it is an external link.

 > I do not know what is indicated by the link '#opmanual_duckiebot/read-camera-data'.
n/a in module n/a.rosmaster of your Duckiebot. So, without knowing, you are already doing distributed robotics! It is important to keep in mind though that a single node can be managed by only one rosmaster at a time.
Another key building block of ROS are the parameters for each node. Recall when you calibrated your Duckiebot’s wheels (unknown ref opmanual_duckiebot/wheel-calibration) Location not known more precisely. Location not known more precisely.previous warning
next (37 of 45)
index
I will ignore this because it is an external link.

 > I do not know what is indicated by the link '#opmanual_duckiebot/wheel-calibration'.
n/a in module n/a.previous warning
next (38 of 45)
index
I will ignore this because it is an external link.

 > I do not know what is indicated by the link '#opmanual_duckiebot/camera-calib'.
n/a in module n/a.rosparam. You can also use parameters in conjunction with services to dynamically modify their behaviour.
In ROS, code is organized in the form of packages. Each package is essentially a collection of nodes which perform very specific, related tasks. ROS packages also contain messages, services, and default parameter configuration files used by the nodes. A standard ROS package looks like this:
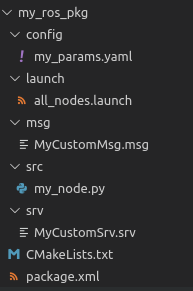
Note that the above diagram is just one of the ways to organize the flow of data. What happens actually on your Duckiebot is a little different.
Installation (Optional)
✎Modified 2020-10-11 by arsimone
If you wish to install ROS on your computer, you can do so using this link. Please note that this might not be possible depending on your OS. Regardless of that, you should be able to use ROS through Docker, because it creates an environment which is completely independent of your OS. Quite powerful right? So much that all ROS development in Duckietown happens through Docker. This is why ROS installation on your pc is not mandatory. Keep in mind that currently all Duckietown ROS software works in ROS Noetic Ninjemys and if you want to use a native installation with your Duckiebot, you should install this version, otherwise you will likely run into compatibility issues. However, we strongly recommend using Docker for all ROS related software development.
ROS Tutorials
✎Modified 2019-09-28 by Rohit Suri
Tutorials on using ROS with Duckietown are covered in the next section. These tutorials are tailored to the Duckietown development process. Apart from this, we strongly recommend going through the official ROS tutorials. You should even try out the Beginner Level tutorials yourself if you have a native ROS installation. If not, read through them at least and proceed to the next section
Additional Reading
✎Modified 2019-09-28 by Rohit Suri