Lane Following - Procedure
✎Modified 2020-08-11 by Andrea F. Daniele
Requires
✎Modified 2020-08-11 by Andrea F. Daniele
- Requires: Duckiebot (correctly assembled, initialized and calibrated) in the version you want to Benchmark daffy, Master19 etc.)
- Requires: Localization standoff
- Requires: Autobot
- Requires: 2 straight and 4 curved tiles
- Requires: At least 4 Watchtowers in WT19B configuration
- Requires: X Ground April tags
- Results: Lane Following Benchmarking
Duckiebot Hardware set up
✎Modified 2020-05-30 by Linus1994
Below a few things you have to be careful with:
- Be careful with placing the April Tag in the very center of the DB as the localization system that measures the Ground Truth expects the April Tag to be exactly in the center! Future work potential!
- Make sure that standoff has an April Tag with a different name as your Duckiebot! So if you use the Autobot18 April Tag for example, make sure your duckiebot is named differently!
- Set the Gain of your Duckiebot to 1.0 by following the instructions found here
Loop Assembly and map making
✎Modified 2020-06-09 by Linus1994
Pleas note that the loop used for these benchmarks does NOT respect the Duckietown specifications and rules as it is not allowed to have two lanes next to each other without any visual barrier. However as all the experiments worked out fine and as the space was limited, the Benchmarks were done on this loop anyways. In the future it is strongly recommended to change the settings to a 3x3 loop that does respect the Duckietown specifications. This can be done without having to change anything else, as the result computed etc will work on any kind of loop.
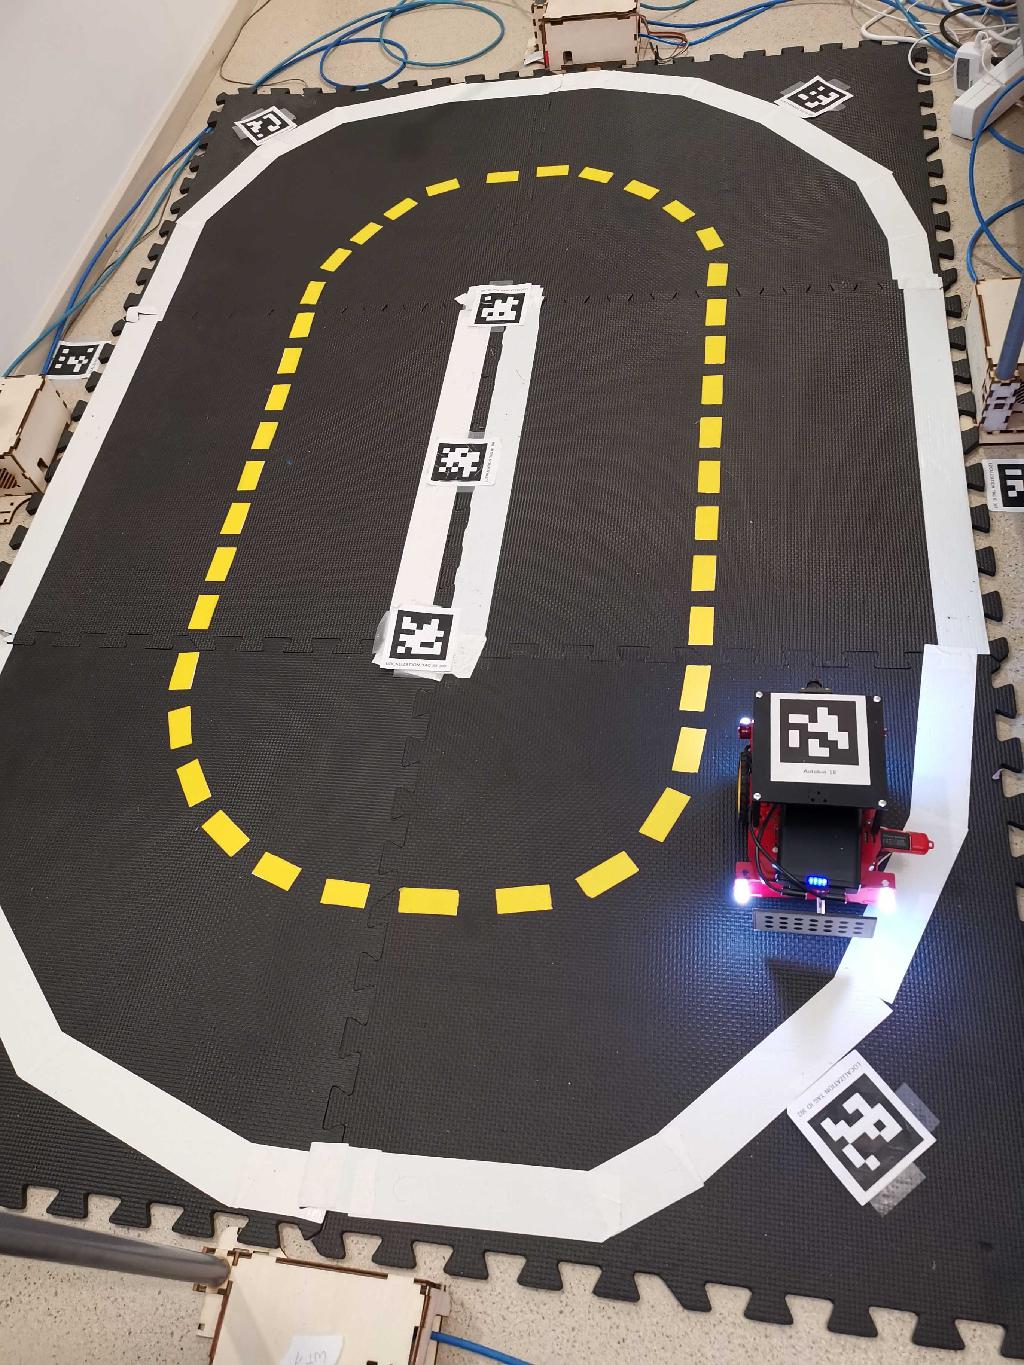
First assemble the tiles to a 2x3 closed loop as seen below.
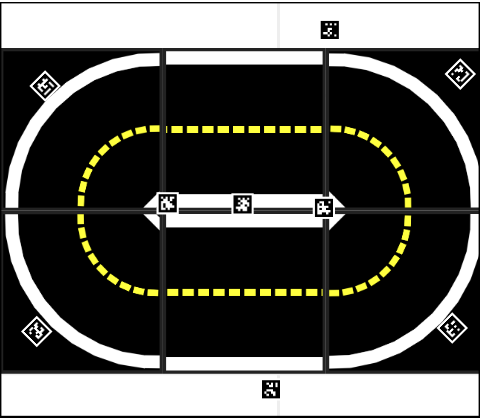
Further place the Watchtowers around the loop such that each part of it is seen by at least one Watchtower. To get really accurate results it is recommended to place them as seen below.
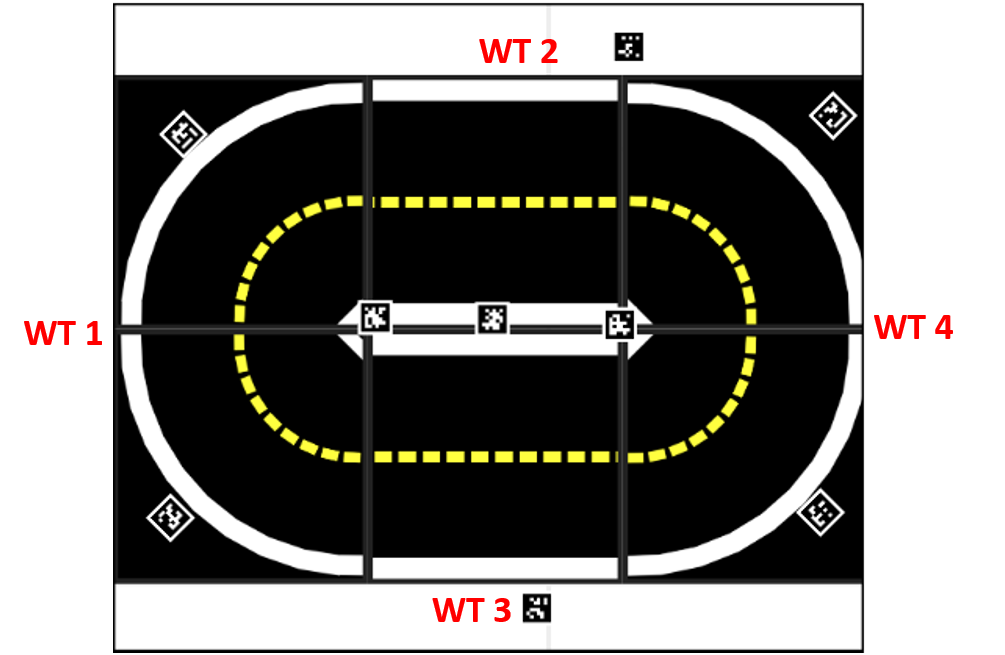
Please note that it is recommended to check what the watchtowers actually just see the loop. Therefor place them in a way such that they see as little from the outside of the loop as possible.
Fork and clone the Duckietown-world repository and follow the instructions found here to create your own map. Or simply add the linus_loop folder into the visualization/maps folder of your duckietown-world repository and the linus_loop yaml file into the src/duckietown_world/data/gd1/maps folder of your duckietown-world repository.
Then place at least 8 Ground April Tags roughly as seen in the images such that each watchtower sees at least 2 Apriltags. After follow the instructions found here to add their exact position to the map.
Localization Set up
✎Modified 2020-05-30 by Linus1994
Set up the offline localization following the instructions found here (Steps 3.1-3.5).
Software preparation
✎Modified 2020-06-11 by Linus1994
- Make sure your duckietown shell is set to the version
daffyfor the upcoming procedure, even when you flashed you Duckiebot on Master19. Run the command:dts --set-version daffy
- On your local computer create a folder called
bag - (Fork and) clone the behaviour-benchmarking repository
- Be sure that
dt-core,dt-car-interface,dt-duckiebot-interface,dt-ros-commonsimages are updated according to the version you are using.
If not, for daffy pull:
* `docker -H BOTNAME.local pull duckietown/dt-core:daffy-arm32v7@sha256:4c7633c2041f5b7846be2346e0892c9f50987d2fd98d3479ec1a4cf378f52ee6`
* `docker -H BOTNAME.local pull duckietown/dt-car-interface:daffy-arm32v7@sha256:e3db984157bf3a2b2d4ab7237536c17b37333711244a3206517daa187c143016`
* `docker -H BOTNAME.local pull duckietown/dt-duckiebot-interface:daffy-arm32v7@sha256:94a9defa553d1e238566a621e084c4b368e6a9b62053b02f0eef1d5685f9ea73`
* `docker -H BOTNAME.local pull duckietown/dt-ros-commons:daffy-arm32v7@sha256:20840df4cd5a8ade5949e5cfae2eb9b5cf9ee7c0`
If not, for Master19 pull:
* `docker -H BOTNAME.local pull duckietown/dt-core:daffy-arm32v7@sha256:4c7633c2041f5b7846be2346e0892c9f50987d2fd98d3479ec1a4cf378f52ee6`
* `docker -H BOTNAME.local pull duckietown/dt-car-interface:daffy-arm32v7@sha256:e3db984157bf3a2b2d4ab7237536c17b37333711244a3206517daa187c143016`
* `docker -H BOTNAME.local pull duckietown/dt-duckiebot-interface:daffy-arm32v7@sha256:94a9defa553d1e238566a621e084c4b368e6a9b62053b02f0eef1d5685f9ea73`
* `docker -H BOTNAME.local pull duckietown/dt-ros-commons:daffy-arm32v7@sha256:20840df4cd5a8ade5949e5cfae2eb9b5cf9ee7c0`
Please note, that you do not have to pull the specific tags above if you want to test a new version of any of the containers. However if you want to test a contribution to dt-core which you wrote (for example a new line_detector) it is recommended to pull the according images above.
- If all the images are at the right version you can start the following steps:
For daffy:
1. Make sure all old containers from the images `dt-duckiebot-interface`, `dt-car-interface`, and `dt-core` are stopped. These containers can have different names, instead look at the image name from which they are run.

2. Start all the drivers in `dt-duckiebot-interface`:

    * `dts duckiebot demo --demo_name all_drivers --duckiebot_name BOTNAME --package_name duckiebot_interface --image duckietown/dt-duckiebot-interface:daffy`


    and the glue nodes that handle the joystick mapping and the kinematics:

    * `dts duckiebot demo --demo_name all --duckiebot_name BOTNAME --package_name car_interface --image duckietown/dt-car-interface:daffy`

    Make sure that this worked properly.

3. Within the folder _packages/light_lf_ of the behaviour-benchmarking repository:
     1. You can **build** the docker container as follows:

        - `docker -H BOTNAME.local build --no-cache -t light_lf:v1 .`

     2. After that, if there were no errors, you can **run** the light_lf:

        - `docker -H BOTNAME.local run -it  --name behaviour_benchmarking --rm -v /data:/data --privileged --network=host light_lf:v1`
For Master19:
Follow the instructions found [here](https://docs.duckietown.org/DT19/opmanual_duckiebot/out/demo_lane_following.html) to start lane following, or the instructions found [here](https://docs.duckietown.org/DT19/opmanual_duckiebot/out/demo_indefinite_navigation.html) to start the indefinite navigation.
Add your contribution in daffy
✎Modified 2020-06-11 by Linus1994
To see if you contribution has improved the Lane following just add your contribution into the packages/light_lf/packages folder and build the container again:
docker -H BOTNAME.local build --no-cache -t light_lf:BRANCH_NAME .
Then run your version of dt-core:
docker -H BOTNAME.local run -it --name behaviour_benchmarking --rm -v /data:/data --privileged --network=host light_lf:BRANCH_NAME
For example, when you have worked one the lane_filter, then simply add your entire lane_filter folder into the folder packages/light_lf/packages. Please make sure that you use the precise name, as then the default version of whatever package is automatically replaced by yours. To get all the different packages in which you can make changes or work in please check here.
If you would like to run indefinite_navigation instead of just lane_following, just un-comment line 3 in the light_lf.launch file found in light_lf/packages/light_lf/launch folder and comment out line 2.
In the end it is the same as if you would simply clone the dt-core repository and building and running this on your Duckiebot. However, it is suggested to develop as you wish and then for the actual Benchmarking to use the way explained above which uses a lighter version of the launch files. This guarantees the benchmarks to be comparable.
Hardware Check:
✎Modified 2020-06-11 by Linus1994
First of all, for each Duckiebot involved, run the hw_check you can find within the cloned behaviour-benchmarking repository. Therefor, follow the following steps:
- Go into the folder hw_check by running:
cd ~/behaviour-benchmarking/packages/hw_check
- Build the container by running:
docker -H BOTNAME.local build --no-cache -t hw_check:v1 .
-
Then run it by running:
docker -H BOTNAME.local run -it --network host -v /data:/data -v /sys/firmware/devicetree:/devfs:ro hw_check:v1
Then follow the instructions within the terminal.
-
When the Docker Container has finished, visit:
http://BOTNAME.local:8082/configand download the .yaml file with your information in the name. - Place the .yaml file within the data/BenchmarkXY folder of your behaviour-benchmarking repository.
- Furthermore, it is suggested that you set up your own autolab fleet rooster. However, this is not necessary.
Duckiebot preparation:
✎Modified 2020-05-30 by Linus1994
To be able to record a rosbag on your Duckiebot please follow the steps below. This rosbag records all messages publisher to the for the specific Benchmark important nodes. The steps below prepare Terminal 4 of the four terminals mentioned below. Please note that the rosbag that will be recorded will automatically be saved on your USB drive.
- Plug a USB drive (of at least 32 Gb) into your Duckiebot
- Ssh into your Duckiebot by running:
ssh AUTOBOT_NAME- Within your Duckiebot, create a folder with the name
bagby running the command: sudo mkdir /data/bag- Use the command
lsblkto see where your USB drive is located. Under name you should see sda1 or sdb1 and the size should be a bit less then the actual size of your drive (about 28.7 Gb for a 32 Gb drive) - Then mount the folder created above to your USB drive by running:
sudo mount -t vfat /dev/sdb1 /data/bag/ -o uid=1000,gid=1000,umask=000- Then exit your Duckiebot by pressing
Crtl + d
- Then start and enter a container on your Duckiebot by running:
dts duckiebot demo --demo_name base --duckiebot_name AUTOBOT_NAME
-
Then prepare the command to record a rosbag within that container:
rosbag record -O /data/bagrec/BAGNAME_duckiebot.bag --duration 50 /AUTOBOT_NAME/line_detector_node/segment_list /AUTOBOT_NAME/lane_filter_node/lane_pose /rosout
Please note that if you are using Master19 you should subscribe to
/AUTOBOT_NAME/lane_controller_node/lane_poseinstead of/AUTOBOT_NAME/lane_filter_node/lane_pose
Place your Duckiebot within the map:
✎Modified 2020-06-03 by Linus1994
Place your Duckiebot in the beginning of the straight part that is on the bottom of the loop relative to the origin of the coordinate system (see image below) of the loop on the outer line such that the Duckiebot drives around the the loop counter-clockwise. Below you see an image on where you should place the Duckiebot, in this image the origin of the global coordinate frame of the map (so the point from where you measured the distances of the April Tags when you added them to the map) lies in the bottom right (in the corner near the Duckiebot).
Prepare 4 terminals:
✎Modified 2020-06-11 by Linus1994
Make sure that you carefully read through the steps and the note section below before starting up everything. It is important that you start recording the bags at roughly the same time and press a to start lane following or indefinite navigation straight after. Therefor first starting the diagnostic toolbox, then start recording both the bags and straight after start lanefollowing by pressing ‘a’.
-
Terminal 1: Run the diagnostic toolbox on your Duckiebot:
dts diagnostics run -G Name_BehBench_LF -d 70 --type duckiebot -H BOTNAME.local
-
Terminal 2: Start the keyboard control on your Duckiebot:
-
dts duckiebot keyboard_control BOTNAMETo start lane_following press ‘a’ on your keyboard
-
-
Terminal 3: Open a Docker container ros being pre-installed by running the command below or record a rosbag directly on your computer if you have the necessary setup installed:
dts cli
Then within this container record a rosbag that subscribes everything published by the localization system by running:
rosbag record -a --duration=50 -O BAGNAME_localization.bag
-
Terminal 4: Run the command already prepared above to record a rosbag that subscribes to the needed topics.
-
Note:
- If your Duckiebot crashes, you can stop lane following by pressing
s, but please let the recordings of the bags as well as the Diagnostic Toolbox finish normally. - If your Duckiebot leaves the loop, make sure that you do not stop lanefollowing until the Duckiebot was out of sight of the watchtowers for at least 3 seconds or just go and grab the Duckiebot when it left the loop and take it completely out of sight manually, then stop the lanefollowing.
- For the BAGNAME please use the following convention:
Country_Autolab_LoopName_Date_GithubUserName_HWConfig_SWConfig- Where:
Country: is the country you ran your benchmark (Ex. CH, USA, DE etc.)Autolab: is the Autolab you ran your benchmark in (Ex. ETHZ etc.)LoopName: is the name of the loop on which you recorded your benchmark, at the moment this should belinus_loopDate: is the date on which you ran the benchmark in the format DDMMYEAR(Ex. 17022020)GithubUserName: is your github username (Ex. duckietown)HWConfig: is the hardware configuration of the Duckiebot you used (Ex. DB18, DB19 etc.)SWConfig: is the software configuration used on the Duckiebot (Ex. Daffy, Master19 etc.)
- If your Duckiebot crashes, you can stop lane following by pressing
File gathering:
✎Modified 2020-06-11 by Linus1994
After the rosbag recording as well as the Diagnostic Toolbox have finished you can stop the Duckiebot by pressing ‘s’ on your keyboard. Then do the following steps:
- Exit the container of Terminal 4 by pressing:
crt+d - Ssh into your Duckiebot again by running:
ssh AUTOBOT_NAME
- Within your Duckiebot, unmount the folder by running:
sudo umount /data/bag
- Then remove the USB drive from your Duckiebot and plug it into your local Computer. Copy the
BAGNAME_duckiebot.bagthat should be on your USB drive into the folderbagon your local computer. - Copy the recorded rosbag of the localization system from the Docker container onto your local computer into the
path_to_bag_folder(should be simplybag) by running:sudo docker cp dts-cli-run-helper:/code/catkin_ws/src/dt-gui-tools/BAGNAME_localization.bag ~/path_to_bag_folderor generally:sudo docker cp Docker_Container_Name:/place_within_container/where_bag_was_recorded/BAGNAME_localization.bag ~/path_to_bag_folder
- Make sure that both the bags are readable by opening the
bagfolder in a terminal and running:sudo chmod 777 BAGNAME_localization.bagsudo chmod 777 BAGNAME_duckiebot.bag
- To get the information recorded by the diagnostic toolbox, visit dashboard and login using your Duckietown token. Then navigate to Diagnostics and in the drop down menu Group select Name_BehBench_LF and in the drop down menu Time the corresponding time when you ran the Benchmark. After add the data by pressing onto the green plus and download the .json file by pressing the Download log button.
-
Place the download .json file within you
bagfolder and rename it toBAGNAME_diagnostics.json. -
To help the Duckietown community to gather the logs of the recorded bags, please create a folder, named BAGNAME, containing the two bag files as well as the .json file. Make zip of this folder and upload it to the bag folder found under this link.
Processing the recorded bags:
✎Modified 2022-11-14 by Andrea Censi
You need to know where your bag is. The folder containing it is referred as path_to_bag_folder in the command below. It is recommended to create new separate folders for each Benchmark (with date and/or sequence number). If you followed the instructions above, your bags are located in the folder bag. Example for path_to_bag_folder is /home/linus/bag.
-
Cd into the package
08-post-processingfound in yourbehaviour-benchmarkingrepository by running:cd behaviour-benchmarking/packages/08-post-processing
-
Then build the repository by running:
docker build -t duckietown/post-processing:v1 .
-
Then run the post_processor for the rosbag of the localization system by running:
docker run --name post_processor -it --rm -e INPUT_BAG_PATH=/data/BAGNAME_localization -e OUTPUT_BAG_PATH=/data/processed_BAGNAME_localization.bag -e ROS_MASTER_URI=http://192.168.1.97:11311 -v path_to_bag_folder:/data duckietown/post-processing:v1
This runs a slightly modified version of the original found here.
(To run the original use the following command:
docker run --name post_processor -dit --rm -e INPUT_BAG_PATH=/data/BAGNAME_localization -e OUTPUT_BAG_PATH=/data/processed_BAGNAME_localization.bag -e ROS_MASTER_URI=http://YOUR_IP:11311 -v PATH_TO_BAG_FOLDER:/data duckietown/post-processor:daffy) Note that when running the original post-processor there won’t be a file created calledBAGNAME_db_estimation.yamlwhich is necessary for the some of the Benchmarks (Ex. Lane Following)
When the container stops, you should have a new bag called
processed_BAGNAME_localization.bagas well as a new .yaml file calledBAGNAME_db_estimation.yamlinside of yourpath_to_bag_folder. (This can take more than a minute, please be patient)-
Make sure that those files are readable by opening the
path_to_bag_folderin a terminal and running:- sudo chmod 777 BAGNAME_db_estimation.yaml
-
Then place the file called
BAGNAME_db_estimation.yamlinto the folder~/behaviour-benchmarking/data/BenchmarkXY/yaml/post_processor.
-
Remember from Unit B-4 - Autolab map, that you created a map. Now is the time to remember on which fork you pushed it (the default is duckietown), and what name you gave to your map (for this Benchmark this should be
linus_loop). The map file needs to be in the same folder as the rest of the maps. They are respectively the YOUR_FORK_NAME and YOUR_MAP_NAME arguments in the following command line. Please run the graph-optimizer by running:docker run --rm -e ATMSGS_BAG=/data/processed_BAGNAME_localization.bag -e OUTPUT_DIR=/data -e ROS_MASTER=YOUR_HOSTNAME -e ROS_MASTER_IP=YOUR_IP --name graph_optimizer -v path_to_bag_folder:/data -e DUCKIETOWN_WORLD_FORK=YOUR_FORK_NAME -e MAP_NAME=YOUR_MAP_NAME duckietown/cslam-graphoptimizer:daffy
This will generate at least one .yaml file that will be stored in the folder
path_to_bag_folder. If you followed the instructions and placed an April Tag with a different name than you Duckiebot on your localization standoff, you should find two .yaml files. One will be named like your Duckiebot, and the other one like the name of the April Tag on you Duckiebot (Ex. autobot01.yaml). For the benchmarking we are only interested in the .yaml file that has the same name as the April Tag on top of your Duckiebot has.-
Make sure that those files are readable by opening the
path_to_bag_folderin a terminal and running:sudo chmod 777 APRILTAGID.yaml
-
Then place this file in the folder
~/behaviour-benchmarking/data/BenchmarkXY/yaml/graph_optimizer
-
For the rosbag recorded on the Duckiebot, run analyze-rosbag by:
- cd into the
analyze_rosbagfolder found in behaviour-benchmarking repository by runningcd behaviour-benchmarking/packages/analyze_rosbag - Build the repository by running:
dts devel build -f --arch amd64
- Then run it with:
docker run -v path_to_bag_folder:/data -e DUCKIEBOT=AUTOBOT_NAME -e BAGNAME=BAGNAME_duckiebot -it --rm duckietown/behaviour-benchmarking:v1-amd64
-
This will create five
.jsonfiles within thebagfolder that will be used for the Benchmarking later. The .json files are named:BAGNAME_duckiebot_constant.json: containing the value of each of the constants that was used for the experimentBAGNAME_duckiebot_lane_pose.json: containing the information about the relative pose estimation of the DuckiebotBAGNAME_duckiebot_node_info.json: containing information about the update frequency of the different nodes, the number of connections etc)BAGNAME_duckiebot_segment_count.json: containing information about the number of segments detected at each time stampBAGNAME_duckiebot_latencies.json: contains information about the latency measured from the very beginning up to and including the detector node
-
Make sure that those files are readable by opening the
bagfolder in a terminal and running:sudo chmod 777 FILENAME.json
- Then place all those files in the folder
~/behaviour-benchmarking/data/BenchmarkXY/json
- cd into the
Result analysis preparation:
✎Modified 2020-06-11 by Linus1994
- Place the .yaml file created by the graphoptimizer with the name of the April Tag that is on top of your Duckiebot into the data/BenchmarkXY/yaml/graph_optimizer folder (please note that it is important that you take the correct .yaml file as the one named after your actual Duckiebot should not be placed within the mentioned folder). Then place the .yaml file created by the post_processor called
BAGNAME_db_estimation.yamlinto the data/BenchmarkXY/yaml/post_processor folder. Also place all the .json files (the one downloaded from the dashboard as well as the 5 created by the analyze_rosbag container) into the data/BenchmarkXY/json folder of your behaviour_benchmarking repository. - Note that XY stands for a number, so for your first Benchmark name the folder Benchmark01.
-
Create a virtual environment as you already did for when you added the map to your duckietown-world repository or when you added the exact position of the ground april tags. However, this time, please create this virtual environment within your cloned behaviour_benchmarking repository by following the instructions below:
-
First, if not already done, install venv by running:
sudo apt install -y python3-venv
-
Then, cd into your behaviour_benchmarking repository, and create the venv:
cd ~/behaviour_benchmarkingpython3.7 -m venv duckietown-world-venvsource duckietown-world-venv/bin/activate
-
Now, you can setup duckietown-world. Inside of the virtual environment (you should see “(duckietown-worl-venv)” in front of your prompt line), please run:
python3 -m pip install --upgrade pippython3 -m pip install -r requirements.txtpython3 -m pip install jupyterpython3 setup.py develop --no-deps
-
Then start the notebook:
jupyter notebook
If you encounter any issues with the steps above, please click here for more detailed instructions.
-
Navigate to the notebooks
-
Result computation:
✎Modified 2020-06-11 by Linus1994
In the following it is briefly explained how to achieve some actual results based on the recorded data. The first two steps have to be repeated for each experiment you ran for this Benchmark. They will extract and analyze the engineering data as well as the actual behaviour. The further steps then will help you decide weather you ran enough experiments or not and then finally let you compare your Benchmark to others. Please note, that detailed explanation on what exactly is calculated and how it is analyzed is explained in the notebooks directly. So if you are interested in more detail what exactly happens, please have a detailed look at them and read the comment when running them. Within the final report which will be the end result, you will also fined some detailed information on what is taken into account ect. There are some instructions within the notebooks, however, they are mostly designed to be ran without having to do much, so the following steps won’t take long. But please read the instructions carefully. If you followed the instructions above you ran at least two experiments. Please run for each experiment you have already done the first steps before continuing.
-
First open the notebook called
95-Trajectory-statisticsand follow the instructions there. To run this Notebook, you will need the file calledAutobotAPRILTAGNB.yamlfound in the folder~/behaviour-benchmarking/data/BenchmarkXY/yaml/graph_optimizer(where APRILTAGNR is the number of the April Tag that is placed on top of your Duckiebot) and the fileBAGNAME_db_estimation.yamlfound within the folder~/behaviour-benchmarking/data/BenchmarkXY/yaml/post_processor. It will result in a .yaml file called BAGNAME__benchmark_results_test_XY.yaml where XY is the number of the test run. In this file you will find all kind of results considering the actual performance of the behaviour. The file will be stored within the folder~/behaviour-benchmarking/data/BenchmarkXY/benchmarks/same_bmand will be further analyzed below. This notebook extracts all kind of data measured by the localization system like the actual trajectory, the absolute mean lane offset of the Duckiebot, the number of tiles the Duckiebot covered etc. For more details on what exactly is analyzed and how the analysis is done, please have a look at the Notebook itself. However, below see below for a list of all computed measurements:- The mean of the offset (distance and angle) of the Duckiebot in respect to the center of the lane [m]
- The number of rounds completed (entirely completed by the center of the April Tag placed on the localization standoff on your Duckiebot
- The number of tiles covered (center of April Tag completely passed the tile)
- Avg time needed per tile in seconds
- Length of the Benchmark in seconds
- Actual length of the benchmark in seconds
- Mean absolute lane offset measured by Watchtowers (ground truth) [m]
- Std of the absolute lane offset measured by Watchtowers (ground truth) [m]
- Mean absolute relative angle measured by Watchtowers (ground truth) [deg]
- Std of the absolute relative angle measured by Watchtowers (ground truth) [deg]
- Mean absolute lane offset measured by the Duckiebot [m]
- Std of the absolute lane offset measured by the Duckiebot [m]
- Mean absolute relative angle measured by the Duckiebot [deg]
- td of the absolute relative angle measured by the Duckiebot [deg]
- Mean of the absolute difference between lane offset measured by the Duckiebot and by the Watchtowers (ground truth) [m]
- Std of the absolute difference between lane offset measured by the Duckiebot and by the Watchtowers (ground truth) [m]
- Mean of the absolute difference between the relative angle measured by the Duckiebot and by the Watchtowers (ground truth) [deg]
- Std of the absolute difference between the relative angle measured by the Duckiebot and by the Watchtowers (ground truth) [deg]
-
Now it is time to see if you have collected enough data, for this, please open and run the notebook
97-compare_calc_mean_benchmarks. This will open all your result .yaml files you produced above and check if the data is meaningful. This means that it calculates the standard deviation of some of the measurements over the different experiments and puts it in relation with the mean. If the standard deviation for all of the considered measurements is small enough it will then produce aBAGNAME_benchmark_final_results.yamlfile which includes the mean values over all the experiments ran and saves it in the folder~/behaviour-benchmarking/data/BenchmarkXY/benchmarks/final. The Notebook produces some nice visualizations that show the user if its data is stable enough or not and why it is important to have stable data. The user literally gets a green or a red light weather he is ready to actually run the evaluation of the performance or if more data needs to be collected. If the standard deviation is too high, please run another experiment, complete the first step of the result computation and run this notebook again. If not, please upload the resulting yaml file in theResultsfolder found here The .yaml file produced holds the following information:- Software information of all the containers like: container name, image name and tag, the base image of the container, the architecture of the container, the branch etc. as well as the constants that were set within the Duckiebot for example the gain, the trim factor etc.
These things do not change within the same Benchmark, this means for all the tests you are running with the specific software version all this information remains the same. Therefore, this data is called
static. - Engineering data analysis like the update frequency of the different nodes, the number of segments detected over time, the latency up to and including the
detector_node, as well as the total overall performance information (CPU usage, the Memory usage and the NThreads). Moreover it includes total performance information of each node of container dt-core. This data changes (at least slightly) between two different tests of the same Benchmark which is why the mean of this data of all the tests ran for one Benchmark is calculated later. - Engineering data analysis like the update frequency of the different nodes, the number of segments detected over time, the latency up to and including the
detector_node, as well as the total overall performance information (CPU usage, the Memory usage and the NThreads). Moreover it includes total performance information of each node of container dt-core. This data changes (at least slightly) between two different tests of the same Benchmark which is why the mean of this data of all the tests ran for one Benchmark is calculated later. - Number of experiments ran
- Run-times of different experiments
- Info about if enough data collected
- Analysis of all data from Notebook 95 (Mean, Median, Std, CV etc.)
- Information about the trajectories
- Software information of all the containers like: container name, image name and tag, the base image of the container, the architecture of the container, the branch etc. as well as the constants that were set within the Duckiebot for example the gain, the trim factor etc.
These things do not change within the same Benchmark, this means for all the tests you are running with the specific software version all this information remains the same. Therefore, this data is called
-
Then you are finally ready to compare your Benchmark with another one of the same type. For this please run the notebook ´ 96-compare_2_benchmarks´. This notebook will guide you through the analysis and show you the comparison of the two Benchmarks you are comparing. In there you find a nice summary of all the measured results, the metric used and the final results. Please have a look at the notebook 96 example for further details about what the final report includes.
Test the code stability
✎Modified 2020-06-09 by Linus1994
You can test the stability of your code when running some experiments under some specific conditions and comparing the result to the original one. For example you can cover the right white line, or the yellow middle line etc.
Future work
✎Modified 2020-08-11 by Andrea F. Daniele
- Improve the out_of_sight condition such that the Watchtowers can still see the Duckiebot but it counts as out of sight if he is on a tile which is not part of the loop for longer then 5 seconds.
- Also improve the offset calculation and punish the score of the Benchmark if the Duckiebot takes for example a huge shortcut, or give a bigger punishment if he drives on the other lane for too long
- improve the calculation of time needed per tile and make a difference between straight, left and right curved tiles
- save the data online automatically (not up to user) -> Automate data storage
- Automate the Benchmarks. This can be done as soon as the localization system works more reliable and efficient.
- set up remaining Benchmarks. This should not take long at all.
- Set up rest of Benchmarks
- Data collection
- Calculate position of center of mass based on position of April Tag
- Spit out type of tile where Benchmark was stopped in case of an early termination