Introduction to Docker for Robotics and Machine Learning
✎Modified 2019-09-22 by Andrea Censi
![]()
Docker is a tool for portable, reproducible computing
✎Modified 2019-09-22 by Andrea Censi
It would be nice to give a computer - any computer with an internet connection - a short string of ASCII characters (say via a keyboard), press enter, and return to see some program running. Forget about where the program was built or what software you happened to be running at the time (this can be checked, and we can fetch the necessary dependencies). Sounds simple, right? In fact, this is an engineering task that has taken thousands of the world’s brightest developers many decades to implement.
Thanks to the magic of container technology we now can run any Linux program on almost any networked device on the planet, as is. All of the environment preparation, installation and configuration steps can be automated from start to finish. Depending on how much network bandwidth you have, it might take a while, but that’s all right. All you need to do is type the string correctly.
Docker containers are easy to install
✎Modified 2019-09-22 by Andrea Censi
Let’s say you have never used Docker. To get Docker, run this command on a POSIX shell of any Docker-supported platform:
$ curl -sSL https://get.docker.com/ | sh
Now you have installed Docker!
Suppose your friend, Daphne, has a Docker container. How can we run this container? Docker containers live inside registries, which are servers that host Docker images. A Docker image is basically a filesystem snapshot—a single file that contains everything you need to run her container.

You can fetch Daphne’s container by running the following command to pull it from her Docker Hub repository:
$ docker pull daphne/duck
Now you have Daphne’s Docker image. To see a list of Docker images on your machine, type:
$ docker images
Every image has an image ID, a name and a tag:
REPOSITORY      TAG        IMAGE ID         CREATED       SIZE
daphne/duck     latest     ea2f90g8de9e     1 day ago     869MB
To run a Docker container, type the repository name, like so:
$ docker run daphne/duck
Now you are running Daphne’s container. To verify it is running, type:
$ docker ps
CONTAINER ID     IMAGE           ...     NAMES
52994ef22481     daphne/duck     ...     happy_hamster
Note how Daphne’s duck container has a container ID, a base image, and a funny-looking name, happy_hamster. This name is an alias for the container ID.
Containers come from other containers
✎Modified 2019-09-22 by Andrea Censi
So you have a terminal and an internet connection? Now it doesn’t matter what operating system you’re running! You can run almost any Linux program in the world with just a few keystrokes. No further steps are necessary. How neat is that? To have a tool that clones a program and its environment, fetches the appropriate dependencies, and runs it on any OS is a big time-saver. Suppose you have a program that runs on one computer. It is extremely likely to run on any other, regardless of the underlying OS or hardware.
But how do you create a Docker image? There are two ways. You can either snapshot a running Docker container, or you can write a plaintext recipe. First, let’s see how to create a snapshot:
$ docker run -it daphne/duck bash
This will launch Daphne’s container and drop us into a bash session within. Suppose we make a change to the Docker container like so:
root@295fd7879184:/# touch new_file && ls
total 0
-rw-r--r-- 1 root root 0 May 21 20:52 new_file
However, this file is not permanent. Exit the container:
root@295fd7879184:/# exit
Then rerun it:
$ docker run -it daphne/duck bash
And run:
root@18f13bb4571a:/# ls
root@18f13bb4571a:/# touch new_file1 && ls -l
total 0
-rw-r--r-- 1 root root 0 May 21 21:32 new_file1
It seems like new_file has disappeared! Notice how the container ID (18f13bb4571a) is now different. This is because docker run daphne/duck created a new container from the image daphne/duck, rather than restarting our old container.
Let’s see all the containers on our machine:
$ docker container ls -a
CONTAINER ID     IMAGE           ...     STATUS                              NAMES
295fd7879184     daphne/duck     ...     Exited (130) About a minute ago     merry_manatee
18f13bb4571a     daphne/duck     ...     Up 5 minutes                        shady_giraffe
52994ef22481     daphne/duck     ...     Up 10 minutes                       happy_hamster
It looks like 295fd7879184 a.k.a. merry_manatee survived, but it is no longer running. Whenever a container’s main process (recall we ran merry_manatee with bash) finishes, the container will stop, but it will not cease to exist.
In fact, we can resume the stopped container right where we left off:
$ docker start -a merry_manatee
root@295fd7879184:/# ls -l
total 0
-rw-r--r-- 1 root root 0 May 21 20:52 new_file
Nothing was lost! Let’s open a new terminal (without leaving the current one) to see what other containers are running:
$ docker ps
CONTAINER ID     IMAGE           ...     NAMES
295fd7879184     daphne/duck     ...     merry_manatee
18f13bb4571a     daphne/duck     ...     shady_giraffe
52994ef22481     daphne/duck     ...     happy_hamster
Now suppose we would like to share the container shady_giraffe with someone else. To do so, we must first snapshot the running container, or commit it to a new image, giving it a name and a tag. This will create a checkpoint that we may later restore:
$ docker commit -m "fork Daphne's duck" shady_giraffe your/duck:v2
Wherever you see a funny-looking name like shady_giraffe in Docker, this is just another way to reference the container. We either can use the container ID, 18f13bb4571a or the designated name (ie. shady_giraffe). The above your can be your username or an organization you belong to on a Docker registry. This image repository will be called your/duck, and has an optional version identifier, v2. Now we can push it to the Docker Hub registry:
$ docker push your/duck:v2
$ docker images
REPOSITORY    TAG        IMAGE ID         CREATED          SIZE
daphne/duck   latest     ea2f90g8de9e     1 day ago        869MB
your/duck     v2         d78be5cf073e     2 seconds ago    869MB
$ docker pull your/duck:v2 # Anyone can run this!
$ docker run your/duck ls -l
total 0
-rw-r--r-- 1 root root 0 May 21 21:32 new_file1
This is a convenient way to share an image with your colleagues and collaborators. Anyone with access to the repository can pull our image and continue right where we left off, or create another image based on our own. Images can be created via the command line or by using something called a Dockerfile.
Containers come from recipes
✎Modified 2019-09-22 by Andrea Censi
The second way to create a Docker image is to write a recipe, called a Dockerfile. A Dockerfile is a text file that specifies the commands required to create a Docker image, typically by modifying an existing container image using a scripting interface. They also have special keywords (which are always CAPITALIZED), like FROM, RUN, ENTRYPOINT and so on. For example, create a file called Dockerfile with the following content:
FROM daphne/duck       # Defines the base image
RUN touch new_file1   # new_file1 will be part of our snapshot
CMD ls -l             # Default command to be run when the container is started
Now, to build the image we can simply run:
$ docker build -t your/duck:v3 . # Where '.' is the directory containing your Dockerfile
You should see something like:
Sending build context to Docker daemon  2.048kB
Step 1/3 : FROM daphne/duck
 --- ea2f90g8de9e
Step 2/3 : RUN touch new_file1
 --- e3b75gt9zyc4
Step 3/3 : CMD ls -l
 --- Running in 14f834yud59
Removing intermediate container 14f834yud59
 --- 05a3bd381fc2
Successfully built 05a3bd381fc2
Successfully tagged your/duck:v3
Now run the command docker images in your terminal, and you should see an image called your/duck with tag v3:
$ docker images
REPOSITORY    TAG        IMAGE ID         CREATED          SIZE
daphne/duck   latest     ea2f90g8de9e     1 day ago        869MB
your/duck     v2         d78be5cf073e     5 minutes ago    869MB
your/duck     v3         05a3bd381fc2     2 seconds ago    869MB
This procedure is identical to the snapshot method we performed earlier, but the result is much cleaner. Now, instead of needing to carry around a 869MB BLOB, we can just store the 4KB text file and rest assured that all our important setup commands are contained within. Similar to before, we can simply run:
$ docker run -it your/duck:v3
total 0
-rw-r--r-- 1 root root 0 May 21 21:35 new_file1
Notice that as soon as we run the container, Docker will execute the ls -l command as specified by the Dockerfile, revealing new_file1 was stored in the image. However we can still override ls -l by passing a command line argument: docker run -it your/duck:v3 [custom_command].
Layer Caching
✎Modified 2019-09-22 by Andrea Censi
An important concept in Docker is the layers. One way to think of a layer is like a Git commit - a set of changes to a previous image or layer, identified by a hash code. In a Dockerfile, layers begins with a keyword. Let’s have a look:
FROM daphne/duck
RUN touch new_file1                             # Defines a new layer
RUN mkdir config && mv new_file1 mkdir          # Each layer can have multiple commands
RUN apt-get update && apt-get install -y wget   # Install a dependency
RUN wget https://get.your.app/install.sh        # Download a script
RUN chmod +x install.sh && ./install.sh         # Run the script
To build this image, we can run the command docker build -t your/duck:v4 .:
Sending build context to Docker daemon  2.048kB
Step 1/6 : FROM daphne/duck
 ---> cd6d8154f1e1
Step 2/6 : RUN touch new_file1
 ---> Running in a88a5e9ab8d0
Removing intermediate container a88a5e9ab8d0
 ---> 0473154b2004
Step 3/6 : RUN mkdir config && mv new_file1 mkdir
 ---> Running in e4c4dd614bd4
Removing intermediate container e4c4dd614bd4
 ---> 2201828019ff
Step 4/6 : RUN apt-get update && apt-get install -y wget
 ---> Running in 8fb56ef38bc8
...
Removing intermediate container 8fb56ef38bc8
 ---> 3358ca1b8649
Step 5/6 : RUN wget https://get.your.app/install.sh
 ---> Running in e8284ff4ec8b
--2018-10-30 06:47:57--  https://get.your.app/install.sh
...
2018-10-30 06:47:57 (89.9 MB/s) - 'install.sh' saved [13847/13847]
Removing intermediate container e8284ff4ec8b
 ---> 24a22dc2900a
Step 6/6 : RUN chmod +x install.sh && ./install.sh
 ---> Running in 9526651fa492
# Executing install script, commit: 36b78b2
...
Removing intermediate container 9526651fa492
 ---> a8be23fea573
Successfully built a8be23fea573
Successfully tagged your/duck:v4
Layers are conveniently cached by the Docker daemon. If we run the same command again, Docker will use the cache insead of rebuilding the entire image:
Sending build context to Docker daemon  2.048kB
Step 1/6 : FROM daphne/duck
 ---> cd6d8154f1e1
Step 2/6 : RUN touch new_file1
 ---> Using cache
 ---> 0473154b2004
...
Step 6/6 : RUN chmod +x index.html && ./index.html
 ---> Using cache
 ---> a8be23fea573
Successfully built a8be23fea573
Successfully tagged your/duck:v4
If we later make a change to the Dockerfile, Docker will only need to rebuild the image starting from the first modified instruction. Suppose we add the line RUN echo "Change here!" to the bottom of our Dockerfile and rebuild:
Sending build context to Docker daemon  2.048kB
...
Step 6/7 : RUN chmod +x index.html && ./index.html
 ---> Using cache
 ---> a8be23fea573
Step 7/7 : RUN echo "Change here!"
 ---> Running in 80fc5c402304
Change here!
Removing intermediate container 80fc5c402304
 ---> c1ec64cef9c6
Successfully built c1ec64cef9c6
Successfully tagged your/duck:v4
If Docker had to rerun the entire Dockerfile from top to bottom to every time we built an image, this would be terribly slow and inconvenient. Fortunately, Docker is smart enough to cache the layers which have not changed, and only rerun the minimum set of commands to rebuild our image. This is a very nice feature, however it can sometimes introduce unexpected results, especially when the cache is stale. To ignore the cache and force a clean rebuild, use the --no-cache flag.
What does Docker consider when deciding whether to use the cache? First is the Dockerfile itself - when an instruction changes, it and any subsequent instructions will need to be rerun during a build. Docker must also consider the build context. When we write docker build -t TAG ., the . indicates the context, or path where the build should occur. Often, this path contains build artifacts. For example:
FROM daphne/duck
COPY duck.txt .
RUN cat duck.txt
Now if we run the command
$ echo "Make way for duckies!" > duck.txt && docker build -t my/duck:v5 .
this will create a new file duck.txt in your build directory, and we will copy that file into the Docker image, then print its contents:
Sending build context to Docker daemon  3.072kB
Step 1/3 : FROM daphne/duck
 ---> cd6d8154f1e1
Step 2/3 : COPY duck.txt .
 ---> e0e03d9e1791
Step 3/3 : RUN cat duck.txt
 ---> Running in 590c5420ce29
Make way for duckies!
Removing intermediate container 590c5420ce29
 ---> 1633e3e10bef
Successfully built 1633e3e10bef
Successfully tagged my/duck:v5
As long as the first three lines of the Dockerfile and duck.txt are not modified, these layers will be cached and Docker will not need to rebuild them. However if the contents of duck.txt are later modified, this will force a rebuild to occur. For example, if we run
$ echo "Thank you. Have a nice day!" >> duck.txt
$ docker build -t my/duck:v5 .
we have:
Sending build context to Docker daemon  3.072kB
Step 1/3 : FROM ubuntu
 ---> cd6d8154f1e1
Step 2/3 : COPY duck.txt .
 ---> f219efc150a5
Step 3/3 : RUN cat duck.txt
 ---> Running in 7c6f5f8b73e9
Make way!
Thank you. Have a nice day!
Removing intermediate container 7c6f5f8b73e9
 ---> e8a1db712aee
Successfully built e8a1db712aee
Successfully tagged my/duck:v5
A common mistake when writing Dockerfiles is to COPY more than is necessary to perform the next build step. For example, if we write COPY . . at the beginning of the Dockerfile, then whenever a file in changed anywhere in the build context, this will trigger a rebuild of subsequent instructions which is not often what we want. If we are conservative and only COPY what we need, this is a more efficient use of the cache and our builds will complete much more quickly. A general rule of thumb is source code be copied after dependencies and before compilation.
Like Git’s .gitignore, Docker has a .dockerignore file. If we add a line to the .dockerignore file, then all paths matching this line in the build context will be ignored. Docker also accepts more sophisticated pattern matching features like regular expressions and negation. For more details, refer to the Docker documentation.
Multi-stage builds
✎Modified 2019-09-22 by Andrea Censi
Docker’s filesystem is purely additive, so each layer will only increase the size of the final image. If you care about image size, it is often necessary to reduce the number of layers and tidy up unnecessary files. For example, when installing dependencies on Debian-based images, a common practice is to run
RUN apt-get update && apt-get install ... && rm -rf /var/lib/apt/lists/*
ensuring the package list is not baked into the image (Docker will only checkpoint the layer after an instruction is complete). But often, you only care about a single artifact, although building it can take several steps. To avoid this dance of chaining together commands and removing the garbage in a single instruction, we can use a technique called multi-stage builds. These allow you to build sequential images inside a Dockerfile, and copy resources from one to another, discarding the rest:
FROM your/duck:v3 as template1              # We can use `template1` as an alias later

FROM daphne/duck as template2
COPY --from=template1 new_file1 new_file2

FROM donald/duck as template3               # The last `FROM` will define *this* image
COPY --from=template2 new_file2 new_file3
CMD ls -l
Now let’s build and run this image:
$ docker build . -t your/duck:v4
Sending build context to Docker daemon  2.048kB
Step 1/6 : FROM your/duck:v3 as template1
 --- e3b75ef8ecc4
Step 2/6 : FROM daphne/duck as template2
 --- ea2f90g8de9e
Step 3/6 : COPY --from=template1 new_file1 new_file2
 ---> 72b96668378e
Step 4/6 : FROM donald/duck:v3 as template3
 ---> e3b75ef8ecc4
Step 5/6 : COPY --from=template2 new_file2 new_file3
 ---> cb1b84277228
Step 6/6 : CMD ls
 ---> Running in cb1b84277228
Removing intermediate container cb1b84277228
 ---> c7dc5dd63e77
Successfully built c7dc5dd63e77
Successfully tagged your/duck:v4
$ docker run -it your/duck:v4
total 0
-rw-r--r-- 1 root root 0 Jul  8 15:06 new_file3
Why would you want to use this feature? For example, one application of multi-stage builds is compiling a dependency from its source code. In addition to all the source code, the compilation itself could have separate build dependencies and setup requirements, all of which are quite incidental to our ultimate goal - to build a single file. If we’re especially unlucky, we might end up with gigabytes of transitive dependencies to build a tiny binary file, and waste a lot of disk space or time cleaning up the mess. Multi-stage builds allow us to build the file, discard the unnecessary bits, copy it to a fresh layer, and move on with our life, unburdened by intermediate dependencies.
Docker is not a silver bullet for complexity
✎Modified 2019-09-22 by Andrea Censi
When creating a new image, it may be tempting to reinvent the wheel. Your application is special, and has special requirements. But there are millions of Docker images in the wild. Unless you are doing something very special indeed, it’s best to keep things simple. Find a base image that accomplishes most of what you are trying to achieve, and build on top of it. Base images like Ubuntu (or the very popular Alpine Linux, due to its small footprint), are okay, but there is probably something more specific to your application’s requirements. Even the python base image can be fairly generic, there are many images which contain specific Python stacks.
It may also be tempting to use some random image you found on Docker Hub, which does exactly what you want. Congratulations! Maybe this is the case. But unless you are doing something very similar, it probably does some extra things that are inefficient, or even harmful to your application. If it provides a Dockerfile, inspect it first and see what’s inside. Maybe you can adapt the Dockerfile to suit your needs and get rid of a lot of complexity. Try to find a happy medium between simplification and creating a Rube Goldberg image stack. It may work, but will not save you any headache in the long run. The best Docker images are often provided by the maintainer of your favorite library or dependency.
Running Docker remotely
✎Modified 2019-09-22 by Andrea Censi
You can run Docker commands locally, or on a remote Docker Host. To do so, run the command docker -H REMOTE_HOST_NAME. You do not need to open a SSH session simply to run a Docker command.
Useful Docker resources
✎Modified 2019-09-22 by Andrea Censi
We have found the following resources helpful for robotics and Machine Learning:
Resin
✎Modified 2019-09-22 by Andrea Censi
Resin.io is a very good source of base images for ARM devices. The best part of using Resin images, is that you can build them on x86 devices, such as your laptop or the cloud. Baked into every Resin image is a shim for the shell that will allow you to run ARM binaries on x86. To use this feature, you can adapt the Dockerfile template below:
FROM resin/BASE_IMAGE # e.g. raspberrypi3-python

RUN [ "cross-build-start" ]

# Your code goes here...

RUN [ "cross-build-end" ]

CMD DEFAULT_START_COMMAND
Resin uses qemu to cross-build images as described in this article. Also described is how to build and run non-Resin-based ARM images on x86 devices. This technique is not just for building images - it also works at runtime! When running an ARM image, simply use the qemu-arm-static binary as an entrypoint to your launch command:
$ docker run --entrypoint=qemu-arm-static -it your/arm-image bash
ROS
✎Modified 2019-09-22 by Andrea Censi
ROS.org builds nightly ARM and x86 images for robotics development. For each distro, there are packages like core, base, perception (including OpenCV), robot (for the robot) and others.
Hypriot
✎Modified 2019-09-22 by Andrea Censi
Hypriot, a base OS for RPi and other ARM devices, include support for Docker out of the box. Hypriot is lightweight, fast, and builds the latest RPi Linux kernels and Raspbian releases.
PiWheels
✎Modified 2019-09-22 by Andrea Censi
Not all Python packages (especially if they wrap a native library) can be run on all platforms. You might be tempted to build some package from its sources (and in rare cases, you may need to do so). But there is a good chance your favorite Python library is already compiled for Raspberry Pi on PiWheels. By running the following command (either in your Dockerfile or at runtime), you can install Python packages, e.g. opencv-python:
$ pip install opencv-python --index-url https://www.piwheels.org/simple
Graphical User Interfaces
✎Modified 2019-09-22 by Andrea Censi
Docker also supports GUIs, but you will need to configure X11 forwarding.
Docker Hub
✎Modified 2019-09-22 by Andrea Censi
Docker Hub is the central repository for Docker Images. Unless you have configured a separate registry, whenever you pull a Docker image tag, it will query the Docker Hub first. You can use the Docker Hub to upload Docker images, and configure automated builds from GitHub (with a 2-hour build timeout). Docker Hub does not support layer caching of any kind, so the build will always take a fixed amount of time.
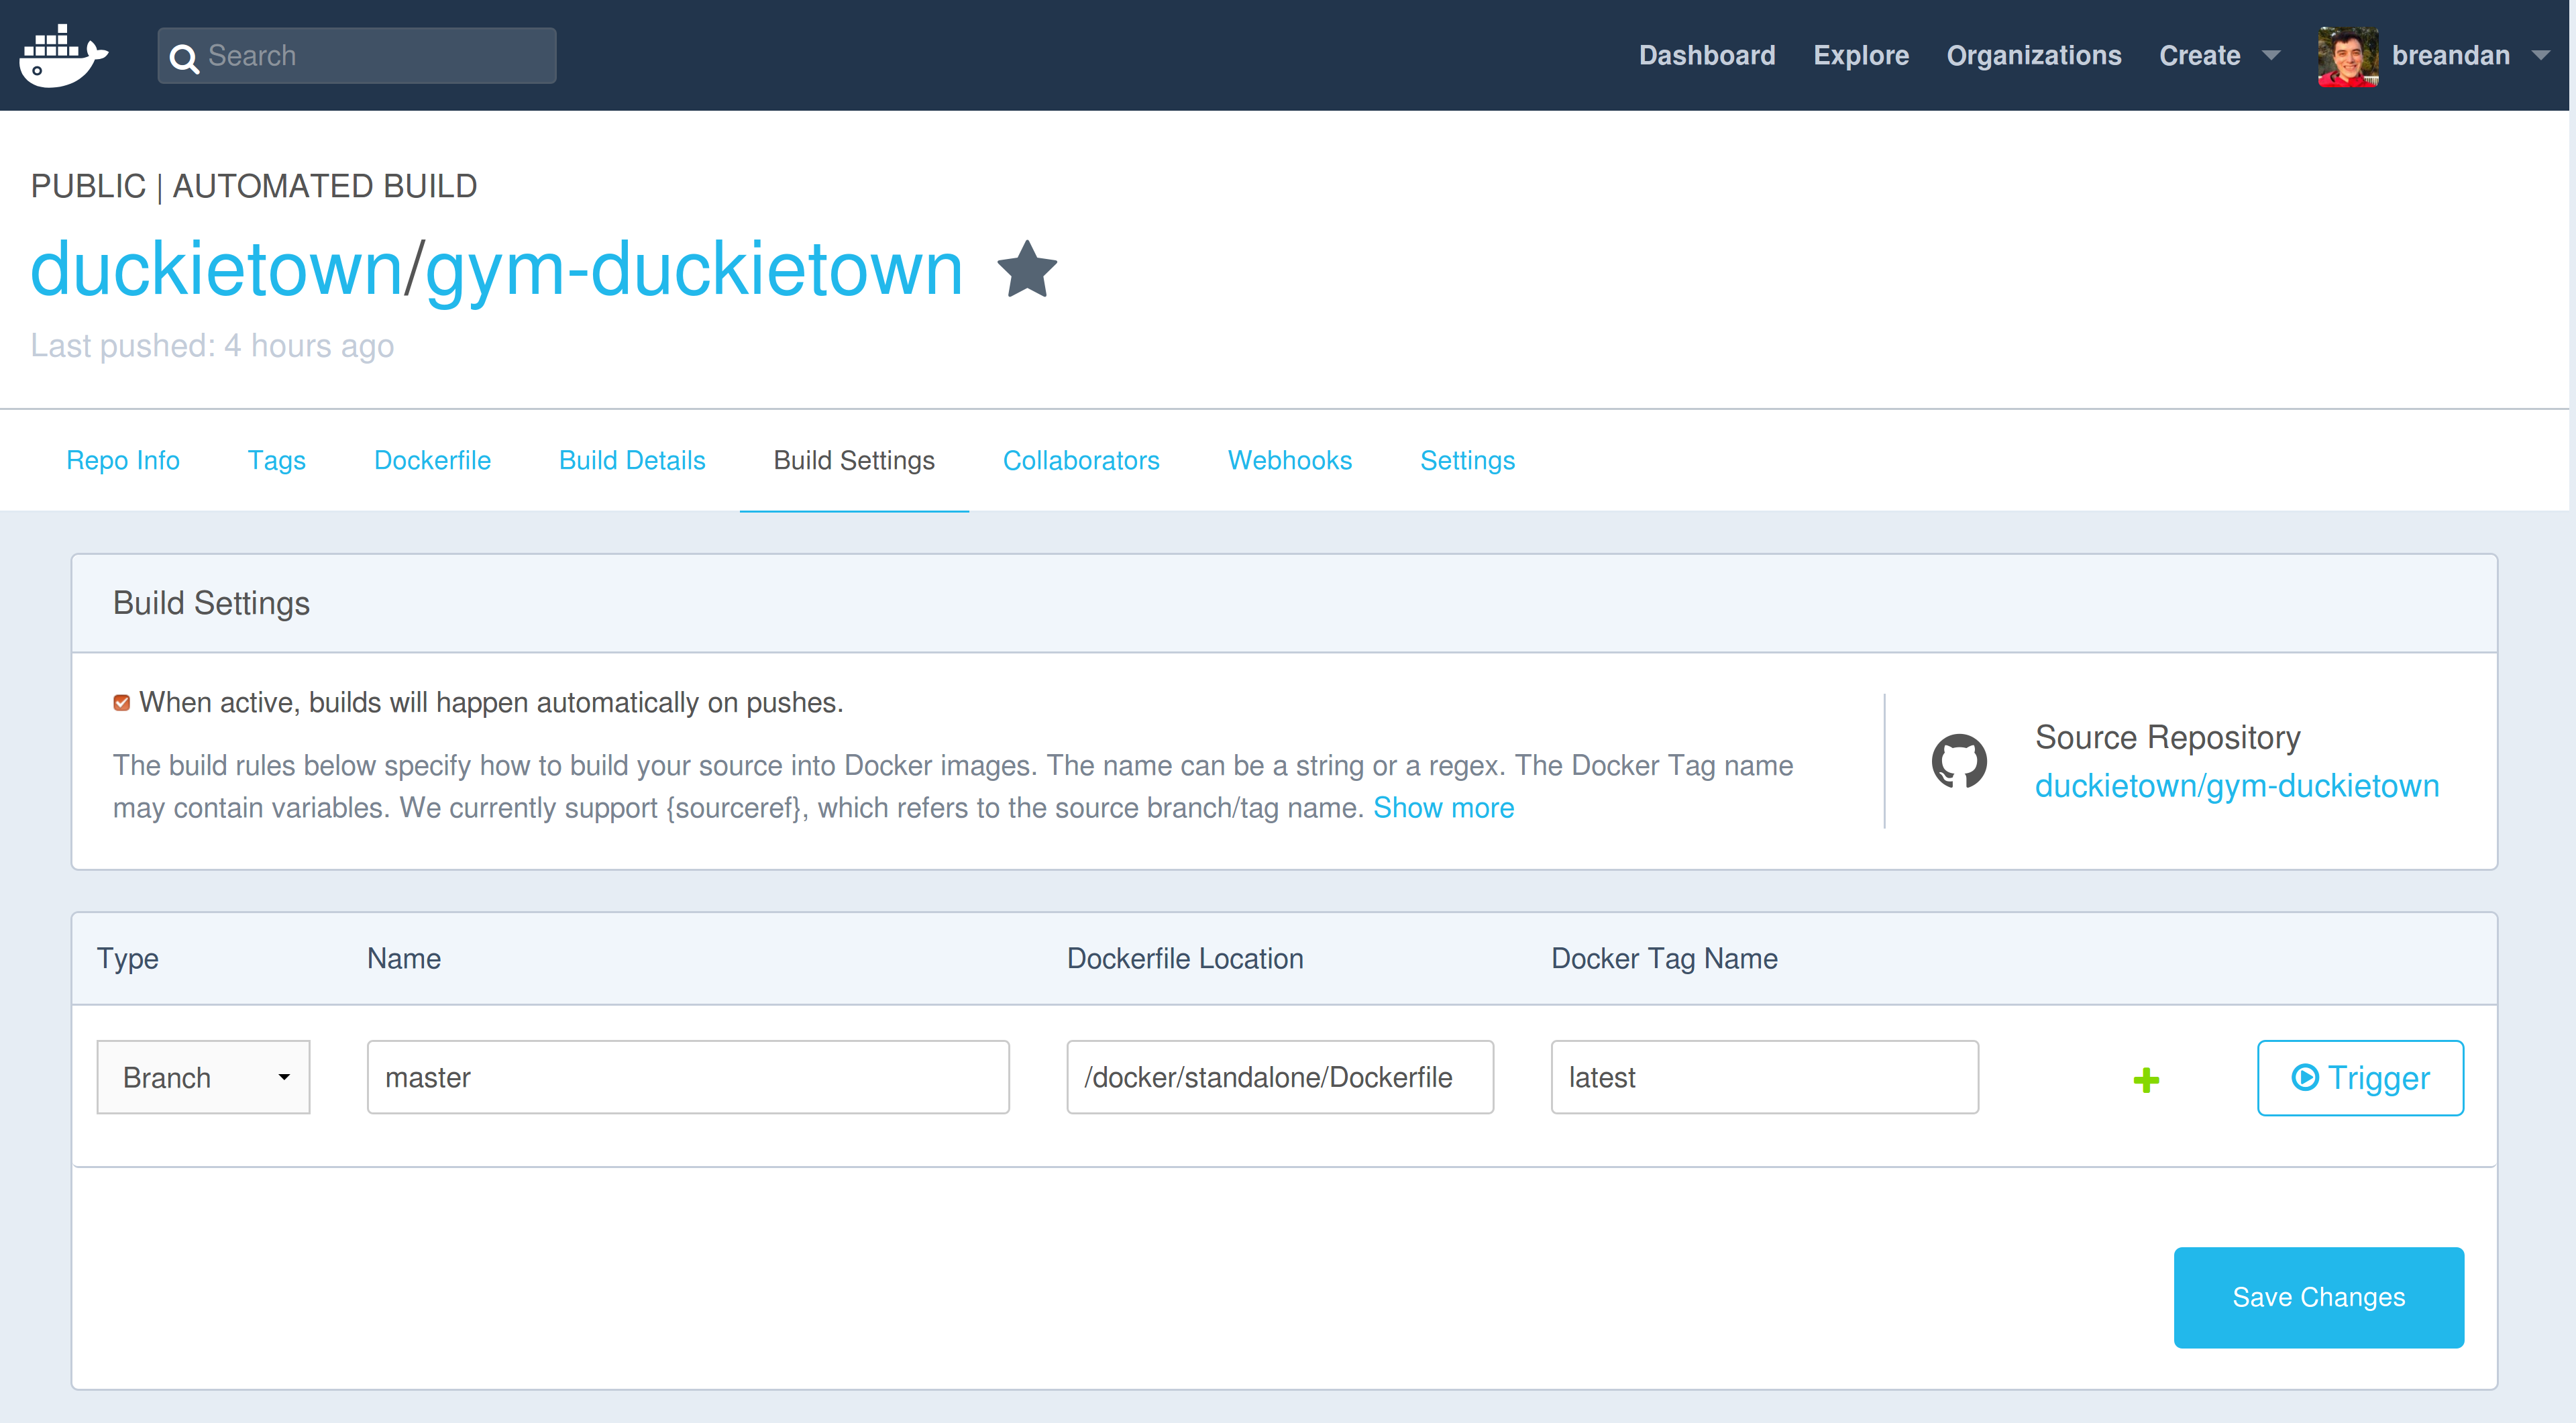
Dockerfile in a GitHub repository, and whenever that Dockerfile changes, the Docker image will be updated.The Docker Hub also has features for configuring repository links and build triggers. These will automatically rebuild your Docker image when some event happens.

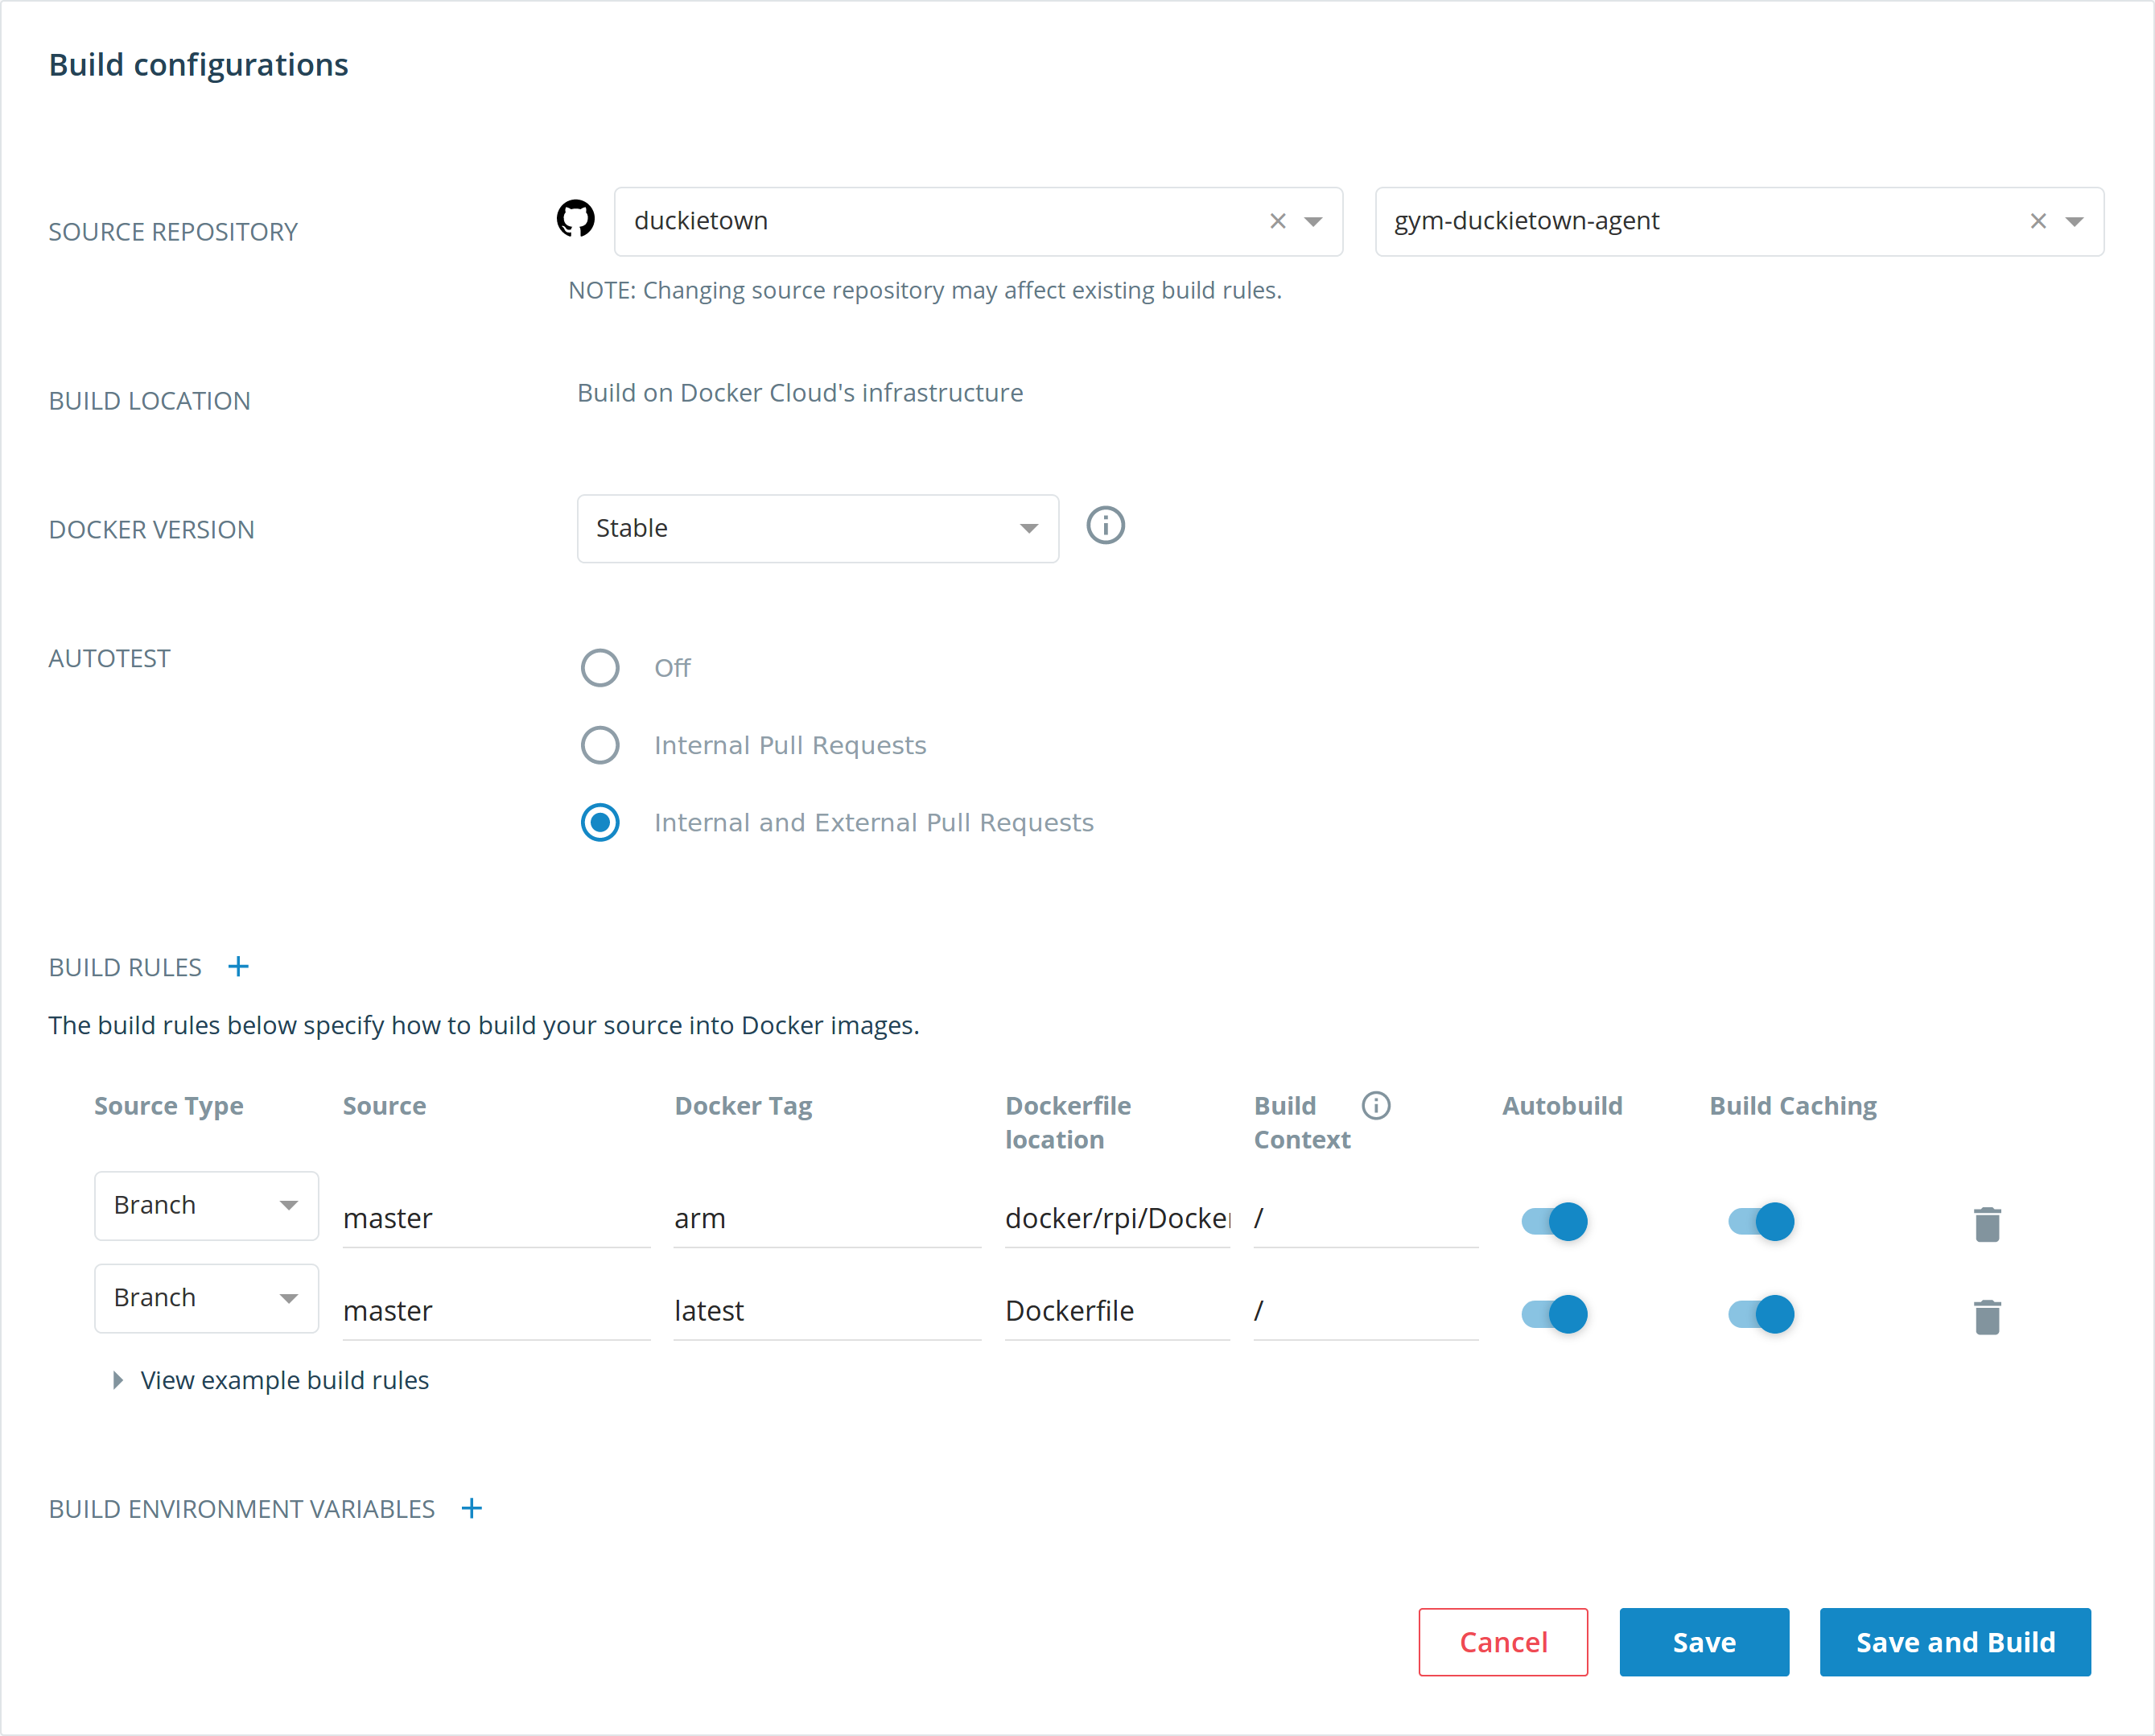
Docker Cloud
✎Modified 2019-09-22 by Andrea Censi
Docker Cloud is integrated with the Docker Hub (and may one day replace it). Builds are automatically published from Docker Cloud to Docker Hub. Notifications for email and Slack, as well as a longer build timeout (up to 4-hours) are supported. It also has features for configuring the build context and other useful build settings, such as enabling caching (unlike Docker Hub).