Development in the Duckietown infrastructure
✎Modified 2019-10-01 by hosnerm
In this section, you will learn everything about creating a Duckietown-compliant Docker image with ROS.
Developer knowledge of ROS
Basic Project Structure
✎Modified 2020-10-12 by Pietro
In Duckietown, everything runs in Docker containers. All you need in order to run a piece of software that uses ROS in Duckietown is a Duckietown-compliant Docker image with your software in it.
A boilerplate is provided here. The repository contains a lot of files, but do not worry, we will analyze them one by one.
Click on the green button that says “Use this template”.

This will take you to a page that looks like the following:
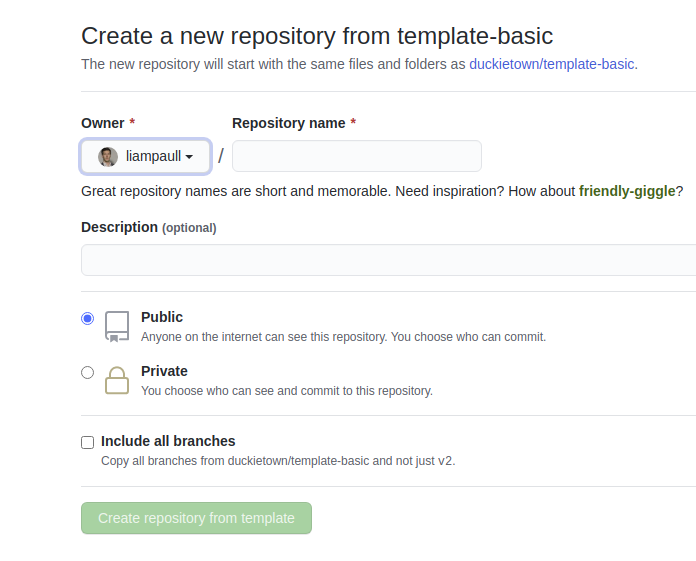
Pick a name for your repository (say my-ros-program) and press the button Create repository from template. Note, you can replace my-ros-program with the name of the repository that you prefer, make sure you use the right name in the instructions below.
This will create a new repository and copy everything from the repository template-ros to your new repository. You can now open a terminal and clone your newly created repository.
laptop $ git clone https://github.com/YOUR_NAME/my-ros-program
laptop $ cd my-ros-program
NOTE: Replace YOUR_NAME in the link above with your GitHub username.
The repository contains already everything you need to create a Duckietown-compliant Docker image for your ROS program. The only thing we need to change before we can build an image from this repository is the repository name in the file Dockerfile. Open it using the text editor you prefer and change the first line from:
ARG REPO_NAME="<REPO_NAME_HERE>"
to
ARG REPO_NAME="my-ros-program"
Similarly update the DESCRIPTION and MAINTAINER ARGs.
Save the changes.
We can now build the image, even though there won’t be much going on inside it until we place our code in it.
Open a terminal and move to the directory created by the git clone instruction above. Run the following command:
laptop $ dts devel build -f
If the above command is not recognized, you will first have to install it with dts install devel.
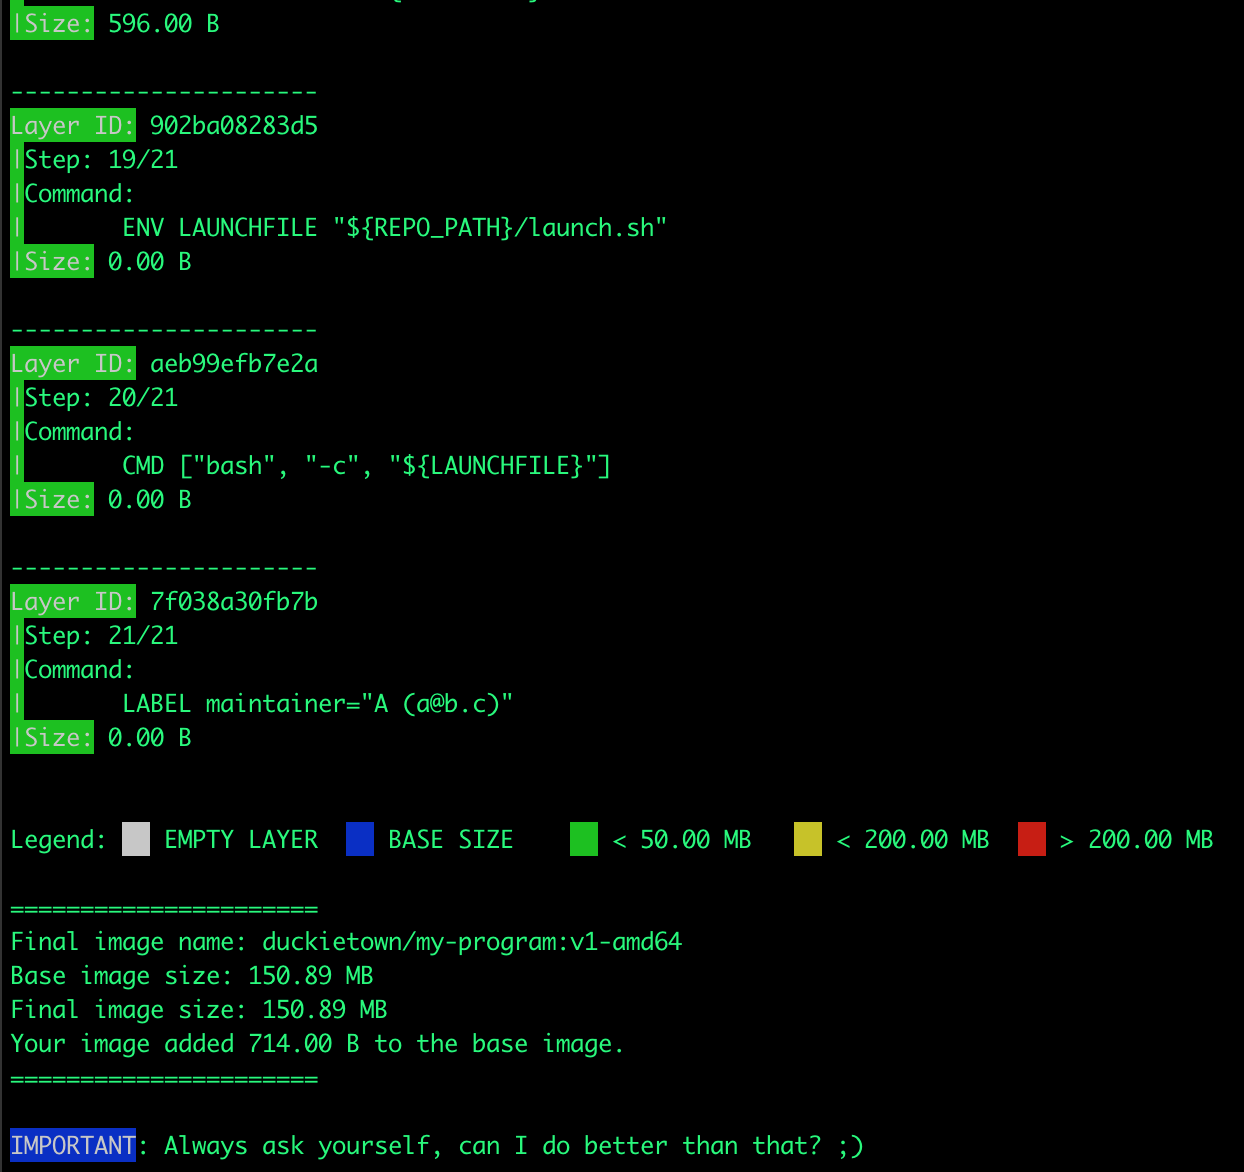
If you correctly installed Docker and the duckietown-shell, you should see a long log that ends with something like the following:
You can now run your container by executing the following command.
laptop $ dts devel run
This will show the following message:
The environment variable VEHICLE_NAME is not set. Using 'LAPTOP_HOSTNAME'.
WARNING: robot_type file does not exist. Using 'duckiebot' as default type.
WARNING: robot_configuration file does not exist.
= Launching app...
This is an empty launch script. Update it to launch your application.
= App terminated!
CONGRATULATIONS! You just built and run your first ROS-based Duckietown-compliant Docker image.
ROS Publisher on Laptop
✎Modified 2020-10-12 by Pietro
Now that we know how to build a Docker image for Duckietown, let’s put some code in one of them. We will see how to write a simple ROS program with Python, but any language supported by ROS should do it.
Open a terminal and go to the directory my-ros-program created above. In ROS, every ROS node must belong to a ROS package. ROS packages are placed inside the directory packages in my-ros-program. Let go ahead and create a directory called my_package inside packages.
laptop $ mkdir -p ./packages/my_package
A ROS package is simply a directory containing two special files, package.xml and CMakeLists.txt. So, let’s turn the my_package folder into a ROS package by creating these two files.
Create the file package.xml inside my_package using your favorite text editor and place/adjust the following content inside it:
<package>
  <name>my_package</name>
  <version>0.1.0</version>
  <description>
  This package is a test for RH3.
  </description>
  <maintainer email="YOUR_EMAIL@EXAMPLE.COM">YOUR_FULL_NAME</maintainer>
  <license>None</license>

  <buildtool_depend>catkin</buildtool_depend>
</package>
Create the file CMakeLists.txt inside my_package using your favorite text editor and place/adjust the following content inside it:
cmake_minimum_required(VERSION 2.8.3)
project(my_package)

find_package(catkin REQUIRED COMPONENTS
  rospy
)

catkin_package()
Now that we have a ROS package, we can create a ROS node inside it. Create the directory src inside my_package and use your favorite text editor to create the file ./packages/my_package/src/my_publisher_node.py and place the following code inside it:
#!/usr/bin/env python3

import os
import rospy
from duckietown.dtros import DTROS, NodeType
from std_msgs.msg import String

class MyPublisherNode(DTROS):

    def __init__(self, node_name):
        # initialize the DTROS parent class
        super(MyPublisherNode, self).__init__(node_name=node_name, node_type=NodeType.GENERIC)
        # construct publisher
        self.pub = rospy.Publisher('chatter', String, queue_size=10)

    def run(self):
        # publish message every 1 second
        rate = rospy.Rate(1) # 1Hz
        while not rospy.is_shutdown():
            message = "Hello World!"
            rospy.loginfo("Publishing message: '%s'" % message)
            self.pub.publish(message)
            rate.sleep()

if __name__ == '__main__':
    # create the node
    node = MyPublisherNode(node_name='my_publisher_node')
    # run node
    node.run()
    # keep spinning
    rospy.spin()
And don’t forget to declare the file my_publisher_node.py as an executable, by running the command:
laptop $ chmod +x ./packages/my_package/src/my_publisher_node.py
We now need to tell Docker we want this script to be the one executed when we run the command docker run .... In order to do so, open the file ./launchers/default.sh and replace the line
dt-exec echo "This is an empty launch script. Update it to launch your application."
with the following lines
roscore &
sleep 5
dt-exec rosrun my_package my_publisher_node.py
Let us now re-build the image
laptop $ dts devel build -f
It is a good idea to make sure that the base image (dt-ros-commons in this case) is up to date. You can do so by adding the flag --pull to the command above, i.e., dts devel build -f --pull.
and run it
laptop $ dts devel run
This will show the following message:
The environment variable VEHICLE_NAME is not set. Using 'b17d5c5d1855'.
... logging to /root/.ros/log/45fb649e-e14e-11e9-afd2-0242ac110004/roslaunch-b17d5c5d1855-56.log
Checking log directory for disk usage. This may take awhile.
Press Ctrl-C to interrupt
Done checking log file disk usage. Usage is <1GB.

started roslaunch server http://172.17.0.4:46725/
ros_comm version 1.15.8


SUMMARY
========

PARAMETERS
 * /rosdistro: noetic
 * /rosversion: 1.15.8

NODES

auto-starting new master
process[master]: started with pid [67]
ROS_MASTER_URI=http://172.17.0.4:11311/

setting /run_id to 45fb649e-e14e-11e9-afd2-0242ac110004
process[rosout-1]: started with pid [80]
started core service [/rosout]

[INFO] [1602534741.100483]: [/my_publisher_node] Initializing...
[INFO] [1602534741.137653]: [/my_publisher_node] Health status changed [STARTING] -> [STARTED]
[INFO] [1602534741.139893]: Publishing message: 'Hello World!'
[INFO] [1602534742.141385]: Publishing message: 'Hello World!'
[INFO] [1602534743.141426]: Publishing message: 'Hello World!'
[INFO] [1602534744.141346]: Publishing message: 'Hello World!'
CONGRATULATIONS! You just built and run your own Duckietown-compliant ROS publisher!
If you want to stop it, just use Ctrl+C.
ROS Publisher on Duckiebot
✎Modified 2020-09-30 by Andrea F Daniele
Now that we know how to package a piece of software into a Docker image for Duckietown, we can go one step further and write code that will run on the robot instead of our laptop.
This part assumes that you have a Duckiebot up and running with hostname MY_ROBOT. Of course, you don’t need to change the hostname to MY_ROBOT, just replace it with your robot name in the instructions below. You can make sure that your robot is ready by executing the command
laptop $ ping MY_ROBOT.local
If you can ping the robot, you are good to go.
Let us go back to our node file my_node.py and change the line:
message = "Hello World!"
to,
message = "Hello from %s" % os.environ['VEHICLE_NAME']
Since roscore is already running on the Duckiebot, we need to remove the following lines from launch.sh:
roscore &
sleep 5
We can now slightly modify the instructions for building the image so that the image gets built directly on the robot instead of your laptop or desktop machine. Run the command:
laptop $ dts devel build -f -H MY_ROBOT.local
As you can see, we added the argument -H MY_ROBOT.local, which tells Docker to build the image on your MY_ROBOT instead of your laptop or desktop machine.
Once the image is built, we can run it on the robot by running the command:
laptop $ dts devel run -H MY_ROBOT.local
If everything worked as expected, you should see the following output,
The environment variable VEHICLE_NAME is not set. Using 'riplbot01'.
[INFO] [1569609192.728583]: [/my_node] Initializing...
[INFO] [1569609192.747558]: Publishing message: 'Hello from riplbot01'
[INFO] [1569609193.749251]: Publishing message: 'Hello from riplbot01'
[INFO] [1569609194.749195]: Publishing message: 'Hello from riplbot01'
CONGRATULATIONS! You just built and run your first Duckietown-compliant and Duckiebot-compatible ROS publisher.
ROS Subscriber on Duckiebot
✎Modified 2020-10-24 by Aleksandar Petrov
Now that we know how to create a simple publisher, let’s create a subscriber which can receive these messages.
Let us go back to our src folder and create a file called my_subscriber_node.py with the following content:
#!/usr/bin/env python3

import os
import rospy
from duckietown.dtros import DTROS, NodeType
from std_msgs.msg import String

class MySubscriberNode(DTROS):

    def __init__(self, node_name):
        # initialize the DTROS parent class
        super(MySubscriberNode, self).__init__(node_name=node_name, node_type=NodeType.GENERIC)
        # construct publisher
        self.sub = rospy.Subscriber('chatter', String, self.callback)

    def callback(self, data):
        rospy.loginfo("I heard %s", data.data)

if __name__ == '__main__':
    # create the node
    node = MySubscriberNode(node_name='my_subscriber_node')
    # keep spinning
    rospy.spin()
Once again, don’t forget to declare the file my_subscriber_node.py as an executable, by running the command:
laptop $ chmod +x ./packages/my_package/src/my_subscriber_node.py
Then add the following line in ./launchers/default.sh
dt-exec rosrun my_package my_subscriber_node.py
after
dt-exec rosrun my_package my_publisher_node.py
Build the image on your Duckiebot again using
laptop $ dts devel build -f -H MY_ROBOT.local
Once the image is built, we can run it on the robot by running the command
laptop $ dts devel run -H MY_ROBOT.local
You should see the following output
[INFO] [1569750046.911664]: [/my_publisher_node] Initializing...
[INFO] [1569750046.914195]: [/my_subscriber_node] Initializing...
[INFO] [1569750046.924943]: Publishing message: 'Hello from riplbot01'
[INFO] [1569750047.926225]: Publishing message: 'Hello from riplbot01'
[INFO] [1569750047.928526]: I heard Hello from riplbot01
[INFO] [1569750048.926269]: Publishing message: 'Hello from riplbot01'
CONGRATULATIONS! You just built and run your first Duckietown-compliant and Duckiebot-compatible ROS subscriber.
As a fun exercise, open a new terminal and run (without stopping the other process
laptop $ dts start_gui_tools MY_ROBOT
and then inside it, run
laptop $ rqt_graph
Have you seen a graph like this before?
Launch files
✎Modified 2020-10-21 by arsimone
You edited the launch.sh file to remove
roscore &
rosmaster when it doesn’t exist?
You also added multiple rosrun commands to run the publisher and subscriber. Now imagine writing similar shell scripts for programming multiple robot behaviors. Some basic nodes such as a camera or a motor driver will be running in all operation scenarios of your Duckiebot, but other nodes will be added/removed to run specific behaviors (e.g. lane following with or without obstacle avoidance). You can think of this as an hierarchy where certain branches are activated optionally.
You can obviously write a “master” launch.sh which executes other shell scripts for heirarchies. How do you pass parameters between these scripts? Where do you store all of them? What if you want to use packages created by other people?
ROS again saves the day by providing us with a tool that handles all this! This tool is called roslaunch.
In this section, you will see how to use a ROS launch file to start both the publisher and subscriber together.
Create a folder called launch inside your package and then create a file inside the folder called multiple_nodes.launch with the following content
<launch>

  <node pkg="my_package" type="my_publisher_node.py" name="my_publisher_node" output="screen"/>
  <node pkg="my_package" type="my_subscriber_node.py" name="my_subscriber_node"  output="screen"/>

</launch>
Then replace the following lines inside launch.sh file
rosrun my_package my_node.py &
rosrun my_package my_node_subscriber.py
with
roslaunch my_package multiple_nodes.launch
Build and run the image again like above. You should get the same result.
You can read more about how to interpret launch files here.
Namespaces and Remapping
✎Modified 2020-10-21 by arsimone
If you went through the above link on launch files, you might have come across the terms namespaces and remapping. Understanding namespaces and remapping is very crucial to working with large ROS software stacks.
Consider you have two Duckiebots - donald and daisy. You want them to communicate with each other so you use one rosmaster for both the robots. You have two copies of the same node running on each of them which grabs images from the camera and publishes them on a topic called /image. Do you see a problem here? Would it not be better if they were called /donald/image and /daisy/image? Here donald and daisy are ROS namespaces.
What if you were dealing with a robot which has two cameras? The names /daisy/camera_left/image and /daisy/camera_right/image are definitely the way to go. You should also be able to do this without writing a new Python file for the second camera.
Let’s see how we can do this. First of all, we need to make sure that all the topics used by your Duckiebot are within its namespace.
Edit the ./packages/my_package/launch/multiple_nodes.launch to look like this:
<launch>

  <group ns="$(arg veh)">

    <node pkg="my_package" type="my_publisher_node.py" name="my_publisher_node" output="screen"/>
    <node pkg="my_package" type="my_subscriber_node.py" name="my_subscriber_node"  output="screen"/>

  </group>

</launch>
Then edit the roslaunch command in ./launch.sh as follows:
roslaunch my_package multiple_nodes.launch veh:=$VEHICLE_NAME
Build and run the image. Once again run rqt_graph like above. What changed?
As a next step, we need to ensure that we can launch multiple instances of the same node with different names, and publishing topics corresponding to those names. For example, running two camera nodes with names camera_left and camera_right respectively, publishing topics /my_robot/camera_left/image and /my_robot/camera_right/image.
Notice how the node tag in the launch file has a name attribute. You can have multiple node tags with different names for the same python node file. The name provided here will override the name you give inside the python file for the node.
Edit the ./packages/my_package/launch/multiple_nodes.launch file to have two publishers and two subscribers as below:
<launch>

  <group ns="$(arg veh)">

    <node pkg="my_package" type="my_publisher_node.py" name="my_publisher_node_1" output="screen"/>
    <node pkg="my_package" type="my_publisher_node.py" name="my_publisher_node_2" output="screen"/>
    <node pkg="my_package" type="my_subscriber_node.py" name="my_subscriber_node_1"  output="screen"/>
    <node pkg="my_package" type="my_subscriber_node.py" name="my_subscriber_node_2"  output="screen"/>

   </group>

</launch>
Check rqt_graph. All communications are happening on one topic. You still cannot differentiate between topics being published by multiple nodes. Turns out doing that is very simple. Open the file ./packages/my_package/src/my_publisher_node.py and edit the declaration of the publisher from
...
        self.pub = rospy.Publisher('chatter', String, queue_size=10)
...
to
...
        self.pub = rospy.Publisher('~chatter', String, queue_size=10)
...
All we did was add a tilde(~) sign in the beginning of the topic. Names that start with a ~ in ROS are private names. They convert the node’s name into a namespace. Note that since the nodes are already being launched inside the namespace of the robot, the node’s namespace would be nested inside it. Read more about private namespaces here
Do this for the subsciber node as well. Run the experiment and observe rqt_graph again. This time, switch the graph type from Nodes only to Nodes/Topics (all) and uncheck Hide: Dead sinks and Hide: Leaf topics. Play with these two “Hide” options to see what they mean.
All looks very well organized, except that no nodes are speaking to any other node. This is where the magic of remapping begins.
Edit the ./packages/my_package/launch/multiple_nodes.launch file to contain the following:
<launch>

  <group ns="$(arg veh)">

    <node pkg="my_package" type="my_publisher_node.py" name="my_publisher_node_1" output="screen"/>
    <node pkg="my_package" type="my_publisher_node.py" name="my_publisher_node_2" output="screen"/>

    <node pkg="my_package" type="my_subscriber_node.py" name="my_subscriber_node_1"  output="screen">
        <remap from="~/chatter" to="/$(arg veh)/my_publisher_node_1/chatter"/>
    </node>

    <node pkg="my_package" type="my_subscriber_node.py" name="my_subscriber_node_2"  output="screen">
        <remap from="~/chatter" to="/$(arg veh)/my_publisher_node_2/chatter"/>
    </node>

   </group>

</launch>
Check rqt_graph. Does it make sense?
Now, replace
<node pkg="my_package" type="my_subscriber_node.py" name="my_subscriber_node_1"  output="screen">
    <remap from="~/chatter" to="/$(arg veh)/my_publisher_node_1/chatter"/>
</node>
with
<node pkg="my_package" type="my_subscriber_node.py" name="my_subscriber_node_1"  output="screen">
    <remap from="~/chatter" to="my_publisher_node_1/chatter"/>
</node>
Does it still work? Why?
How about if you replace it with this:
<node pkg="my_package" type="my_subscriber_node.py" name="my_subscriber_node_1"  output="screen">
    <remap from="~/chatter" to="/my_publisher_node_1/chatter"/>
</node>
How about this?
<remap from="my_subscriber_node_1/chatter" to="my_publisher_node_1/chatter"/>
<node pkg="my_package" type="my_subscriber_node.py" name="my_subscriber_node_1"  output="screen"/>
Or this?
<remap from="~my_subscriber_node_1/chatter" to="~my_publisher_node_1/chatter"/>
<node pkg="my_package" type="my_subscriber_node.py" name="my_subscriber_node_1"  output="screen"/>
Can you explain why some of them worked, while some did not?
Multi-agent Communication
✎Modified 2022-11-14 by Andrea Censi
In this subsection, you will learn how to communicate between your laptop and the Duckiebot using ROS. Start by verifying that Portainer is running.
Next, ping your Duckiebot to find its IP address:
laptop $ ping MY_ROBOT.local
Note down the address. Next, find the IP address of your computer. Note that you may have multiple IP addresses depending on how many networks you are connected to. If you have a Linux computer, you can find your IP using:
laptop $ ifconfig
From the output, extract the IP address of the interface from which you are connected to your Duckiebot. For example, if you and your Duckiebot are both connected through WiFi, find your IP address from the WiFi connection.
Run the following command:
laptop $ docker run -it --rm --net host duckietown/dt-ros-commons:daffy /bin/bash
Right now, you are inside a ROS-enabled container which is connected to the rosmaster running on your laptop. But you want to connect to the rosmaster on your duckiebot. To do this, inside the container, run:
laptop $ export ROS_MASTER_URI=http://MY_ROBOT_IP:11311/
laptop $ export ROS_IP=MY_IP
Replace MY_ROBOT_IP and MY_IP with the IP addresses extracted above, in that order. More information about these environment variables here.
Now, run:
laptop $ rostopic list
You should see topics from your Duckiebot appearing here. Voilà! You have successfully established connection between your laptop and Duckiebot through ROS!
Are you confused about the 11311 above? You should not be. This is simply the default port number that ROS uses for communication. You can change it for any other free port.