Developing new Duckiebot functionality
✎Modified 2020-10-13 by Pietro
Learn how to develop new functionality within the Duckietown framework
You will now learn how to add your own code to already existing Duckietown codebase. In particular you will learn how to interface your nodes with the provided ones such that you don’t have to rewrite already existing modules. Then, you will be able to master these skills by developing Braitenberg vehicle behavior on Duckiebots.
Skills on how to develop new code as part of the Duckietown framework
Exploring DTROS
✎Modified 2020-10-19 by Pietro
The DTROS class is often referred to as the ‘mother node’ in Duckietown. It provides some very useful functionalities that the other nodes inherit. It has modified ROS Subscribers and Publishers which can be switched on and off. It also provides an interface to the ROS parameters of the node using it which allows dynamical changes while the node is running. For this reason we strongly suggest you to always base your nodes on DTROS. For some guidelines on how to structure a node in the Duckietown infrastructure, take a look at the dedicated chapter in the Developer Book. Instead of explaining all the details of DTROS, we instead invite you to investigate them yourself.
Exploring how DTROS works
✎First, take a look at the documentation of DTROS here. Find out how its functionalities are implemented by looking at their implementation in the dt-ros-commons repository here. In particular, make sure you can answer the following list of questions. To do that, it might be helpful to see how DTROS is being used in some of the other nodes. Take a look at camera_node, the kinematics_node, and the other nodes in dt-duckiebot-interface and dt-car-interface.
-
How do you initialize the
DTROSparent class? How do you start your node? What doesrospy.spin()do? (Hint: look at the nodes indt_duckiebot_interface) -
When should you redefine the
on_shutdownmethod? Why do you still need to call theon_shutdownmethod ofDTROS? (Hint: look at the nodes indt_duckiebot_interfaceand at the official ROS documentation) -
What is the difference between the
DTROSlogmethod and the native ROS logging? (Hint: look at theDTROSimplementation indt-ros-commons) -
How are the parameters dynamically updated? Should you ever use
rospy.get_param()in your node? If not, how should you access a ROS parameter? How do you initialize the parameters of your node? (Hint: look at the nodes indt_duckiebot_interfaceand at the official ROS documentation) -
What does the
~switchservice do? How can you use it? What is the benefit of using it? -
What is the difference between the native ROS Subscriber and Publisher and
DTPublisherandDTSubscriber?
Basic Braitenberg vehicle behavior
✎Modified 2020-10-13 by Pietro
Through a series of exercises you will implement a very basic brightness- and color- based controller for your Duckiebot that can result in a surprisingly advanced robot behavior. In his book Vehicles: Experiments in Synthetic Psychology, Valentino Braitenberg describes some extremely basic vehicle designs that are capable of demonstrating complex behaviors. By using only a pair of ‘sensors’ that can only detect brightness, two motors, and direct links between the sensors and the motors, these vehicles can exhibit love, aggression, fear, foresight and many other complex traits.
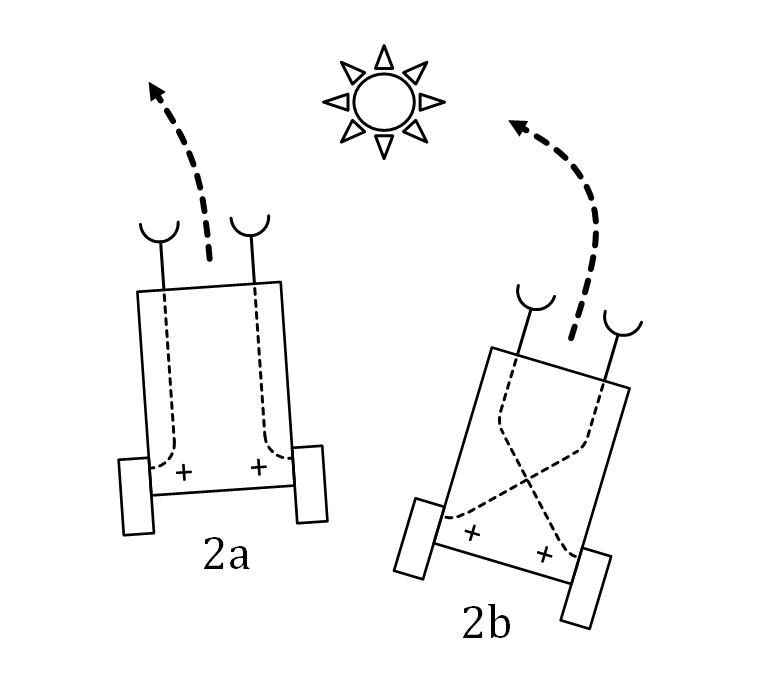
In the image above, the light intensity detected by a sensor is used proportionally to control a motor. Depending on whether each sensor is connected to the motor on the same or the opposite side, respectively avoiding or attracting behavior can be observed. These behaviors can further be combined if the robot also detects the color of the light.
Here’s an example video of how this Braitenberg behavior would look like on Duckiebots. When the light a Duckiebot sees is green, it has attracting behavior. Otherwise, it will be avoiding. By the end of this series of exercises you will be able to create similar Duckiebot controllers. Note that while this is recorded in a dark room, with a few smart tricks you can also make your robots work in well-lit spaces.

The video is at https://vimeo.com/365020910.
Avoiding Braitenberg vechicles
✎Using everything you have learnt so far, create a ROS node that implements the avoiding Braitenberg behavior. You should run this ROS node in a container running on your Duckiebot. Here are some details and suggestions you might want to take into account:
-
Use the
dt-duckiebot-interfaceand all the drivers it provides. In particular, you will need to subscribe to the images that thecamera_nodepublishes and to publish wheel commands towheel_driver_node. To do that simply make sure that thedt-duckiebot-interfacecontainer is running. Then, whenever you start the container with your code and--net host(why?), they will share their ROS Master, so that your subscribers and publishers can find each other. -
Use the nodes in
dt-duckiebot-interfaceas a reference for code and documentation style. You will find a number of useful code snippets there. Also, it may be useful to visit the development book’s chapter about structuring ROS nodes. -
Use the ROS template and create your package and node there. Don’t forget to add the
package.xmlandCMakeLists.txtfiles, and to make your Python code executable, as explained before. -
Your controller needs to run in real time with a frequency of at least 10-12 Hz. Therefore, processing the input image at its full resolution might not be possible and you should consider reducing it. A neat way to do this is to change the configuration parameters of the
camera_noderunning indt-duckiebot-interface. In the template node code below that is already done for the exposure mode. Consult the ROS API docs and the code for theCameraNodeclass if you are not sure about which parameters you can change. -
For now ignore the color that your bot observes, focus only on the brightness of the image on its left and right side. If you still want to change the color of the LEDs, use the
set_patternservice provided by theled_emitter_node. Its use is also documented on the ROS API docs. You do not need to call this service from inside your Python file. You would need to create a Docker container on your Duckiebot usingduckietown/dt-duckiebot-interface:daffyas the image (why?) to run the required command. What other arguments should you use while creating this container? -
If your Duckiebot keeps on moving even after you stop your node, you will have to edit the provided
on_shutdownmethod. Make sure that the last commands your node publishes towheel_driver_nodeare zero. -
You will need to publish
WheelsCmdStampedmessages towheel_driver_node. You can see the message structure here. -
The template loads the kinematics calibration on your Duckiebot so you don’t need to worry about trimming your Braitenberg controller. Simply use the provided
speedToCmdmethod apply gain, trim, and the motor constant to your wheel commands. However, in order for that to happen you need to make sure to mount the/datafolder of your Duckiebot, where all calibrations are stored, to your container. To do that, just add-v /data:/datato your Docker run. -
Once you have finished this exercise, you should have a Duckiebot which goes towards the left if your program senses that the right side has more brightness, and vice versa.
Template:
#!/usr/bin/env python3

import cv2
import numpy as np
import os
import rospy
import yaml

from duckietown.dtros import DTROS, NodeType, TopicType, DTParam, ParamType
from sensor_msgs.msg import CompressedImage
from duckietown_msgs.msg import WheelsCmdStamped


class BraitenbergNode(DTROS):
    """Braitenberg Behaviour

    This node implements Braitenberg vehicle behavior on a Duckiebot.

    Args:
        node_name (:obj:`str`): a unique, descriptive name for the node
            that ROS will use

    Configuration:
        ~gain (:obj:`float`): scaling factor applied to the desired
            velocity, taken from the robot-specific kinematics
            calibration
        ~trim (:obj:`float`): trimming factor that is typically used
            to offset differences in the behaviour of the left and
            right motors, it is recommended to use a value that results
            in the robot moving in a straight line when forward command
            is given, taken from the robot-specific kinematics calibration
        ~baseline (:obj:`float`): the distance between the two wheels
            of the robot, taken from the robot-specific kinematics
            calibration
        ~radius (:obj:`float`): radius of the wheel, taken from the
            robot-specific kinematics calibration
        ~k (:obj:`float`): motor constant, assumed equal for both
            motors, taken from the robot-specific kinematics calibration
        ~limit (:obj:`float`): limits the final commands sent to the
            motors, taken from the robot-specific kinematics calibration

    Subscriber:
        ~image/compressed (:obj:`CompressedImage`): The acquired camera
            images

    Publisher:
        ~wheels_cmd (:obj:`duckietown_msgs.msg.WheelsCmdStamped`): The
            wheel commands that the motors will execute

    """

    def __init__(self, node_name):

        # Initialize the DTROS parent class
        super(BraitenbergNode, self).__init__(node_name=node_name,
                                              node_type=NodeType.BEHAVIOR)
        self.veh_name = rospy.get_namespace().strip("/")

        # Set parameters using a robot-specific yaml file if such exists
        self.readParamFromFile()

        # Get static parameters
        self._baseline = rospy.get_param('~baseline')
        self._radius = rospy.get_param('~radius')
        self._k = rospy.get_param('~k')
        # Get editable parameters
        self._gain = DTParam(
            '~gain',
            param_type=ParamType.FLOAT,
            min_value=0.0,
            max_value=3.0
        )
        self._trim = DTParam(
            '~trim',
            param_type=ParamType.FLOAT,
            min_value=0.0,
            max_value=3.0
        )
        self._limit = DTParam(
            '~limit',
            param_type=ParamType.FLOAT,
            min_value=0.0,
            max_value=1.0
        )

        # Wait for the automatic gain control
        # of the camera to settle, before we stop it
        rospy.sleep(2.0)
        rospy.set_param('/%s/camera_node/exposure_mode'
                        self.veh_name, 'off')

        self.log("Initialized")

    def speedToCmd(self, speed_l, speed_r):
        """Applies the robot-specific gain and trim to the
        output velocities

        Applies the motor constant k to convert the deisred wheel speeds
        to wheel commands. Additionally, applies the gain and trim from
        the robot-specific kinematics configuration.

        Args:
            speed_l (:obj:`float`): Desired speed for the left
                wheel (e.g between 0 and 1)
            speed_r (:obj:`float`): Desired speed for the right
                wheel (e.g between 0 and 1)

        Returns:
            The respective left and right wheel commands that need to be
                packed in a `WheelsCmdStamped` message

        """

        # assuming same motor constants k for both motors
        k_r = self._k
        k_l = self._k

        # adjusting k by gain and trim
        k_r_inv = (self._gain.value + self._trim.value) / k_r
        k_l_inv = (self._gain.value - self._trim.value) / k_l

        # conversion from motor rotation rate to duty cycle
        u_r = speed_r * k_r_inv
        u_l = speed_l * k_l_inv

        # limiting output to limit, which is 1.0 for the duckiebot
        u_r_limited = self.trim(u_r,
                                -self._limit.value,
                                self._limit.value)
        u_l_limited = self.trim(u_l,
                                -self._limit.value,
                                self._limit.value)

        return u_l_limited, u_r_limited

    def readParamFromFile(self):
        """
        Reads the saved parameters from
        `/data/config/calibrations/kinematics/DUCKIEBOTNAME.yaml` or
        uses the default values if the file doesn't exist. Adjsuts
        the ROS paramaters for the node with the new values.

        """
        # Check file existence
        fname = self.getFilePath(self.veh_name)
        # Use the default values from the config folder if a
        # robot-specific file does not exist.
        if not os.path.isfile(fname):
            self.log("Kinematics calibration file %s does not "
                     "exist! Using the default file." % fname, type='warn')
            fname = self.getFilePath('default')

        with open(fname, 'r') as in_file:
            try:
                yaml_dict = yaml.load(in_file)
            except yaml.YAMLError as exc:
                self.log("YAML syntax error. File: %s fname. Exc: %s"
                         %(fname, exc), type='fatal')
                rospy.signal_shutdown()
                return

        # Set parameters using value in yaml file
        if yaml_dict is None:
            # Empty yaml file
            return
        for param_name in ["gain", "trim", "baseline", "k", "radius", "limit"]:
            param_value = yaml_dict.get(param_name)
            if param_name is not None:
                rospy.set_param("~"+param_name, param_value)
            else:
                # Skip if not defined, use default value instead.
                pass

    def getFilePath(self, name):
        """
        Returns the path to the robot-specific configuration file,
        i.e. `/data/config/calibrations/kinematics/DUCKIEBOTNAME.yaml`.

        Args:
            name (:obj:`str`): the Duckiebot name

        Returns:
            :obj:`str`: the full path to the robot-specific
                calibration file

        """
        cali_file_folder = '/data/config/calibrations/kinematics/'
        cali_file = cali_file_folder + name + ".yaml"
        return cali_file

    def trim(self, value, low, high):
        """
        Trims a value to be between some bounds.

        Args:
            value: the value to be trimmed
            low: the minimum bound
            high: the maximum bound

        Returns:
            the trimmed value
        """

        return max(min(value, high), low)

    def on_shutdown(self):
        """Shutdown procedure.

        Publishes a zero velocity command at shutdown."""

        # MAKE SURE THAT THE LAST WHEEL COMMAND YOU PUBLISH IS ZERO,
        # OTHERWISE YOUR DUCKIEBOT WILL CONTINUE MOVING AFTER
        # THE NODE IS STOPPED

        # PUT YOUR CODE HERE

        super(BraitenbergNode, self).on_shutdown()


if __name__ == '__main__':
    # Initialize the node
    camera_node = BraitenbergNode(node_name='braitenberg')
    # Keep it spinning to keep the node alive
    rospy.spin()
Attracting Braitenberg vechicles
✎You should be able to change the avoiding behavior of your robot into an attracting one by editing just a few lines of code. Give it a try! Once you have finished this exercise, you should have a Duckiebot which goes towards the right if your program senses that the right side has more brightness, and vice versa.
Combined behavior Braitenberg vechicles
✎Add a color detector to your Braitenberg controller node. If your Duckiebot sees green light (perhaps of a different Duckiebot) it should be attracted to it, otherwise it should be repelled by it.
If you have more than one robot, try to run your controller on a few of them. Set some to have green LEDs, and some red. Do you see complex behavior emerging? Changing the color of the LEDs can be done with the set_pattern service provided by the led_emitter_node in dt-duckiebot-interface. It is documented on the ROS API docs.
Can you devise even more complex behavior and interactions?