My First Duckietown Python Library
✎Modified 2020-09-16 by liampaull
Learn how to do proper python development
Get the Duckietown library template
✎Modified 2020-10-06 by arsimone
A boilerplate is provided by the library template repository.
The repository contains a lot of files, but do not worry, we will analyze them one by one. Click on the green button that says “Use this template”.

This will take you to a page that looks like the following:
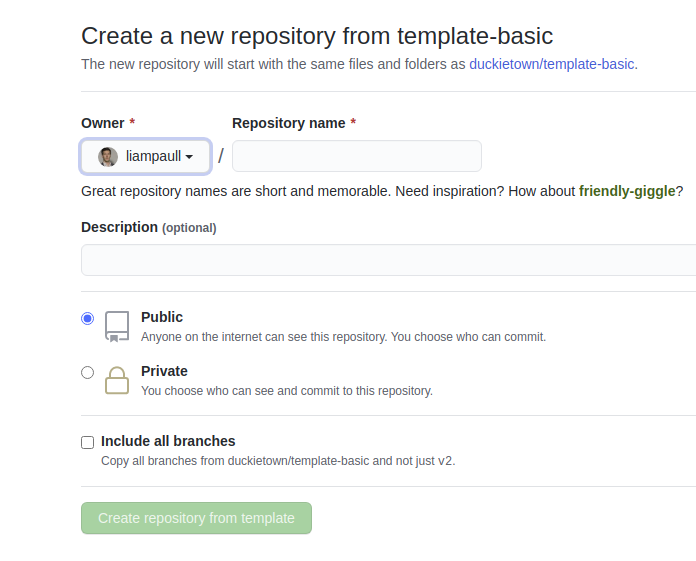
Pick a name for your repository (say my-library) and press the button Create repository from template. Note, you can replace my-library with the name of the repository that you prefer.
This will create a new repository and copy everything from the repository template-library to your new repository. You can now open a terminal and clone your newly created repository.
laptop $ git clone https://github.com/YOUR_NAME/my-library
laptop $ cd my-library
Replace YOUR_NAME in the link above with your GitHub username.
Features of the library template
✎Modified 2020-09-16 by liampaull
We have the following features:
- Unit-tests using Nose.
- Building/testing in Docker environment locally.
- Integration with CircleCI for automated testing.
- Integration with CodeCov for displaying coverage result.
- Integration with Sphinx to build code docs. (So far, only built locally.)
- Jupyter notebooks, which are run also in CircleCI as tests.
- Version bump using Bumpversion.
- Code formatting using Black.
- Command-line program for using the library.
Anatomy of the library template
✎Modified 2020-09-16 by liampaull
This repository describes a library called “duckietown_pondcleaner” and there is one command-line tool called dt-pc-demo.
Meta-files
✎Modified 2020-09-16 by liampaull
-
.gitignore: Files ignore by Git. -
.dtproject: Enables the project to be built and used bydts develtools -
.bumpversion.cfg: Configuration for bumpversion -
Makefile: Build tools configuration with Make
Python packaging
✎Modified 2020-10-25 by Fidel Esquivel
-
requirements.txt: Contains the pinned versions of your requirement that are used to run tests. -
MANIFEST.in: Deselects the tests to be included in the egg. -
setup.py: Contains meta information, definition of the scripts, and the dependencies information.
Python code
✎Modified 2020-09-16 by liampaull
-
src/- This is the path that you should set as “sources root” in your tool -
src/duckietown_pondcleaner: Contains the code. -
src/duckietown_pondcleaner/__init__.py: Contains the__version__library. -
src/duckietown_pondcleaner_tests: Contains the tests - not included in the egg.
Docker testing
✎Modified 2020-09-16 by liampaull
These are files to build and run a testing container.
-
.dockerignore: Describes what files go in the docker container. -
Dockerfile: …
Sphinx
✎Modified 2020-09-16 by liampaull
-
src/conf.py: Sphinx settings -
src/index.rst: Sphinx main file -
src/duckietown_pondcleaner/index.rst: Documentation for the package
Coverage
✎Modified 2020-09-16 by liampaull
.coveragerc: Options for code coverage.
Notebooks
✎Modified 2020-09-16 by liampaull
-
notebooks: Notebooks that are run also as a test. -
notebooks-extra: Other notebooks (not run as test) -
notebooks/*.ipynb: The notebooks themselves.
Creating your Library
✎Modified 2020-09-16 by Liam Paull
Using the repo you have already created:
- Clone the newly created repository;
- Place your Python packages inside
src/; - List the python dependencies in the file
dependencies.txt; - Update the appropriate section in the file
setup.py;
Make sure that there are no other remains:
laptop $ grep -r . pondcleaner
Update the branch names in README.md.
Other set up (for admins)
✎Modified 2020-09-16 by liampaull
The following are necessary steps for admins to do:
-
Activate on CircleCI. Make one build successful.
-
Activate on CodeCov. Get the
CODECOV_TOKEN. Put this token in CircleCI environment.
How to use the utilities in the library template
✎Modified 2020-09-16 by liampaull
Test the code
✎Modified 2020-10-04 by arsimone
Test the code using Docker by:
laptop $ make test-docker
This runs the test using a Docker container built from scratch
with the pinned dependencies in requirements.txt.
This is equivalent to what is run on CircleCI.
To run the tests natively on your pc, use:
laptop $ make test
To do so you will need to have installed the libraries listed in the file requirements.txt on your computer.
For that we assume you have already setup a Python virtual environment.
To do so you will need to pip install virtualenv then virtualenv duckietown then source duckietown/bin/activate. In order to install the requirements to run the test do pip install -r requirements.txt.
Development
✎Modified 2020-10-04 by arsimone
In the same virtual environment as above run:
laptop $ python setup.py develop
This will install the library in an editable way (rather than copying the sources somewhere else).
If you don’t want to install the deps, do:
laptop $ python setup.py develop --no-deps
For example, this is done in the Dockerfile so that
we know we are only using the dependencies in requirements.txt with the
exact pinned version.
Adding tests
✎Modified 2020-09-16 by liampaull
To add another tests, add files with the name test_*py in the
package duckietown_podcleaner_tests. The name is important.
Tip: make sure that the tests are actually run looking at the coverage results.
Notes on using the notebooks
✎Modified 2020-09-16 by liampaull
Always clean the notebooks before committing them:
laptop $ make -C notebooks cleanup
If you don’t think you can be diligent, then add the notebooks using Git LFS.
Releasing a new version
✎Modified 2020-09-16 by liampaull
Updating the version
✎The first step is to change the version and tag the repo.
DO NOT change the version manually; use the CLI tool bumpversion instead.
The tool can be called by:
laptop $ make bump # bump the version, tag the tree
If you need to include the version in a new file, list it inside the file .bumpversion.cfg using the
syntax [bumpversion:file: <FILE_PATH >].
Releasing the package
✎The next step is to upload the package to PyPy. We use twine. Invoke using:
laptop $ make upload # upload to PyPI
For this step, uou need to have admin permissions on PyPy.