Part 3: Flight Controller and Cleanflight Checkpoint
✎Modified 2020-10-18 by sageshoyu
Expected Time: 20 minutes
Check the ESC ordering
✎Modified 2020-08-06 by Garrett Warren
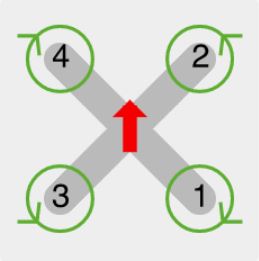
Ensure the PWM wires are connected to the correct pins on the flight controller. Do this by following the PWM wires from the flight controller back to which motor the ESC is connected to. Make sure that this matches up with the image below.
Check the motor attachment
✎Modified 2020-08-06 by Garrett Warren
Make sure the arrows on the motors match up with the diagram above. It is important that the correct motors are in the correct spot because the motor bolts are threaded so that the propeller will not loosen the nut and fly off the drone.
Check the motor direction
✎Modified 2020-08-06 by Garrett Warren
Make sure the motors are spinning in the correct direction. To do this, connect your flight controller to cleanflight with the propellers off and the battery plugged in, and spin up each motor to make sure it is spinning in the same direction as the arrow on the motor, which is the same direction as shown in the image above. It helps to put a small piece of tape on the side of the motor to know which way it is spinning.
Arm your drone
✎Modified 2020-08-06 by Garrett Warren
You will now test out arming your motors using the drone software. To arm the motors, the software sends out a sequence of PWM values that let’s the flight controller know that the operator is ready to fly. After arming the motors, the software sends out a low PWM value that leaves the motors idling at speed much slower than what would be needed for takeoff.
In this checkpoint, you go through the process of setting up your drone to fly, and then will arm the motors and make sure they are spinning. Then you will disarm the motors and make sure they stop spinning. Then you will be done with build part 3!
Power up your drone
✎Modified 2020-09-01 by Garrett Warren
-
Make sure the propellers are off of the motors
-
Connect the flight controller USB to the Raspberry Pi
-
Plug in the battery
Connect to your drone
✎Modified 2020-09-01 by Garrett Warren
-
Connect to your drone’s wifi
-
Browse to the drone’s code editor: http://192.168.42.1:8081
Start up the flight code
✎Modified 2020-09-01 by Garrett Warren
-
If a terminal is not already open at the bottom of the code editor, then open a terminal: Menu (top left button) > Terminal > New Terminal
-
Start up the flight code by typing in the command
./startand press enter
Connect to the web interface
✎Modified 2020-09-01 by Garrett Warren
-
In a new tab, browse to the web interface: http://192.168.42.1
-
Refresh this page and ensure it says “Connected” at the top. If not, wait a few more seconds and try refreshing the page again.
Start the flight controller node
✎Modified 2020-09-01 by Garrett Warren
-
Navigate back to the terminal in the code editor
-
Identify the “tick” key on your keyboard. It looks like this: ` and is typically the key to the left of the ‘1’ key. It is also typically located on the same key as the tilde
~. -
Navigate to the flight controller node by typing “tick” and then 1: `
1 -
Press enter to start the node
-
When prompted “Are you ready to fly?”, type
yand press enter since we want to spin the motors
Get a safety failure message!
✎Modified 2020-12-08 by Garrett Warren
-
Navigate back to the web interface
-
Attempt to arm your drone by pressing the semicolon (
;) button on your keyboard. (Nothing should happen at this point, continue on) -
Navigate back to the code editor and read the message in the terminal. It should look like the image below:

Explanation: The drone code contains safety checks that stop the drone from flying if there is a technical problem. Based on the message in the terminal, the issue is that the drone is not receiving data from the camera. This makes sense, because we haven’t even attached the camera, yet! You will temporarily disable this safety check for the purpose of this checkoff, and then reenable it afterwords. This is useful to practice because you may want to adjust other safety thresholds later on as you fly your drone.
Change the safety threshold
✎Modified 2020-12-08 by Garrett Warren
-
On the left side of your code editor, locate the “params” folder.
-
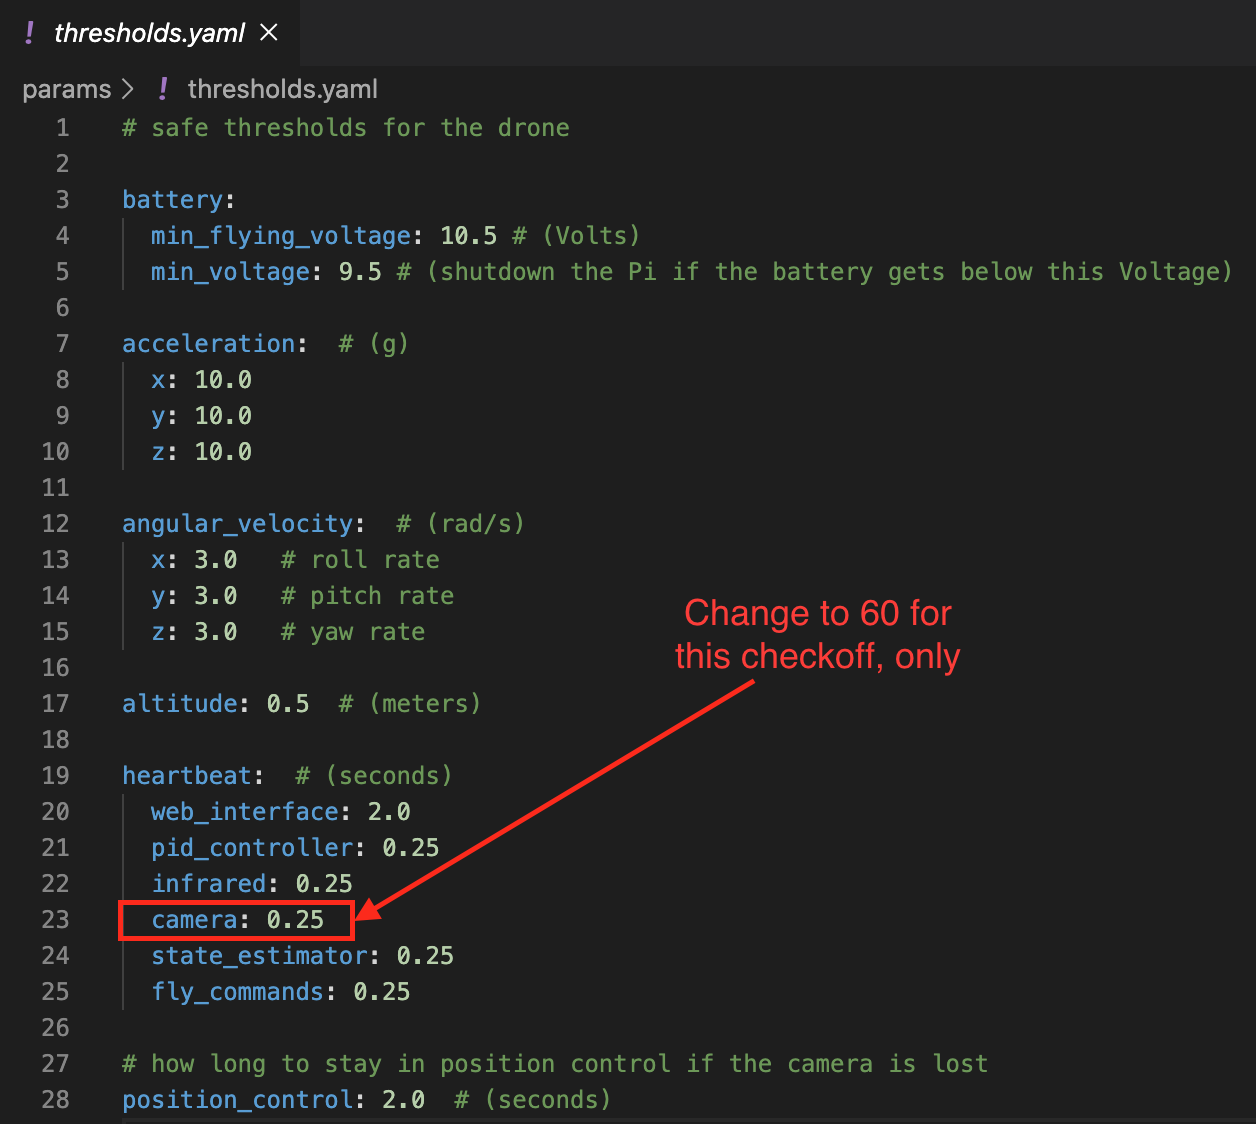
Open the
thresholds.yamlfile. -
Locate the
cameraparemeter underneathheartbeat, and change the value from0.25to60. This means the code will check for camera errors every 60 seconds, which is plenty of time for this checkoff. -
Close the file to avoid accidentaly editing it by clicking the small “x” near the file name at the top of the editor. The file change is saved automatically
Arm your drone for real!
✎Modified 2020-12-08 by Garrett Warren
-
Restart the flight controller: click in the terminal, press the up arrow on your keyboard, type “y” and press enter.
-
Navigate back to the web interface
-
Arm your drone by pressing the semicolon (
;) button on your keyboard. -
Verify that the motors start spinning. If not, navigate back to the code editor and see if any errors were printed out in the terminal. If there are no errors and the motors are not spinning, it is recommended that you check your cleanflight settings and make sure they’re exactly like ours.
-
Observe how the flight controller automatically adjusts to disturbances by tilting up one side of the drone and noticing how the motors that are lower are spinning faster than the motors that you’ve tilted up.
-
Disarm your drone by pressing the spacebar.
Revert the safety threshold
✎Modified 2020-12-08 by Garrett Warren
-
On the left side of your code editor, locate the “params” folder.
-
Open the
thresholds.yamlfile. -
Locate the
cameraparemeter and change the value from60back to0.25. -
Close the file to avoid accidentaly editing it (the file saves automatically).
Congrats on finishing build part 3!