AMOD18 SemSeg
✎Modified 2019-04-28 by tanij
A Duckiebot able to take logs from the camera (a working ros-picam container)
A calibrated camera
A duckietown complying with the usual standards
A laptop with python2, ROS and Docker installed
Bash shell command line
Viewing segmented images from the Duckiebot camera on your laptop
Semantic Segmentation
✎Modified 2018-12-20 by eeedWard
Semantic segmentation is a computer vision task in which specific regions of an image are labeled according to what’s being shown. More specifically, the goal of semantic segmentation is to label each pixel of an image with a class corresponding to what is being represented. Currently, most semantic segmentation methods rely on deep learning.
Network
✎Modified 2018-12-20 by eeedWard
Aim
✎Modified 2018-12-20 by eeedWard
The aim of the project is to design and implement a semantic sementation algorithm able to segment images of Duckietown.The algorithm has to be light, fast and accurate. In particular, it should take as small computing resources as possible, in order to be run on the Duckiebot Rasberry Pi. Moreover, it should be fast enough to achieve real-time image inference while being accurate enough for autonomous driving applications. However, since we were unable to obtain labeled images of Duckietown, we were forced to use a network trained on “real-world” images (Cityscapes dataset).
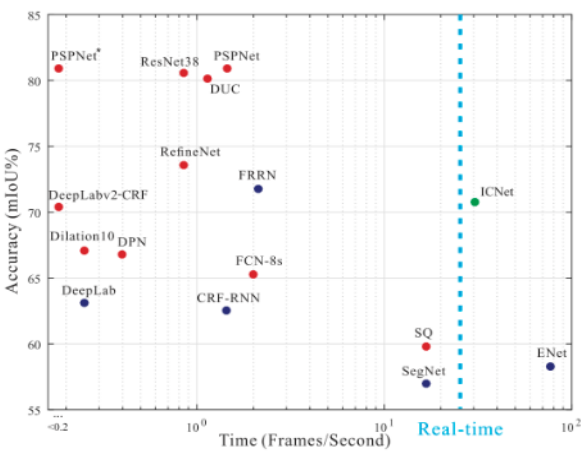
The comparison between the most popular segmentation networks is shown in the above figure. According the design principles of segmentation algorithm, we chose the Image Cascade Network (ICNet), which is relatively light, fast and accurate.
Network architecture
✎Modified 2018-12-20 by eeedWard
The ICNet provides us with a high efficiency segmentation system with decent quality. Its working principle is to first let low-resolution images go through the full semantic perception network for a coarse prediction map. Then the cascade feature fusion unit and cascade label guidance strategy are used to integrate medium and high resolution features, which gradually refine the coarse semantic map. The network architecture is shown in the following image.

Our code of the ICNet is implemented using the tensorflow framework and pre-trained on the Cityscapes dataset. The algorithm can obtain a mean accuracy of 80.3% on the Cityscapes dataset.
Implementation
✎Modified 2018-12-20 by eeedWard

Performance
✎Modified 2018-12-20 by eeedWard
Even if the images from Cityscapes are somewhat similar to the ones of Duckietown, the algorithm could not be optimized for our application in terms of both computational requirements, speed and accuracy.
-
Computational requirements: since the network can only analyze 1024 x 2048 images, the images from the Rasberry Pi (480 x 640) are up-sampled before before being analyzed, with low performance in speed and computational requirements.
-
Speed: the algorithm is able to segment two images per second.
-
Accuracy: the network is trained to classify pixels between 19 “real-world” classes (such as humans, buses, bicycles etc). Despite the differences, some meaningful result can be obtained when classifying pixels as part of the road or background. The accuracy was not formally evaluated due to the differences in the number of classes and the non-availability of a test set.
AIDO challenge framework
✎Modified 2018-12-20 by eeedWard
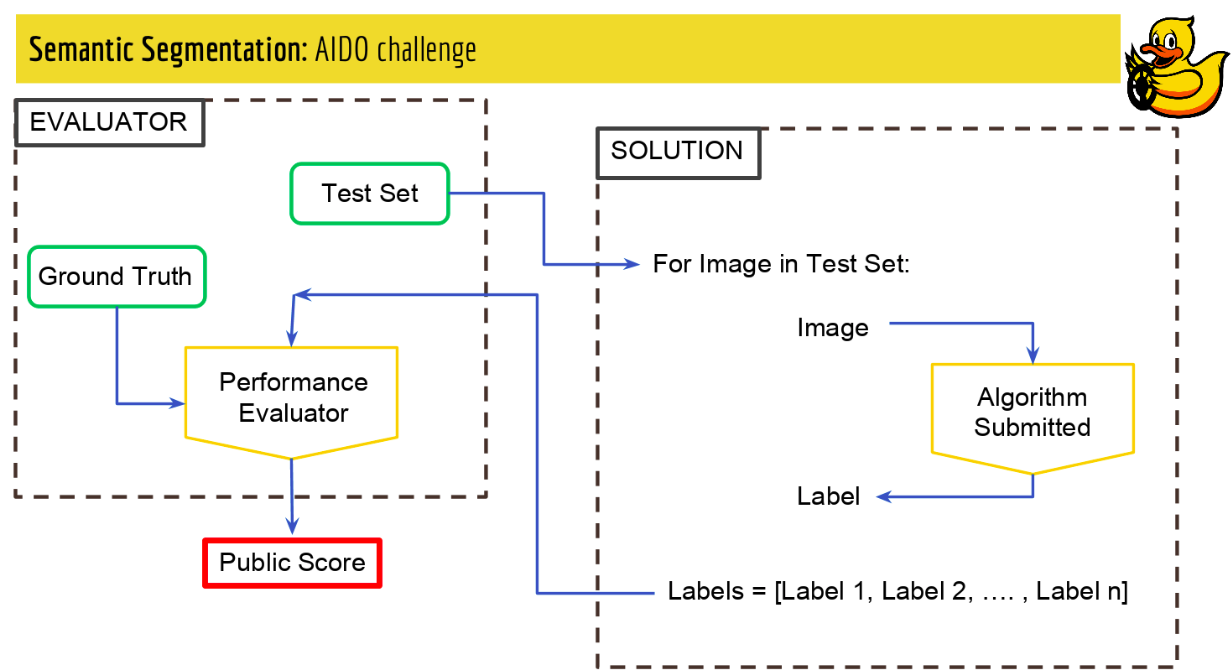
As part of the project, we created an AIDO challenge framework where you can upload your segmentation algorithm and receive a performance score. The framework works as follows:
- Your algorithm is adapted to a provided template. In particular, you should fit your main algorithm into a class with a specific method that takes a standard 480 x 640 Duckietown image and outputs a labeled image in a specific format. The main algorithm can import external scripts, weights and libraries
- The solution container is uploaded to the server
- The submitted algorithm is run on a hidden test_test
- The labeled images are compared to the ground truths of the test_set
- The following scores are provided: Overall accuracy, Weighted mean accuracy, Overall IoU (intersection over union), Weighted mean IoU
- Note that the submissions will be ranked based on the Weighted mean IoU score.
The performance metrics script used to compare labels and ground truths will be available to the users, including the class weights used to compute the weighted averages. In particular, the weights are currently set as follows:
- 0.35 for Road
- 0.15 for Duckiebots
- 0.15 for Ducks
- 0.1 for Red Line
- 0.1 for Yellow Line
- 0.1 for Traffic Signs
- 0.05 for Background
Video of expected results
✎Modified 2018-12-27 by zxcvfd13502
First, we show a video of the expected behavior (if the demo is successful).
https://youtu.be/FhLgdG9PItg
(Please see this link first. We will upload the video to duckiebook later)
Duckietown setup notes
✎Modified 2018-12-20 by eeedWard
A duckietown complying with the usual standards is required. In particular, the segmentation algorithm is designed to work under the following conditions:
- Uninterrupted white lines complying with standards
- Yellow (middle) lines complying with standards
- Only ducks or duckiebots are allowed to be on the road, cones or other objects should be removed as they won’t be detected as obstacles
- Humans, other animals or objects are only allowed outside of the driving lanes
- No particular lighting conditions are required
Duckiebot setup notes
✎Modified 2018-12-20 by eeedWard
No special requirements for duckiebots are needed, except the ability of taking logs from the camera.
Pre-flight checklist
✎Modified 2018-12-20 by eeedWard
Check: you have python2 and pip installed
Check: you have ROS installed. Run >>roscore in terminal too check this.
Check: your Duckiebot has to roscore and ros-picam containers running
Demo instructions
✎Modified 2018-12-20 by eeedWard
First option: Docker (Recommended)
✎Modified 2018-12-20 by eeedWard
Step 1: Make sure you have ROS and Docker installed on your laptop. You should have completed the steps in the Duckiebot operation manual from Unit B-1 to Unit B-9: see Unit C-2 - Setup - Laptop. Make sure you have ros-picam, roscore container running on your Duckiebot.
Step 2: Find the IP adress of your computer and Duckiebot using the ping command:
laptop $ ping hostname.local
laptop $ ping Computer name
do not use your username instead of your computer name. Usually, the ping of your computer should be 127.0.1.1. The ping command to find your IP should look as follows:

Step 3: Run the semantic segmentation Docker image
laptop $ docker -H hostname.local run -it --network host -e ROS_MASTER_URI=http://IP of your duckiebot:11311 -e DUCKIEBOT_NAME=hostname -e ROS_HOSTNAME=IP of your computer zjdong/semantic-segmentation:2.0
The command should look like this:
$ docker -H zjbot.local run -it --network host -e ROS_MASTER_URI=http://10.42.0.115:11311 -e DUCKIEBOT_NAME=zjbot -e ROS_HOSTNAME=127.0.1.1 zjdong/semantic-segmentation:2.0
Well done”. You are now receiving images from the Duckiebot and processing them on your laptop. Wait until you can read “Predicting” and “Finish prediction”, then let the node running without stopping it.
Step 4: Visualize the results
Now, in order to visualize your the processed images, run the following commands in the terminal:
laptop $ dts start_gui_tools hostname
laptop $ rqt_image_view
Wait for rviz to load. Once the interface is ready, click on “Add” (bottom right) and choose “by topic -> /prediction_images/Image”
You can make the image larger by dragging the boundaries of the window.
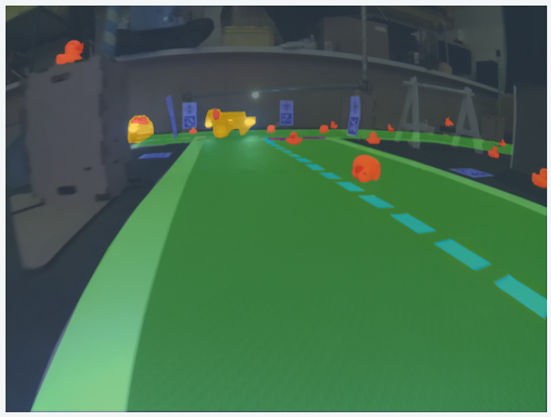
The first image is the image obtained from the Duckiebot. The second image shows the results of the segmentation algorithm. The third image shows both images together.
Please consider that the algorithm was not trained on duckietown images but on a standard semantic segmentation database with images from “real world” roads. This happened because we were unable to obtain labelled images for duckietown. Since the network was pre-trained, it was impossible for us to reduce its size and make it lightweight. In particular, the images from the Duckiebot, are resized to 1024 x 2048 images in order to be processed by the network and this is obviously inefficient.
Second option: ROS
✎Modified 2018-12-20 by eeedWard
Step 1: Open a new terminal and enter the following commands
all these commands have to be run in the bash command line. If you are using zsh, enter the command >>bash every time you open a new terminal.
laptop $ git clone https://github.com/zj-dong/duckietown-semantic-segmentation.git
laptop $ cd
laptop $ mkdir -p ~/catkin_ws3/src
laptop $ cd ~/catkin_ws3
laptop $ catkin_make
laptop $ cd duckietown-semantic-segmentation
laptop $ cp -r src/duckietown_msgs/ src/tf_sem_seg/ ~/catkin_ws3/src
laptop $ chmod +x requirements.txt
laptop $ cd ~/catkin_ws3
laptop $ catkin_make
laptop $ sudo pip2 install -r requirements.txt
Step 2: edit and run lode_launch.sh
laptop $ gedit node_launch.sh
In these two lines you need to replace “”“your duckiebot”“” with the name of your duckiebot:
export DUCKIEBOT_NAME=”“”your duckiebot”“”
export ROS_MASTER_URI=http://”“”your duckiebot”“”.local:11311
Save and close the file.
Now, check if you can ping your bot. If you can’t, you have problems with the connection. Please refer to the duckiebot manual for this: see Unit C-20 - Operation - Networking.
If you can ping your bot, go on portainer (http://.![robot name]:9000/#/containers) and make sure that ros-picam and roscore containers are running.
Enter the following commands
laptop $ cd ~/catkin_ws3
laptop $ source devel/setup.bash
laptop $ sh node_launch.sh
Well done”. You are now receiving images from the Duckiebot and processing them on your laptop. Wait until you can read “Predicting” and “Finish prediction”, then let the node running without stopping it.
Step 3: Visualize the results
Now, in order to visualize your the processed images, run the following commands in the terminal (make sure you are in bash)
Open a new terminal
laptop $ source ~/catkin_ws3/devel/setup.bash
laptop $ export ROS_MASTER_URI=http://robot name.local:11311
laptop $ rostopic list
Check whether there is a /”“”your duckiebot”“”/prediction_images. If you can find it, proceed as follows.
laptop $ rosrun rviz rviz
Wait for rviz to load. Once the interface is ready, click on “Add” (bottom right) and choose “by topic -> /prediction_images/Image”
You can make the image larger by dragging the boundaries of the window.
The first image is the image obtained from the Duckiebot. The second image shows the results of the segmentation algorithm. The third image shows both images together.
Please consider that the algorithm was not trained on duckietown images but on a standard semantic segmentation database with images from “real world” roads. This happened because we were unable to obtain labelled images for duckietown. Since the network was pre-trained, it was impossible for us to reduce its size and make it lightweight. In particular, the images from the Duckiebot, are resized to 1024 x 2048 images in order to be processed by the network and this is obviously inefficient.
Troubleshooting
✎Modified 2018-12-20 by eeedWard
Error message:
$ ERROR: unable to contact ROS master at [http://10.41.0.233:11311]
The traceback for the exception was written to the log file
—> Check that the roscore container is running on your robot (go on Portainer, refresh the page and start the roscore container) —> ping your robot and check your IP adress again, as it might have changed —> re-enter the command with the right IP address
I followed the guide but nothing happens in the terminal after this line:
$ [INFO] [1545147258.632912]: tf semantic segmentation node started
—> Check that your ros-picam container is running (go on Portainer, refresh the page and activate it)
Demo failure demonstration
✎Modified 2018-12-20 by eeedWard
Finally, put here a video of how the demo can fail, when the assumptions are not respected.