Lane Following with Vehicles Advanced
✎Modified 2020-08-23 by frank-qcd-qk
This is the description of the lane following with vehicles demo.
Wheel calibration completed.
Camera calibration completed.
Fully set up Duckietown.
Duckiebot safely navigating in Duckietown whilst speeding up on straight paths and slowing down at turns, in addition to stopping behind other duckiebots when they are too close in front of it.
Video of expected results
✎Modified 2019-12-31 by saryazdi

The video is at https://vimeo.com/382115160.

The video is at https://vimeo.com/382063260.

The video is at https://vimeo.com/382102891.

The video is at https://vimeo.com/382103131.
Duckietown setup notes
✎Modified 2019-12-31 by Soroush Saryazdi
- A Duckietown with white and yellow lanes.
- Other dynamic duckiebots can be on the lane.
- Layout conform to Duckietown Appearance Specifications (unknown ref opmanual_duckietown/dt-ops-appearance-specifications)
- Required tiles types: straight tile, turn tile
- Configurated wireless network for communicating with Duckiebot.
- Good consistent lighting, avoid natural lighting.
Duckiebot setup notes
✎Modified 2019-12-31 by Soroush Saryazdi
- Make sure the camera is heading ahead.
- One (or possibly more) duckiebot in configuration DB18.
Pre-flight checklist
✎Modified 2019-12-31 by Soroush Saryazdi
- Check that every duckiebot has sufficient battery charge and that they are all properly calibrated.
- Turn on battery of the duckiebot.
- Place duckiebot in lane so that enough of the lane lines are visible to the camera.
- Verify you can ping your duckiebot over the network.
- IMPORTANT Make sure no containers are running on the duckiebot which use either the camera or joystick. We will run these ROS nodes together in a new container.
Demo instructions
✎Modified 2019-12-31 by Soroush Saryazdi
Start the demo containers
✎Modified 2019-12-31 by saryazdi
Running this demo requires almost all of the main Duckietown ROS nodes to be up and running. As these span 3 Docker images (dt-duckiebot-interface, dt-car-interface, and dt-core, we will need to start all of them.
First, make sure all old containers from the images dt-duckiebot-interface, dt-car-interface, and dt-core are stopped. These containers can have different names, instead look at the image name from which they are run.
Then, start all the drivers in dt-duckiebot-interface:
laptop $ dts duckiebot demo --demo_name all_drivers --duckiebot_name DUCKIEBOT_NAME --package_name duckiebot_interface --image duckietown/dt-duckiebot-interface:daffy
Start also the glue nodes that handle the joystick mapping and the kinematics:
laptop $ dts duckiebot demo --demo_name all --duckiebot_name DUCKIEBOT_NAME --package_name car_interface --image duckietown/dt-car-interface:daffy
Pull the lane following with vehicles image onto the duckiebot:
laptop $ docker -H DUCKIEBOT_NAME.local pull saryazdi/pp-navigation:v1-arm32v7
Finally, we are ready to start the high-level pipeline for lane following with vehicles:
laptop $ dts duckiebot demo --demo_name HW_lfv_start --package_name pure_pursuit_lfv --duckiebot_name DUCKIEBOT_NAME --image saryazdi/pp-navigation:v1-arm32v7
You have to wait a while for everything to start working. While you wait, you can check in Portainer if all the containers started successfully and in their logs for any possible issues.
After a while, your duckiebot should start driving around autonomously and stop when it reaches another duckiebot. To stop the demo, you can stop the container created from the pp-navigation image through Portainer.
Tuning the Parameters (optional)
✎Modified 2019-12-31 by Soroush Saryazdi
The parameters might need to be re-tuned for different duckiebot calibration configurations. This becomes more important if you want to use high speeds. In order to change the parameters as the code is running, first run the below command to get a bash in the container running your code:
laptop $ docker -H DUCKIEBOT_NAME.local exec -it demo_HW_lfv_start /bin/bash
Source the workspace:
container $ source /code/catkin_ws/devel/setup.bash
From here, you can view the names of all of the parameters related to pure pursuit and duckiebot detection by running:
container $ rosparam list | grep -E 'pure_pursuit|duckiebot_detection'
And from that list, you can change the value of any parameter by running:
container $ rosparam set PARAMETER_NAME PARAMETER_VALUE
Visualizations (optional)
✎Modified 2022-11-14 by Andrea Censi
There are various different visualizations in place to help with debugging the code and finding out the correct parameters. To see the visualizations, you first need to enable them.
Start by getting a shell in the container:
laptop $ docker -H DUCKIEBOT_NAME.local exec -it demo_HW_lfv_start /bin/bash
Source the workspace:
container $ source /code/catkin_ws/devel/setup.bash
From here, you can enable visualizations by setting verbose to true:
container $ rosparam set /DUCKIEBOT_NAME/pure_pursuit_controller_node/verbose true
container $ rosparam set /DUCKIEBOT_NAME/duckiebot_detection_node/verbose true
Run below command to start noVNC:
laptop $ dts start_gui_tools DUCKIEBOT_NAME --base_image duckietown/dt-core:daffy
Log into noVNC by going to http://localhost:6901/vnc.html and using the password quackquack. Once in noVNC, open up terminal and run:
container $ rqt_image_view
You can now see the 3 main visualizations that we have:
- path_points (right figure) shows the ground projected target point (green point), the current robot position (cyan point), the ground-projected and shifted points on the yellow and white lanes which now lie on the path (yellow and white points respectively), the ground-projected bounding boxes of other duckiebots (red quadrilaterals), and the “safety zone” where we stop if there is a duckiebot within that zone (gray box).
- detections (left figure) and detection_masks (right figure) show the detected obstacle bounding boxes and the HSV filter output used for detection respectively.

Extras
✎Modified 2019-12-31 by saryazdi
Here are some additional things you can try:
- Test the code in simulation (instructions below) and try our dynamic obstacles custom map for easier debugging.
- Get a remote stream of your Duckiebot.
- You can visualize the detected line segments the same way as for the lane following demo
- Try to change some of the ROS parameters to see how your Duckiebot’s behavior will change.
Run in Simulation
✎Modified 2019-12-31 by saryazdi
A local development directory from Duckietown (LOCAL-DUCKIETOWN-DIRECTORY) which contains the simulator and so on (e.g. challenge-aido_LF-baseline-duckietown).
Clone the lane following with vehicles repository:
laptop $ cd LOCAL-DUCKIETOWN-DIRECTORY/catkin_ws/src
laptop $ git clone https://github.com/saryazdi/pp-navigation.git
Start docker container:
laptop $ cd LOCAL-DUCKIETOWN-DIRECTORY
laptop $ docker-compose up
Build the package within the container and source the workspace:
container $ catkin build --workspace catkin_ws
container $ source catkin_ws/devel/setup.bash
Run the code within the container:
container $ roslaunch catkin_ws/src/pp-navigation/packages/pure_pursuit_lfv/launch/lfv_start.launch
After a short while, the duckiebot should start moving in simulation. To see the duckiebot’s camera output, you can log into noVNC by going to http://localhost:6901/vnc.html and using the password quackquack. Once in noVNC, open up terminal and run rqt_image_view. The compressed_images topic will show the camera output of the duckiebot.
Implementation details
✎Modified 2019-12-31 by Soroush Saryazdi
Lane Following
✎Modified 2019-12-31 by saryazdi
This demo uses a modified version of the pure pursuit controller for lane following which can be found here. To learn more about the pure pursuit controller, check out “Implementation of the Pure Pursuit Path Tracking Algorithm” by R. Craig Conlter. We use the following modifications on pure pursuit:
Finding the Target Point
We avoided computing the path by directly estimating our target (follow) point via the ground projected line segments.
-
We offset the points on the ground-projected yellow lane to the right, and then take the average of them to have an estimate of our target point.
-
If we are not seeing the yellow lane, we offset the points on the ground-projected white lane to the left and then take the average of them to get an estimate of our target point.
-
Additionally, the average direction of the line segments is also taken into consideration for computing the offset: E.g., if the ground-projected yellow line segments are perpendicular to us (like when facing a turn), then the target point would not just be to the right of the average of the yellow points, but also downwards (towards the robot).
-
In the visualization below, we can see the ground projected and shifted line segments. The cyan point is our robot’s position, and the green point is the pure pursuit target (follow) point. The yellow and white points are the ground-projected and shifted points on the yellow and white lanes respectively.
Varying Speed and Omega Gain
-
Our robot detects whether it is close to a left turn, a right turn or on a straight path. Turns are detected using statistics of detected lines.
-
The duckiebot gradually speeds up on straight paths, while reducing the omega gain so that the robot corrects less when moving fast (to avoid jerky movement).
-
The duckiebot gradually slows down at turns, while increasing the omega gain (to make nice sharp turns).
-
A second order degree polynomial is used for changing the velocity/omega gain. So, after a turn the robot speeds up slowly, giving it enough time to correct its position before going really fast. At turns, the robot will slow down faster to ensure safe navigation of the turn.
Modified Lane Filter
- We modified the “lane_filter” package so that at each update step, it computes how much time has passed since the last update, and based on that we scale the variance of the gaussian that is used for smoothing the belief. This is especially useful if there is too much variance in the FPS: Not scaling the covariance when the FPS has a high variance would cause us to either smoothen the belief too much or too little.
Lane Following with Vehicles
✎Modified 2019-12-31 by saryazdi
We annotated our own real-world duckietown object detection dataset and trained a deep learning model on it. However, since we also needed an object detector in simulation, we made a second object detector using image processing operators.
TODO: Get the GPU to work with docker. Currently the implementation detects vehicles with image processing on hardware as well. This is temporary to show that the pipeline is working correctly and we can integrate our trained deep learning model on hardware once we figure out how to get the GPU working with docker.
previous task next (4 of 10) index
The following was marked as "todo".
TODO: Get the GPU to work with docker. Currently the implementation detects vehicles with image processing on hardware as well. This is temporary to show that the pipeline is working correctly and we can integrate our trained deep learning model on hardware once we figure out how to get the GPU working with docker.
Location not known more precisely.
n/a in module n/a.Object Detection with Deep Learning
1. The Dataset
We annotated a real-world dataset from Duckietown for detecting duckiebots, duckies and traffic cones. Information regarding the dataset can be found here.
TODO: Replace the link for “duckietown object detection dataset” from our github page to the duckiebook version of the page after the pull request is merged.
previous task next (5 of 10) index
The following was marked as "todo".
TODO: Replace the link for “duckietown object detection dataset” from our github page to the duckiebook version of the page after the pull request is merged.
Location not known more precisely.
n/a in module n/a.2. The Model
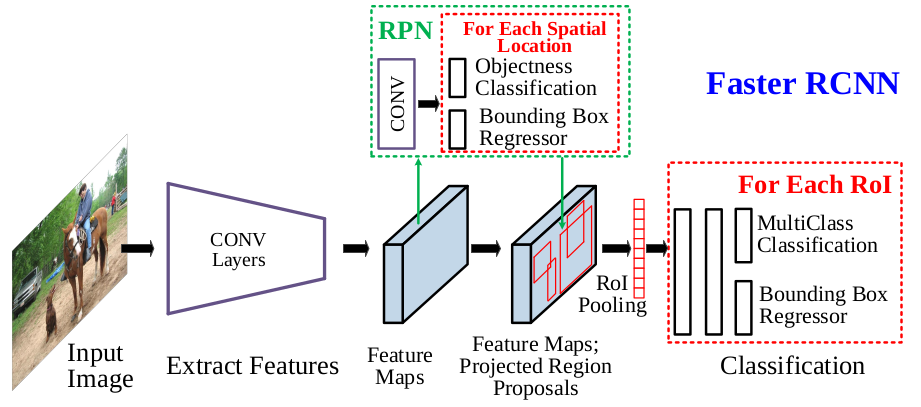
For object detection with deep learning, we use Faster RCNN architecture with Feature Pyramid Network. Faster RCNN is a popular 2 stage object detection pipeline. The first stage involves feature map extraction from a backbone network and the usage of region proposal network to find potential object regions. Once we find the object regions, we feed it through the second stage of the network. In the second stage, we do bounding box regression and object classification. We also use Feature Pyramid Network (FPN). FPN enables us to detect objects at various scales and sizes. We extract features at multiple different resolutions and fuse them to get a rich set of features before feeding it to the region proposal network to find final region proposals. FPNs are more effective at detecting small objects. As mentioned above, we use the Duckietown Object Detection Dataset to train the network. Below is the architecture of Faster RCNN.
For the model implementation, we use detectron2, a state of the art object detection framework from Facebook AI research. We train the model for 15000 iterations over the dataset with a learning rate of 0.015. We use Resnet 50 backbone for the model. Below are some qualitative results of the object detector, and you can find a video of our object detector in action in the “Video of expected results” section on top of this page.

Object Detection with Image Processing
- For object detection using image processing, we use HSV filtering followed by erosion and dilation, we then find the bounding boxes around the contours. Bounding boxes with a small area are filtered out.
Ground Projections
- We modified the “ground_projection” package to subscribe to the topic with the obstacle bounding box coordinates, and then we ground project those coordinates and re-publish them.
Vehicle Avoidance
- If we get closer to a vehicle (which is directly in front of us) than some distance threshold, we stop. We stay still until the obstalce is no longer in front of us within that distance threshold. In the visualization below, the gray box is the “safety zone” where we stop if an obstacle is within that box.
Troubleshooting
✎Modified 2019-12-31 by Soroush Saryazdi
The Duckiebot stops behind red lines.
This is because currently we are using the image processing pipeline for duckiebot detection on the hardware which relies on HSV filtering. It will be fixed once we are able to integrate the GPU with Docker to use the deep learning model.
Maintainers: Soroush Saryazdi and Dhaivat Bhatt via Slack for further assistance.