Camera Calibration in the Duckietown simulator
✎Modified 2019-12-29 by ai404
This Demo provides general instructions to perform camera calibration in the Duckietown simulator.
Step-By-Step Installation
✎Modified 2019-12-29 by ai404
Clone the LF duckietown baseline
✎Modified 2019-12-29 by ai404
$ git clone https://github.com/duckietown/challenge-aido_LF-baseline-duckietown
Navigate to the newly created directory
✎Modified 2019-12-29 by ai404
$ cd challenge-aido_LF-baseline-duckietown
Prepare submodules
✎Modified 2019-12-29 by ai404
Change submodule URLs in .gitmodules file
✎
- open the
.gitmodulesfile.
$ your_favourite_editor .gitmodules
-
change the url in line 3 from
https://github.com/duckietown/gym-duckietown.gittohttps://github.com/ai404/gym-duckietown.git. -
change the url in line 7 from
https://github.com/duckietown/dt-core.gittohttps://github.com/ai404/dt-core.git. -
save and close the file.
Update submodules
✎$ git submodule init
$ git submodule update --recursive
Don’t worry if you get an error saying that the “Server does not allow request for unadvertised object … Direct fetching of that commit failed.”
Switch to daffy branch on all submodules
✎$ git submodule foreach "(git checkout daffy; git pull)"
Build Docker Image
✎Modified 2019-12-29 by ai404
Navigate to the 1_develop directory and build the docker images:
$ cd 1_develop
$ docker-compose build
$ docker-compose up
Setup the workspace
✎Modified 2019-12-29 by ai404
If the docker image runs properly, you will be given a link to access a jupyter notebook connected to the now-running container. Open the jupyter notebook by following the link in a web browser. From the notebook, open a terminal, and perform the following commands in that terminal.
do not worry if you get a message saying “bash: catkin_ws/devel/setup.bash: No such file or directory” - we will deal with this in a couple of steps!
Install missing packages
✎Install quickapp
$ pip install quickapp
Downgrade systemCmd to version 2.0
$ pip uninstall systemCmd
$ git clone --single-branch --branch p3 https://github.com/AndreaCensi/system_cmd
$ cd system_cmd
$ python setup.py install
$ cd ..
Install compmake
$ pip install -U git+https://github.com/AndreaCensi/compmake/
Build and Source catkin_ws
✎
$ catkin build --workspace catkin_ws
$ source catkin_ws/devel/setup.bash
Shut down the container
✎Control-C the currently running Jupyter notebook. Manually kill the docker containers if necessary with docker ps and docker kill CONTAINER ID.
Intrinsic Calibration
✎Modified 2019-12-29 by ai404
Set intrinsic calibration map
✎Modified 2019-12-29 by ai404
Change the map_name parameter in 1_develop/utils/ros_helpers.py from "loop_empty" to "calibration_map_int".
Run the docker image with the new map
✎Modified 2019-12-29 by ai404
From the 1_develop directory, run
$ docker-compose up
Open a terminal in the Jupyter notebook
✎Modified 2019-12-29 by ai404
Run the camera service in the Jupyter notebook terminal.
$ roslaunch pi_camera camera.launch veh:=default
In a terminal on the local machine, disable access control or add localhost
✎Modified 2019-12-29 by ai404
$ xhost +
Get the ID of the notebook container
✎Modified 2019-12-29 by ai404
Get the container ID of the container running from the duckietown/dt-notebook:daffy image. This can be done with the docker ps command.
Connect to the docker container using the container ID you just found
✎Modified 2019-12-29 by ai404
$ docker exec -it -u root -e DISPLAY=host.docker.internal:0 CONTAINER ID /bin/bash
In this terminal you now have a command prompt directly into the container. We do this (as opposed to using a terminal from the jupyter notebook) so that we can view the GUI for duckiebot calibration.
Perform intrinsic calibration
✎Modified 2019-12-29 by ai404
In this command prompt, run
$ roslaunch pi_camera intrinsic_calibration.launch veh:=default
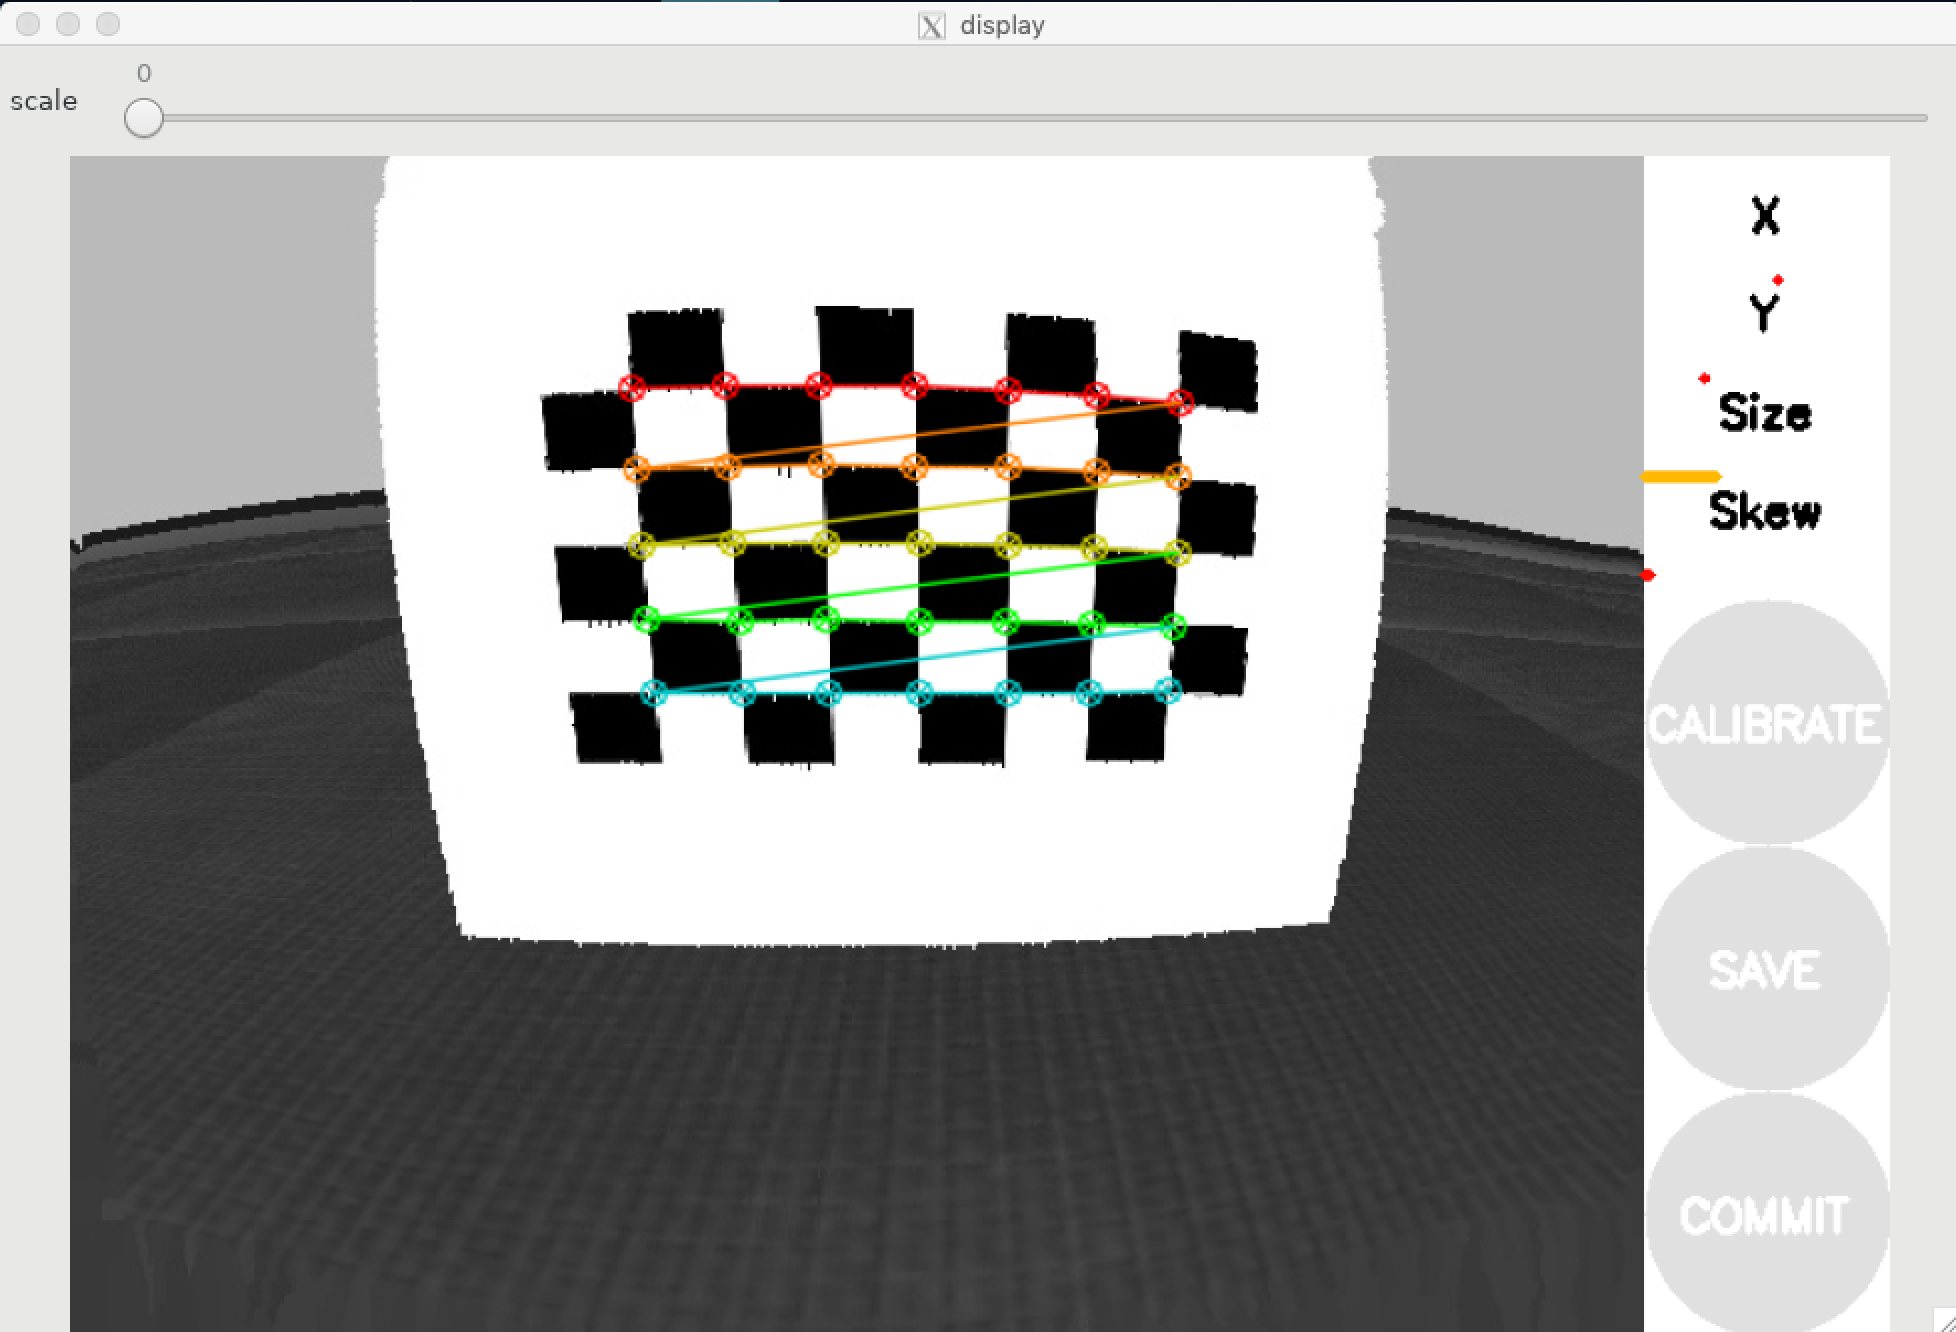
When it launches you will get a window similar to the one you get when calibrating a real duckiebot. You can resize the window by dragging the bottom-right corner. The calibration will be performed automatically (it might take a minute!) (Figure 21.1)
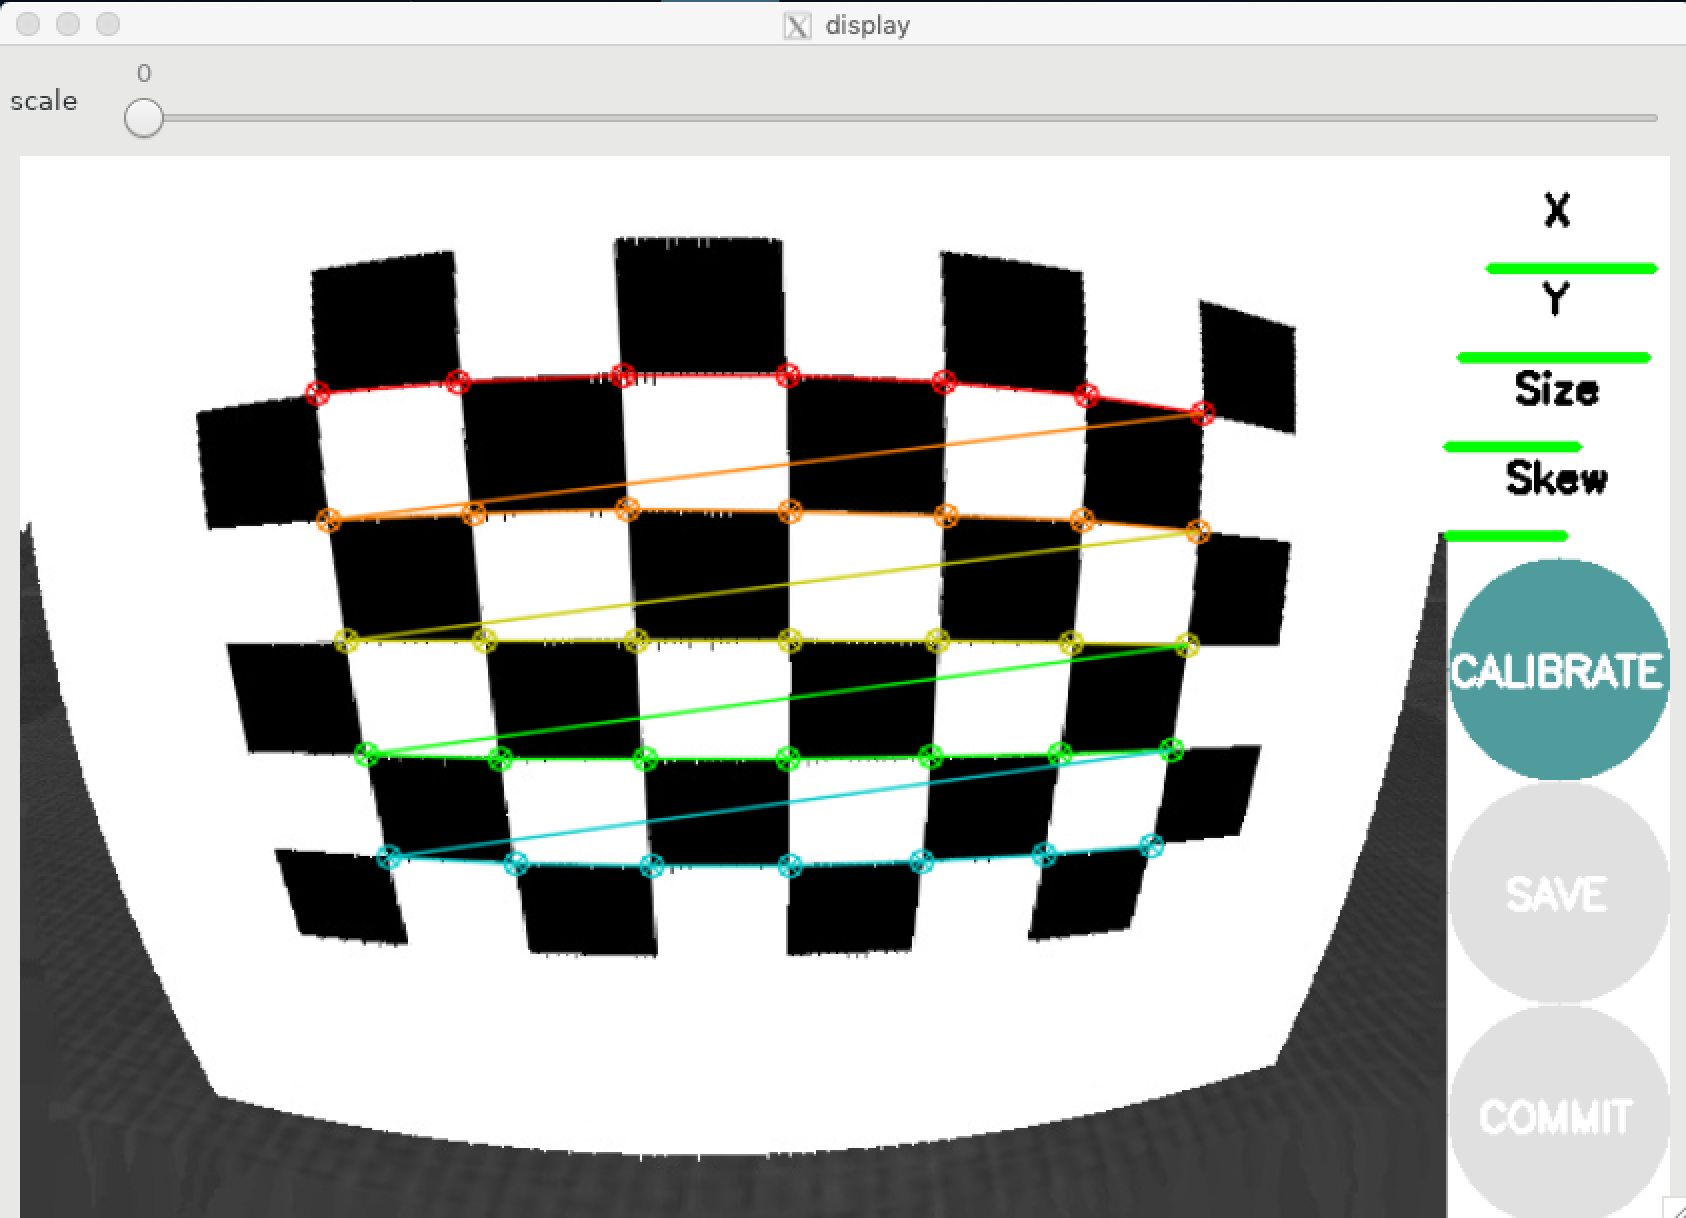
When calibration has enough images, the CALIBRATE button will turn from grey to green. Click on the CALIBRATE button to perform distortion removal and intrinsic calibration. After calibration, the squares in the cube should appear rectified, and the horizon should appear flat. (Figure 21.2)
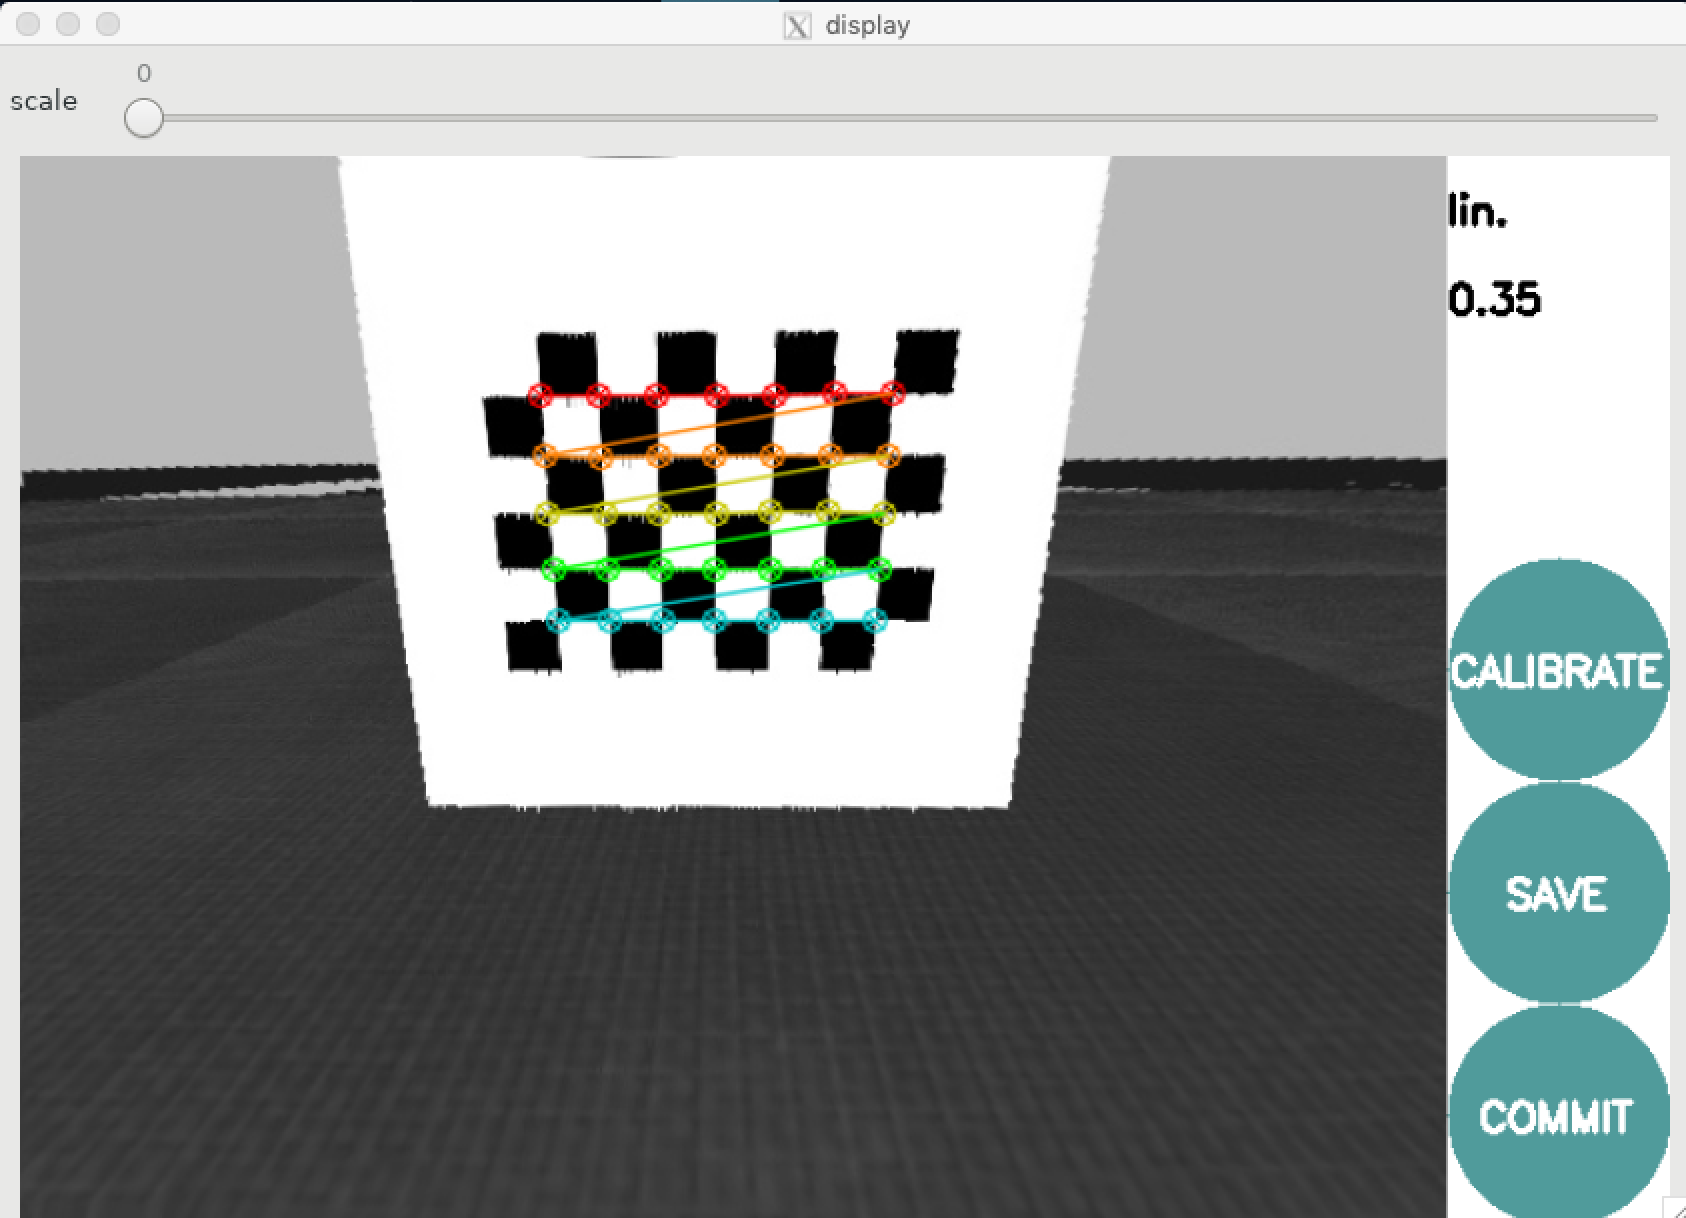
Once calibration has succeeded (Figure 21.3), the COMMIT and SAVE buttons will turn from grey to green:
SAVEbutton generates a zip file at/tmp/calibrationdata.tar.gzwhere you can find the images used to calibrate the camera’s intrinsics as well as a yaml file with calculated parameters.COMMITwrites the calculated parameters directly to the apropriate path at/data/config/calibrations/camera_intrinsic/robot_name.yamlusing theset_camera_infoservice.
Note that the simulator uses a value of "default" for robot_name.
Shut down the container
✎Control-C the currently running Jupyter notebook, and Control-D the currently running container. Manually kill the docker containers if necessary with docker ps and docker kill CONTAINER ID.
Extrinsic Calibration
✎Modified 2019-12-29 by ai404
Set extrinsic calibration map
✎Modified 2019-12-29 by ai404
Change the map_name parameter in 1_develop/utils/ros_helpers.py to "calibration_map_ext".
Run the docker image with the new map
✎From the 1_develop directory, run
$ docker-compose up
and open a terminal in the resulting Jupyter notebook.
Change the default homography name
✎Modified 2019-12-29 by ai404
The default name of the robot will interfere with default homography. To avoid this issue, we rename the default homography file.
In the Jupyter notebook terminal, run
$ roslaunch pi_camera camera.launch veh:=default
Now, open a second Jupyter notebook terminal (from the same place you opened the first one, http://127.0.0.1:8888/tree), and run
$ cp /data/config/calibrations/camera_extrinsic/default.yaml /data/config/calibrations/camera_extrinsic/default_homography.yaml
Set the project root folder
✎Modified 2019-12-29 by ai404
To successfully save the calibration files, we must specify the project root folder. Again, in the Jupyter notebook terminal, run
$ export DUCKIETOWN_ROOT=/duckietown
Run the extrinsic calibration pipeline
✎Modified 2019-12-29 by ai404
Finally, in the Jupyter notebook terminal, run
$ rosrun complete_image_pipeline calibrate_extrinsics
To see the effect of the calibration, look in the duckietown/out-calibrate-extrinsics directory - there should now be new images similar to those shown below (Figure 21.4)

Shut down the container
✎Control-C the currently running Jupyter notebook. Manually kill the docker containers if necessary with docker ps and docker kill CONTAINER ID.
Evaluation and cleanup
✎Modified 2019-12-29 by ai404
Reset to the default map
✎Modified 2019-12-29 by ai404
Change the map_name parameter in 1_develop/utils/ros_helpers.py to "loop_empty".
Run the docker image with the new map
✎$ docker-compose up
Set the project root folder
✎To successfully save the calibration files, we must specify the project root folder:
$ export DUCKIETOWN_ROOT=/duckietown
Run the evaluation procedure.
✎Modified 2019-12-29 by ai404
$ rosrun complete_image_pipeline single_image_pipeline
If calibration worked properly, you should see something like the following expected results (Figure 21.5)

The calculated extrinsic parameters are saved at /data/config/calibrations/camera_extrinsic/default.yaml
Shut down the container
✎Control-C the Jupyter notebook. Manually kill the docker containers if necessary with docker ps and docker kill CONTAINER ID.