AMOD18 Visual Odometry
✎Modified 2019-09-27 by Aleksandar Petrov
This is the report of the AMOD18 Visual Odometry group. In the first section we present how to run the demo, while the second section is dedicated on a more complete report of our work.
The visual odometry demo
✎Modified 2018-12-26 by Gianmarco Bernasconi
1 Duckiebot in configuration DB18 (make sure there is a Duckie on it)
1 External computer to operate the demo, with a Docker installation
Camera calibration completed.
Joystick demo succesful.
A Duckiebot running a pose estimate algorithm in real time.
Video of expected results
✎Modified 2018-12-26 by Gianmarco Bernasconi
First, we show a video of the expected behavior.
The code used in this demo can be found here.
Duckietown setup notes
✎Modified 2019-04-02 by gibernas
To run this demo, you can setup any generic Duckietown which complies to the appereance specifications presented in the duckietown specs (unknown ref opmanual_duckietown/dt-ops-appearance-specifications).
The only two constraints are that you have good lighting conditions and enough texture in the field of view of the Duckiebot (it can be anything, really, from duckies to street signs to a replica of the Saturn V).
Most of your environment should be static. Otherwise you might get bad results.
Pre-flight checklist
✎Modified 2018-12-19 by tmguillem
The pre-flight checklist describes the steps that are sufficient to ensure that the demo will be correct:
Check: Your Duckiebot has enough battery to run a demo.
Check: Your performed recently the camera calibration on your Duckiebot.
Check: Both yout duckiebot and your laptop are connected to the same, stable network
Check: You have a laptop with ROS installed to visualize the output of the pipeline.
Demo setup
✎Modified 2018-12-19 by tmguillem
Either using Portainer or manually from a terminal, start both ros-picam,
laptop $ docker -H hostname.local start ros-picam
and joystick containers:
laptop $ docker -H hostname.local start joystick
Activate the joystick control and test that you can control the duckiebot with the keyboard:
laptop $ dts duckiebot keyboard_control hostname
Leave this terminal open.
Finally, we want to open an rviz session listening to the duckiebot to visualize the results of the visual odometry pipeline. First, naviage to the directory of your choice in your computer.
laptop $ cd ~/your_favourite_repo
And download the rviz configuration file using the following command.
laptop $ wget https://raw.githubusercontent.com/duckietown/duckietown-visualodo/master/odometry_rviz_conf.rviz
Export the ROS_MASTER_URI of your duckiebot so that this terminal listens to the roscore of the duckiebot:
laptop $ export ROS_MASTER_URI=http://hostname.local:11311/
Run rviz with the configuration file:
laptop $ rosrun rviz rviz -d odometry_rviz_conf.rviz
Demo instructions
✎Modified 2018-12-26 by Gianmarco Bernasconi
Open a new terminal. First, create a docker container with the Visual Odometry image in your duckiebot. If you have recently re-initialized your SD card and have expaned the swap memory capacity, run the container specifying the amount of swap:
laptop $ docker -H hostname.local run -it --net host --memory="800m" --memory-swap="1.8g" --privileged -v /data:/data --name feature_vo recksahr/feature-alignment-tests:master
Otherwise just run it normally:
laptop $ docker -H hostname.local run -it --net host --privileged -v /data:/data --name feature_vo recksahr/feature-alignment-tests:master
Compile the new package you just downloaded using catkin_make. This will take a few minutes.
container $ cd catkin_ws
And build it:
container $ catkin_make
Then, source the packages:
container $ source devel/setup.bash
We want to ensure that the turns are performed in a more or less slow and continuous manner with the joystick, so we will turn down the speed gain. Reduce this parameter calling the following ros service:
container $ rosservice call /hostname/inverse_kinematics_node/set_gain 0.5
Finally, run the visual odometry package.
Remember to use the tag veh:=hostname so that it uses your camera images to compute the visual odometry.
container $ roslaunch duckietown_visualodo visual_odometry_node.launch veh:=hostname
If you see a bunch of info and warn messages fastly printing, visual odometry is running! Move the duckiebot around (smoothly) with the keyboard and see how it moves too in rviz.
The most uptaded stable version of the code can be found here.
Troubleshooting
✎Modified 2018-12-26 by Gianmarco Bernasconi
The duckiebot does not move.
Make sure you tried the virtual joystick demo
The estimated pose is really bad.
You might have a too dynamic scene, for the visual odometry to run correctly.
The estimated pose is really bad and the scene is not dynamic
Debug the pipeline by turning on the plotting parameters, they are in the .yaml file in the data folder of lib-visualodo
Offline demo
✎Modified 2018-12-27 by Gianmarco Bernasconi
ROS Kinetic installed on your computer
The demo was only tested for ROS Kinetic.
If you dont have a duckiebot in hand, or your network is not reliable enough, you can also run this demo offline! Clone the git repository of visual odometry and compile the repository:
laptop $ cd ~/[path_to_duckietown_software]/catkin_ws/src
laptop $ git clone https://github.com/duckietown/duckietown-visualodo.git
laptop $ cd ..
laptop $ catkin_make
laptop $ source devel/setup.bash
Run rviz using the custom configuration file as specified in the demo instructions, but this time without exporting the ROS URI address of the duckiebot, as we will run the demo offline in the laptop.
Run the visual odometry node. We will use a rosbag recorded by fellow duckiebot enbot, so specify this in the veh parameter:
laptop $ roslaunch duckietown_visualodo visual_odometry_node.launch veh:=enbot
Download our demo rosbag from the following google drive link
Play the rosbag, and visualize the results!
laptop $ rosbag play [direction_to_download]/offline_demo_vo.bag
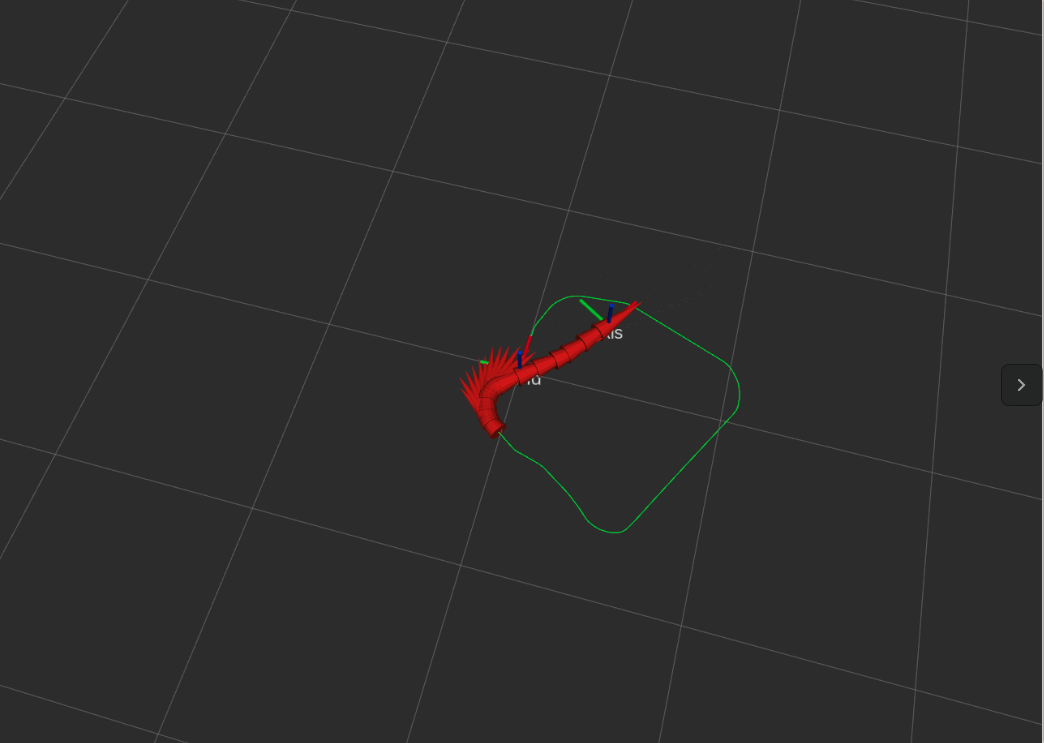
You should visualize a similar result as in Figure 20.2

The AMOD18 Visual Odometry final report
✎Modified 2018-12-17 by Gianmarco Bernasconi
Mission and Scope
✎Modified 2018-12-16 by Gianmarco Bernasconi
Our goal is to provide an estimate of the pose, using a monocular visual odometry approach.
Motivation
✎Providing a pose estimate is essential in the operation of a Duckiebot (how can you go where you want if you don’t know where you are), and yet having only one camera it is a non trivial task and could yield catastrophic results if fails.
Existing solution
✎The current solution for the pose estimate is the so called Lane Filter, which estimates the pose of the Duckiebot with respect of a template straight tile.
The pose is estimate by a distance from the center of the lane, and an angle which is measured with respect to the direction of the lane.
Opportunity
✎The Lane Filter assumes that the Duckiebot always travel along a straight road, which is clearly not possible, because Duckietown is full of exciting curves and interesting intersections.
Therefore, by applying a working visual odometry pipeline, it would be possible to get an estimate about the pose even independantly on where the Duckiebot is travelling.
Definition of the problem
✎Modified 2018-12-16 by Gianmarco Bernasconi
Final objective
✎Given a Duckiebot travelling in Duckietown, an estimate of the pose with respect to a relevant frame should be obtained:
- At a frequency of ~12 Hz on a Raspberry Pi
- With an accuracy similar to the the one provided by the
Lane Filter, with possibility of drift and divergence in long-term executions
Assumptions
✎The following assumptions are made:
- Duckiebot in configuration DB18
- The camera is calibrated and works properly (30Hz and 640x480 resolution)
- Most of the scene is static
Added functionality
✎Modified 2018-12-16 by Gianmarco Bernasconi
Visual odometry
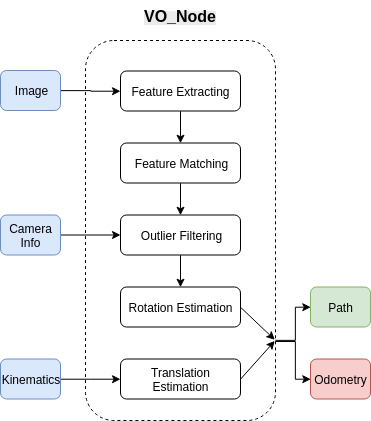
✎The algorithm performes a visual odometry pipeline as follows.
When the visual_odometry_node receives an image, the relative callback function gets activated. If the node should be active according to the FSM, the pipeline starts.
The image gets converted to an OpenCV object. Then the actual algorithm present in lib-visualodo is triggered with this image object.
The image gets then downsampled, as this reduces significantly the computational time. Then relevant features are extracted from the image, using either SURF, SIFT or ORB (by default ORB is chosen). Information about these methods can be found in [1],in particular the paper presenting ORB is [2].
At each frame, we gather one image and we discard the oldest one, so to keep always the two most recent to perform the pipeline.
Then we need to match the features, with either KNN or using the Hamming distance (default). If KNN is chosen, its matches can be filtered using a first-neighbor-to-second-neighbor ratio threshold. Empirically Bruteforce Hamming distance has proven to outperform KNN in the Duckietown environment.
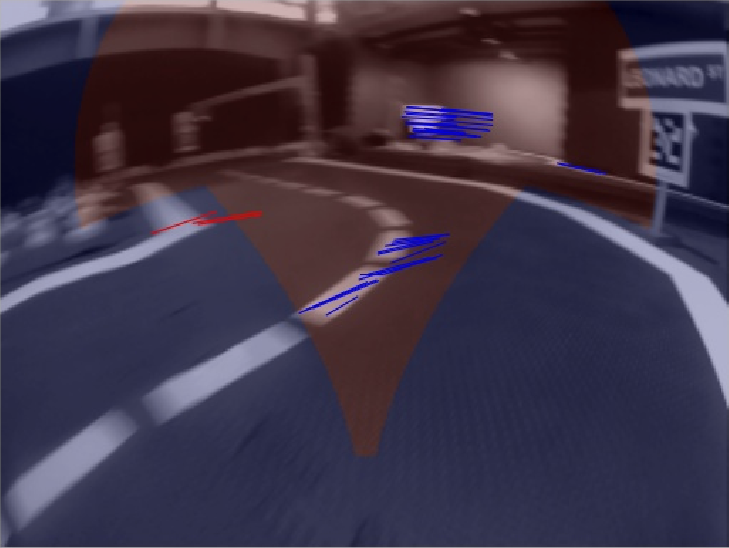
Matches may be further filtered using histogram fitting (activated by default, can be turned off). This means that we fit a gaussian distribution to the lenght and angle of the matches, and we remove the ones further than x standard deviations from the average value. These x values can be set in the parameters yaml file. The results of outlier filtering can be seen in Figure 20.3.

Then we divide the feature pairs between far and close regions, to decouple the estimate of the translation vector to the estimate of the rotation matrix, as presented in [3]. The division we used for the Duckietown environment can be seen in Figure 20.4.

After having computed the motion matrix, we apply it to the previous duckiebot rotation it to get a new estimate of the pose.
The translation vector is assumed to be always a one-component vector (pointing towards the front direction), and is scaled by a factor of the duckiebot linear velocity command.
The pipeline can be seen in Figure 20.5

Logical architecture
✎Given a Duckiebot with a running demo (can be of any kind, it only needs a camera stream and possibly commands over the wheels), upon launch of the visual odometry demo, the following will happen: our algorithm will communicate with the current demo, getting the camera stream. Using this data, it will publish an estimate of the translation and the rotation between two analyzed frames. Stacking those motion estimates it will also provide a global pose estimate. These results can be visualized on a computer screen.
Software architecture
✎For the development of this project, we organized the code the following way: all the code needed to handle communications using ROS is in the folder ros-visualodo. All the logic containing how the algorithms are implemented, is in lib-visualodo. This way we enabled an independance between ROS and the code itself.
Nodes:
visual_odometry_node:
-
Input: The compressed camera image
-
Output: A pose estimate with respect to a world frame
-
Subsribed topics:
-
camera_node/image_compressed
-
fsm_node/switch
-
forward_kinematics_node/velocity
-
-
Published topics:
-
path
-
odometry
-
Future development
✎Modified 2018-12-16 by Gianmarco Bernasconi
The pipeline can be improved by performing bundle adjustment, however the computational burdain in that case is unclear. Other functionalities which could be interesting are a controller based on the visual odometry to travel intersections, and the placement of the path inside a given map.